

Learn how to test multi-device messaging on iOS effectively with this comprehensive guide on setup, scenarios, automated and manual testing techniques.

Introduction
It's important to test iOS multi-device messaging to guarantee a smooth user experience across various Apple devices. Due to the widespread use of Macs, iPhones, and iPads, users have come to anticipate seamless messaging syncing across all platforms.
With multi-device texting, users may begin a conversation on one device and carry it over smoothly to another. Maintaining the consistency and dependability that users have come to expect from contemporary messaging apps requires this capability. Any hiccup in the syncing of messages might irritate users and possibly damage the app's reputation.
Challenges Specific to iOS
Testing multi-device messaging on iOS involves several challenges:
- Device Diversity: iOS devices come in various models and versions, each with unique configurations. Ensuring consistent performance across all these devices is a significant challenge.
- Synchronization Issues: Messages need to be accurately synchronized across all devices, handling real-time updates and ensuring no message is lost or delayed.
- Network Conditions: Varying network conditions, such as switching between Wi-Fi and cellular data, can impact message delivery and synchronization. Testing must account for these conditions to ensure reliability.
- Operating System Updates: iOS updates can introduce changes that affect messaging functionality. Keeping the app compatible with the latest iOS versions while maintaining backward compatibility is essential.
- Security and Privacy: Ensuring that messages are securely transmitted and stored across devices is crucial, given the sensitive nature of user communications.
Understanding these challenges is the first step in developing a strong testing strategy for multi-device messaging on iOS.
Setting Up the Test Environment
Properly setting up your test environment is crucial for effectively testing multi-device messaging on iOS. This involves configuring the necessary tools, devices, and accounts to simulate real-world usage conditions accurately.
Required Tools and Software
To begin, ensure you have the following tools and software installed:
- Xcode: The integrated development environment (IDE) for macOS containing a suite of software development tools for developing macOS, iOS, watchOS, and tvOS applications.
- iOS Devices: Multiple iOS devices such as iPhones and iPads running various versions of iOS to cover different use cases.
- Simulator: Use the iOS Simulator included with Xcode to test different device configurations without needing physical devices.
- TestFlight: Apple's beta testing service for distributing your app to testers and collecting feedback.
- Automation Frameworks: Tools like XCTest for automated testing.
Configuring Devices
- Device Preparation:
- Ensure all devices are updated to the required iOS versions.
- Sign in with test accounts on each device to avoid data interference from personal accounts.
- Network Setup:
- Connect devices to a stable Wi-Fi network. Consider setting up a local network to control external factors.
- Simulate different network conditions using network throttling tools.
Setting Up Test Accounts
Creating dedicated test accounts ensures that your testing environment remains clean and consistent. Follow these steps:
- Apple IDs: Create separate Apple IDs for testing purposes. This avoids any interference with personal data and provides a controlled environment.
- Messaging App Accounts:
- Set up accounts for the messaging app you're testing. Use realistic data to simulate actual user scenarios.
- Ensure that all devices are logged in with these test accounts and are set to sync messages.
Test Environment Configuration
- App Configuration:
- Deploy the latest build of your messaging app on all test devices. Use TestFlight to distribute beta versions to your test devices.
- Ensure that all necessary permissions (e.g., notifications, background app refresh) are enabled on each device.
- Environment Variables:
- Set up any required environment variables or configuration files specific to your test scenarios.
- Logging and Monitoring:
- Implement comprehensive logging within your app to capture all relevant data during testing. Tools like OSLog can be useful for collecting detailed logs.
- Set up monitoring tools to track performance metrics and identify any anomalies during testing.
By carefully setting up your test environment, you lay the groundwork for effective and accurate testing of multi-device messaging on iOS.
Using Mobot for Multi-Device Testing
Mobot is a testing service that utilizes mechanical robots to operate real devices. This unique approach ensures that tests are conducted on actual hardware, providing more accurate results than emulators or simulators. Here are some key features of Mobot:
- Automated Physical Testing: Mobot can automate repetitive tasks on physical devices, ensuring consistent and reliable test execution.
- Real Device Interaction: Testing on real devices helps identify issues that might not be apparent on simulators, such as hardware-specific bugs.
- Scalability: Mobot can handle a large number of devices simultaneously, making it ideal for testing multi-device scenarios.
How Mobot Can Streamline Your Testing Process
- Setting Up Mobot for Multi-Device Testing:
- Integrate Mobot with Your CI/CD Pipeline: Connect Mobot to your continuous integration and deployment pipeline to automate testing after each code change. This integration ensures that new features and fixes are tested across multiple devices without manual intervention.
- Define Test Scenarios: Configure Mobot to run specific test scenarios relevant to multi-device messaging. These scenarios can include sending and receiving messages, handling attachments, and testing synchronization under various network conditions.
- Executing Tests:
- Automated Message Sending: Use Mobot to simulate sending messages from one device and verify receipt on other devices. This automation reduces the time and effort required for manual testing.
- Attachment Handling: Automate the testing of sending and receiving various attachment types across devices. Mobot can verify that attachments are correctly transmitted and accessible.
- Network Condition Simulation: Configure Mobot to test under different network conditions, such as switching between Wi-Fi and cellular data. This ensures that your app handles network transitions smoothly.
- Monitoring and Reporting:
- Real-Time Monitoring: Monitor test execution in real-time through Mobot’s dashboard. This visibility helps quickly identify and address issues as they arise.
- Detailed Reports: Mobot provides detailed test reports, including logs, screenshots, and video recordings of test executions. These reports help diagnose problems and verify that issues are resolved.
Benefits of Using Mobot
- Increased Efficiency: Automating repetitive tasks with Mobot frees up your QA team to focus on more complex testing scenarios and exploratory testing.
- Higher Accuracy: Testing on real devices ensures that you catch issues related to specific hardware configurations, leading to more reliable app performance.
- Scalability: Mobot can test on a wide range of devices simultaneously, ensuring comprehensive coverage without the need for a large in-house device lab.
Practical Example: Using Mobot for Message Synchronization Testing
To illustrate how Mobot can be used in practice, let’s consider a scenario where you need to test message synchronization across three devices:
- Test Setup:
- Configure Mobot to include three iOS devices (e.g., iPhone 12, iPhone 13, and iPad Pro).
- Set up Mobot to log in to your messaging app on all three devices using test accounts.
- Test Execution:
- Automate the process of sending a message from iPhone 12.
- Verify that the message appears on iPhone 13 and iPad Pro.
- Delete the message from iPhone 13 and check that it is removed from iPhone 12 and iPad Pro.
- Result Analysis:
- Review the logs and video recordings provided by Mobot to ensure that the message synchronization works as expected.
- Address any issues identified during the test and rerun the test to verify fixes.
Using Mobot for multi-device testing simplifies the testing process, ensuring that your messaging app performs reliably across different iOS devices. By leveraging Mobot’s capabilities, you can achieve more thorough and efficient testing, leading to a better user experience.
Test Scenarios
To ensure comprehensive testing of multi-device messaging on iOS, it is essential to cover various test scenarios. These scenarios help identify potential issues and ensure that the messaging app performs reliably across different situations.
Basic Message Synchronization
- Send and Receive Messages:
- Send a message from Device A and ensure it is received on Device B and Device C.
- Verify that the message status (e.g., delivered, read) is correctly updated across all devices.
- Message Deletion:
- Delete a message on Device A and confirm that it is removed from Device B and Device C.
- Check if the deletion status is synchronized properly across all devices.
Group Messaging Synchronization
- Creating and Managing Groups:
- Create a group chat on Device A and add participants.
- Ensure the group is visible and synchronized on Device B and Device C.
- Group Message Flow:
- Send messages within the group from various devices and confirm they are received by all participants.
- Verify that participants can join and leave the group and that these actions are synchronized across devices.
Handling Attachments
- Sending Attachments:
- Send different types of attachments (images, videos, documents) from Device A.
- Verify that these attachments are received and accessible on Device B and Device C.
- Attachment Synchronization:
- Delete an attachment from one device and check that it is removed from other devices.
- Ensure that the attachments' download status is correctly synchronized across all devices.
Offline and Online Synchronization
- Offline Messaging:
- Send a message from Device A while Device B is offline.
- Bring Device B online and verify that the message is received and synchronized.
- Network Transitions:
- Test message synchronization while switching between Wi-Fi and cellular networks on each device.
- Confirm that messages are not lost or delayed during network transitions.
Edge Cases
- Large Message Volumes:
- Send a high volume of messages in a short period and observe how well the devices handle synchronization.
- Monitor for any performance issues or delays in message delivery.
- Device Restarts:
- Restart one or more devices during an active conversation and verify that the messaging app resumes normal operation.
- Check that all messages sent during the restart period are properly synchronized once the device is back online.
These test scenarios help ensure that the multi-device messaging functionality on iOS works seamlessly across different conditions. Each scenario should be documented with clear expected outcomes and steps to reproduce any issues encountered.
Automated Testing
Automated testing is an efficient way to ensure that multi-device messaging on iOS works reliably and consistently. Using automation tools like XCTest, you can run tests repeatedly and catch issues early in the development cycle. This section will guide you through setting up automated tests for multi-device messaging, providing sample code snippets to illustrate the process.
Using XCTest for Messaging Tests
XCTest is the framework provided by Apple for writing and running tests on iOS applications. It allows you to create unit tests, UI tests, and performance tests. For multi-device messaging, UI tests are particularly useful because they can simulate user interactions and verify that messages are correctly synchronized across devices.
Sample XCTest Code for Message Synchronization
Below is an example of how you can write a basic UI test to verify message synchronization between two iOS devices using XCTest. This example assumes that you have already set up your test environment and configured the necessary accounts and devices.
Step 1: Setting Up the Test Class
Create a new test class in your Xcode project:
Swift

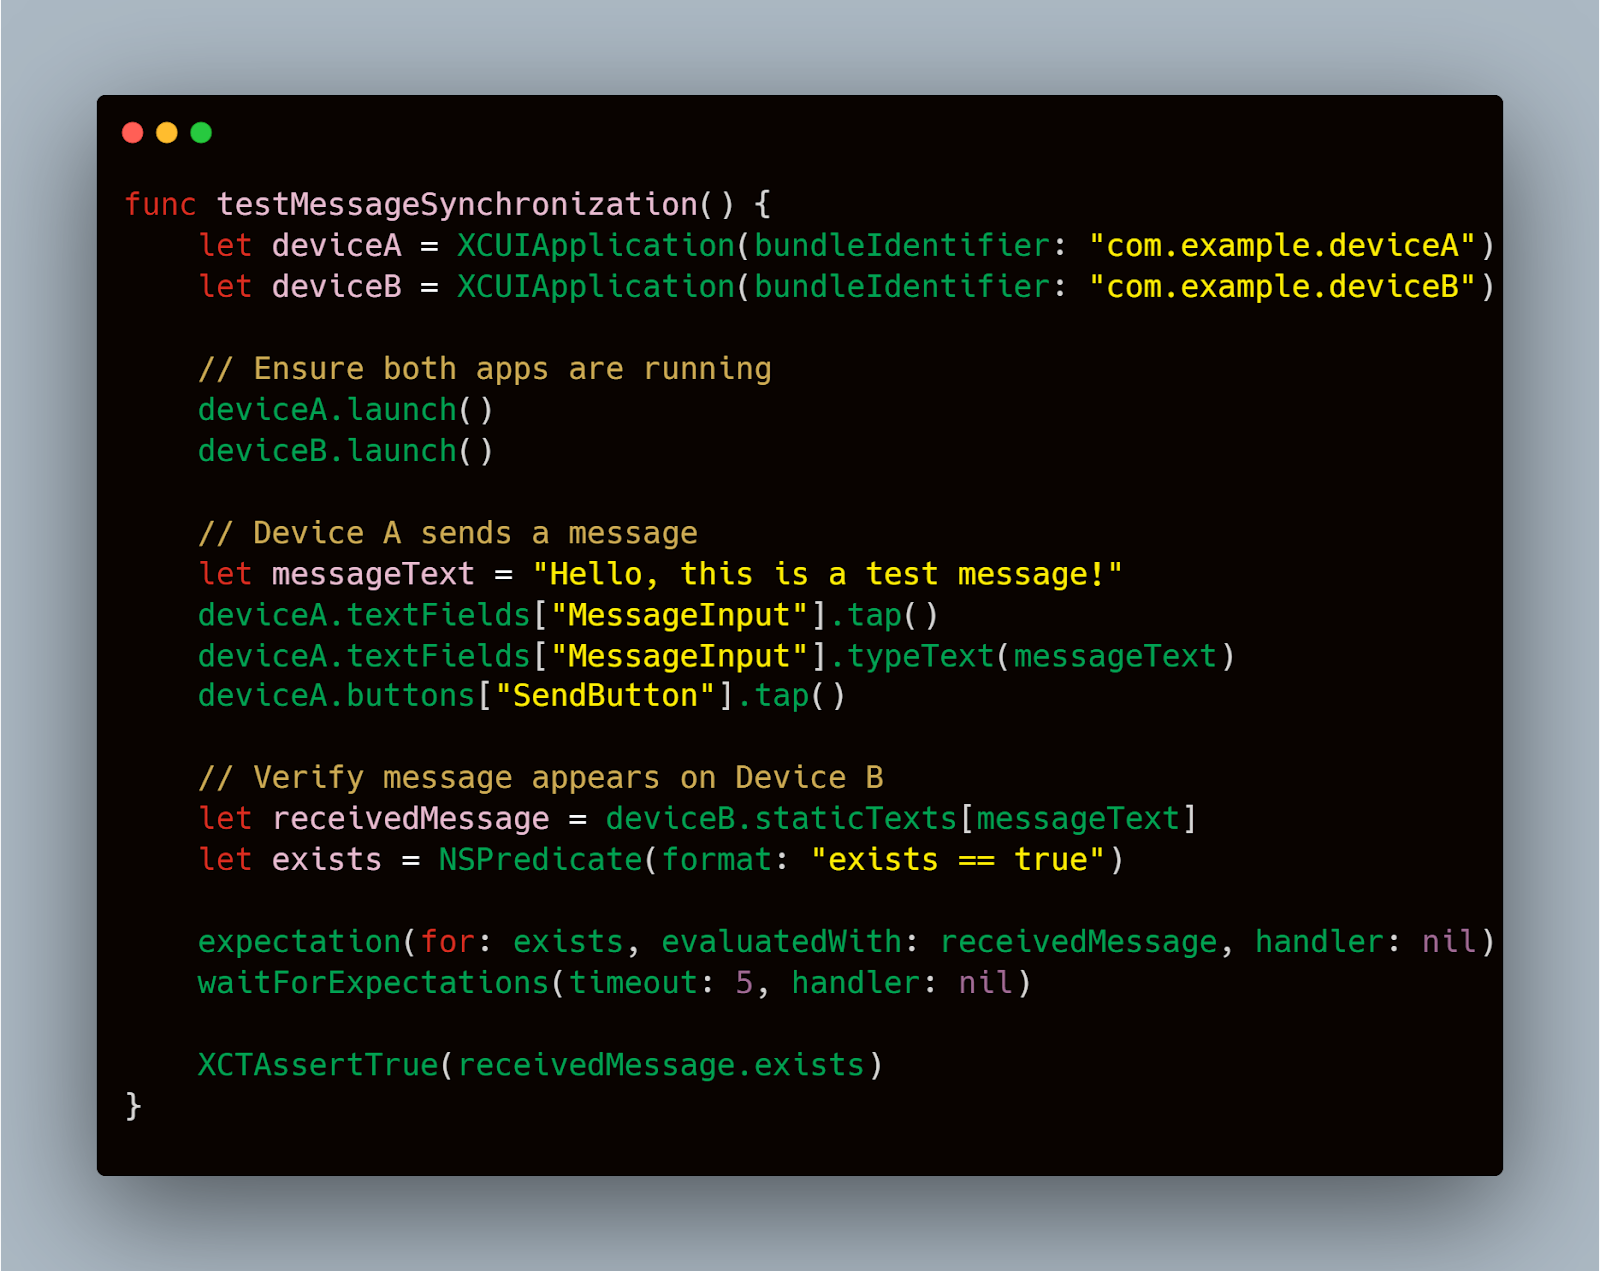
Step 2: Writing the Test Case for Message Sending
Write a test case to send a message from one device and verify that it appears on another device:
Swift
Step 3: Running the Tests
To run the tests, select the test scheme and press Command-U in Xcode. XCTest will launch the apps on the devices and execute the test steps.
Benefits of Automated Testing
- Consistency: Automated tests can be run repeatedly with the same parameters, ensuring consistent results.
- Efficiency: Once set up, automated tests can save time and effort compared to manual testing.
- Early Detection: Automated tests can catch issues early in the development cycle, reducing the cost and effort required to fix them later.
- Scalability: Automated tests can be expanded to cover a wide range of scenarios and devices, providing comprehensive coverage.
Integrating with CI/CD Pipelines
To further enhance the efficiency of automated testing, integrate your tests with a continuous integration and continuous deployment (CI/CD) pipeline. Tools like Jenkins, GitLab CI, or Bitrise can automatically run your tests whenever changes are made to the codebase, ensuring that issues are detected and addressed promptly.
Manual Testing Techniques
While automated testing is highly effective, manual testing is crucial for validating complex scenarios and user interactions that automated scripts might miss.
Step-by-Step Manual Testing Process
- Prepare Your Devices:
- Ensure all test devices are fully charged and connected to the same network.
- Log in to the messaging app with test accounts on each device.
- Basic Message Synchronization:
- Send and Receive Messages: Send a message from Device A and verify it appears on Device B and Device C. Check for delivery and read receipts.
- Message Deletion: Delete the message on Device A and ensure it is removed from Device B and Device C.
- Group Messaging:
- Create a Group: On Device A, create a group chat and add participants. Confirm the group appears on Device B and Device C.
- Send Group Messages: Send messages within the group from different devices. Verify all participants receive the messages.
- Handling Attachments:
- Send Attachments: Send images, videos, and documents from Device A. Check that these attachments are received and accessible on Device B and Device C.
- Attachment Deletion: Delete an attachment on one device and ensure it is removed from the others.
- Offline and Online Synchronization:
- Offline Messaging: Send a message from Device A while Device B is offline. Bring Device B online and verify that the message is received.
- Network Transitions: Switch Device A from Wi-Fi to cellular data while sending messages. Confirm that messages are not lost or delayed during the transition.
- Edge Cases:
- High Message Volume: Send a large number of messages in a short period and observe the app's performance and synchronization across devices.
- Device Restarts: Restart one or more devices during an active conversation. Verify that the messaging app resumes correctly and all messages are synchronized.
Common Issues and How to Identify Them
- Message Delays:
- Monitor the time it takes for messages to appear on different devices. Significant delays can indicate synchronization issues.
- Missing Messages:
- Ensure no messages are lost during transmission, especially during network transitions or when devices are offline.
- Incorrect Message Order:
- Verify that messages appear in the correct order on all devices. Out-of-order messages can confuse users and indicate synchronization problems.
- Attachment Issues:
- Check for failed uploads or downloads of attachments. Ensure that all file types are supported and accessible on all devices.
- Group Messaging Errors:
- Ensure all group members receive messages correctly. Test adding and removing participants and observe any synchronization issues.
Manual testing provides a detailed understanding of how the messaging app performs in various scenarios. It complements automated testing by covering complex interactions and edge cases that automated scripts might miss.
Conclusion
Ensuring reliable multi-device messaging on iOS requires a thorough and well-planned testing strategy. By setting up a strong test environment, covering various test scenarios, leveraging automated testing with XCTest, and complementing it with manual testing techniques, you can identify and resolve potential issues effectively.
Incorporating Mobot into your testing process can further streamline and enhance your efforts, providing automated physical device testing that offers accuracy and scalability. By following these strategies, you can ensure your messaging app delivers a seamless and consistent user experience across all iOS devices, ultimately leading to higher user satisfaction and retention.


.jpg)


.jpg)