

Here’s how to test SMS messages on iOS, including setup, creating test scenarios, automation, performance, load testing, and ensuring reliable app performance.

Introduction
Testing SMS messages on iOS is crucial for ensuring that mobile applications provide reliable and effective communication. SMS functionalities are integral to many apps, serving purposes like user authentication, notifications, and direct communication. Ensuring these functionalities work flawlessly across various iOS versions and devices is essential for maintaining a positive user experience.
However, testing SMS on iOS can be challenging. It involves handling different network conditions, verifying compatibility across various iOS versions, and ensuring the proper delivery and display of messages.
Setting Up the Test Environment
Prerequisites for SMS Testing
Before diving into testing, ensure you have the following essentials in place:
- Mac with Xcode Installed: Download and install Xcode from the Mac App Store. Make sure it’s the latest version to avoid compatibility issues.
- Apple Developer Account: An active Apple developer account is required for running apps on physical devices and accessing various development tools.
- iOS Devices: Access to both simulators and physical iOS devices ensures comprehensive testing across different environments.
Configuring Xcode for SMS Testing
To effectively test SMS functionalities, Xcode needs to be properly configured. Here’s how you can set it up:
- Install Xcode:
- Open the Mac App Store.
- Search for "Xcode" and install it.
- Launch Xcode and complete any additional setup steps.
- Create or Open a Project:
- Launch Xcode and select "Create a new Xcode project" or open your existing project.
- Choose the appropriate template for your project (usually a Single View App).
- Enable Push Notifications (if required):
- Go to your project settings by selecting your project in the Navigator, then selecting your app target.
- Under the "Capabilities" tab, turn on "Push Notifications" if your app uses them for SMS functionalities.
- Add Required Frameworks:
- In your project, go to the “General” tab of your target settings.
- Scroll down to the "Frameworks, Libraries, and Embedded Content" section.
- Click the "+" button, search for "MessageUI.framework," and add it.
Setting Up Simulators and Real Devices
Using both simulators and real devices ensures comprehensive testing. Here’s how to set them up:
Simulators:
- Launch Simulators:
- Open Xcode.
- Go to Xcode > Open Developer Tool > Simulator.
- Choose the desired device and iOS version from the Device menu.
- Configure Simulators:
- Use different simulators to test various iOS versions and device types (iPhone, iPad).
- Install your app on the simulator by selecting the target device from the Xcode toolbar and clicking the "Run" button.
Real Devices:
- Connect Devices:
- Use a USB cable to connect your iOS device to your Mac.
- Ensure the device is recognized by Xcode.
- Register the Device:
- Go to Window > Devices and Simulators in Xcode.
- Select the connected device and add it to your Apple developer account if prompted.
- Install the App on the Device:
- Select your physical device from the Xcode toolbar.
- Click the "Run" button to build and install the app on your device.
Using real devices is crucial for capturing issues that may not appear in simulators, such as specific network conditions or hardware-related behaviors.
Understanding the SMS Framework on iOS
The SMS framework in iOS provides the necessary tools to integrate SMS capabilities within your application. The framework primarily revolves around the MessageUI framework, which includes essential classes and methods to compose, send, and manage SMS messages.
Key Components and APIs for SMS Handling
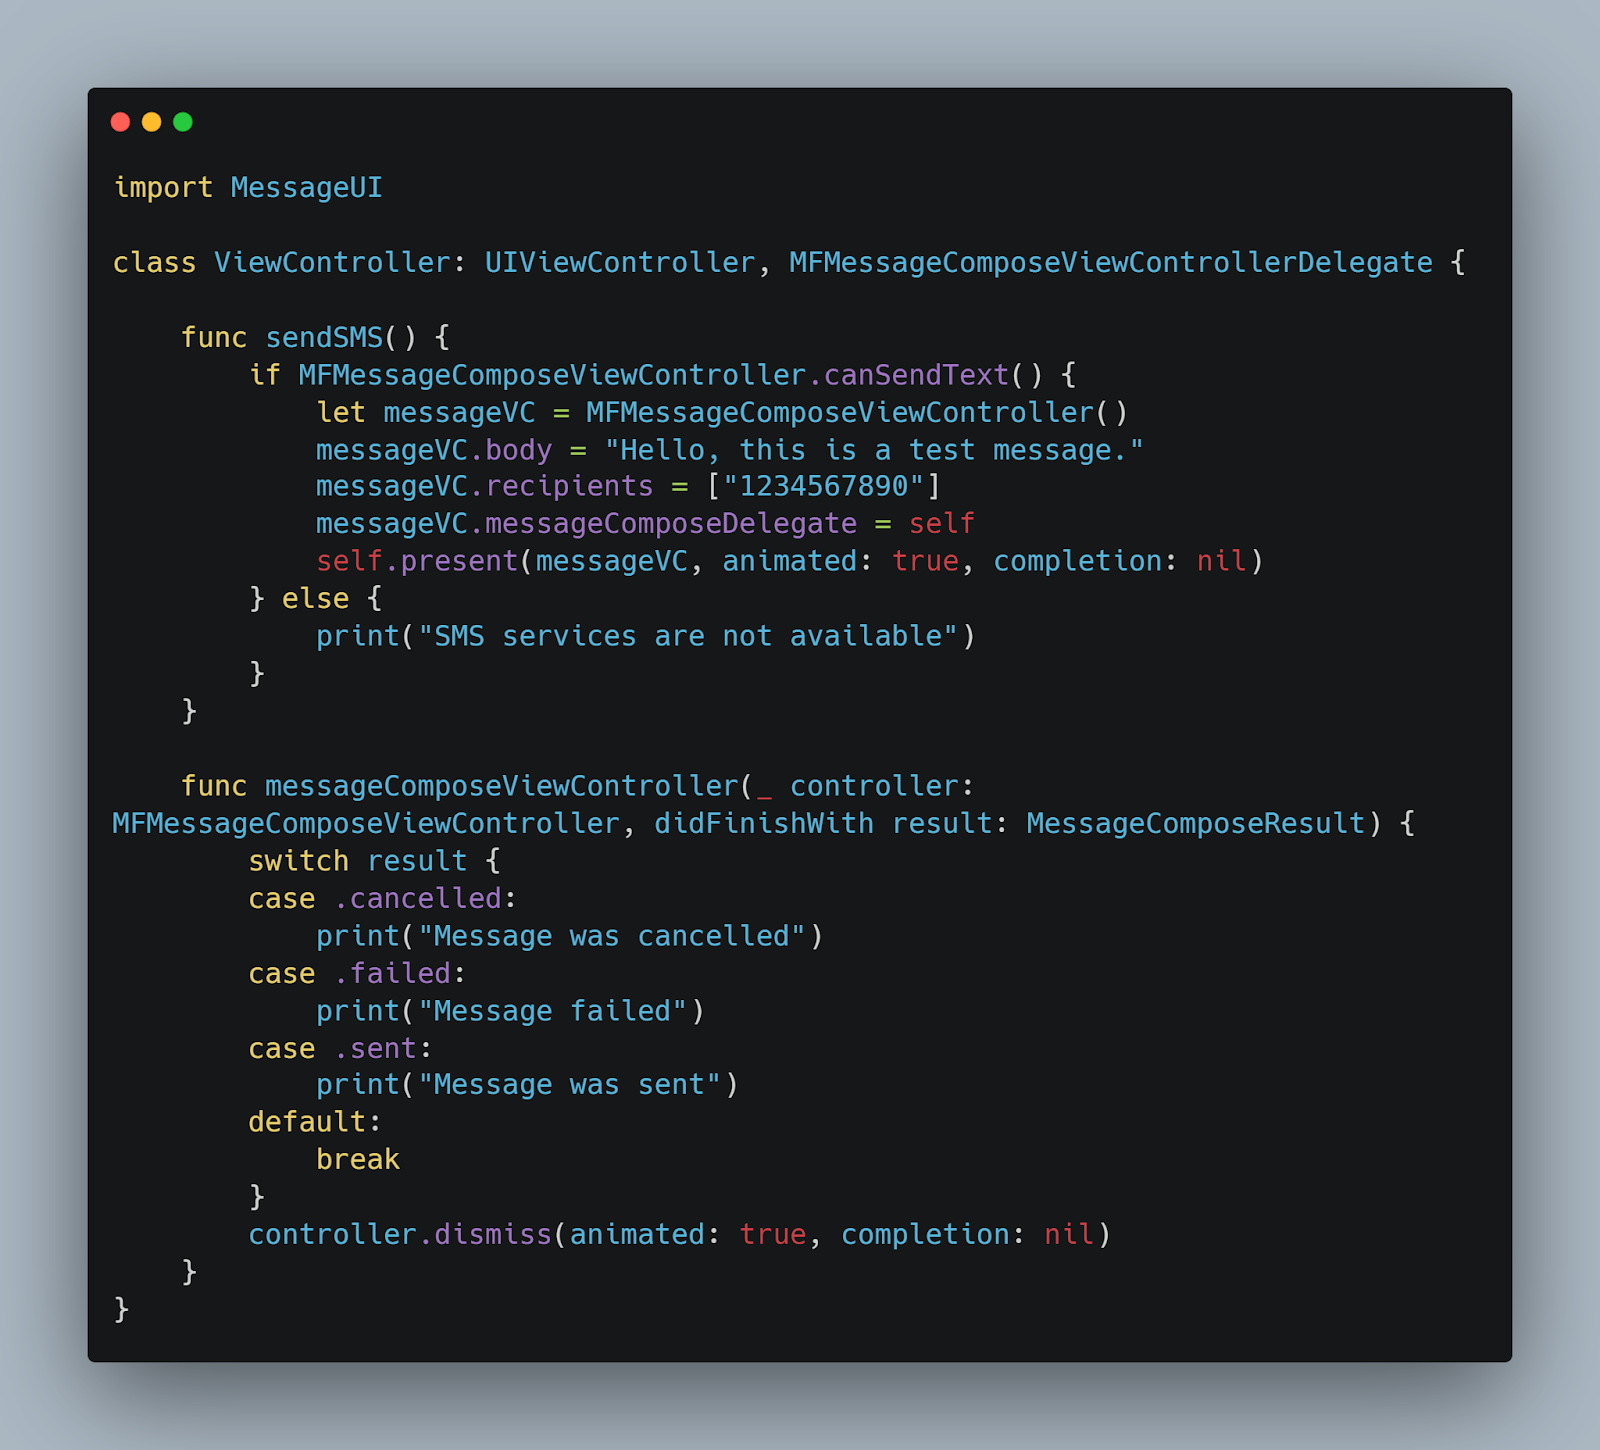
- MFMessageComposeViewController
- Purpose: This class allows you to present a standard interface for composing SMS and MMS messages.
- Usage: It’s used to configure the recipients, message body, and attachments before presenting the message compose interface to the user.
Example
Swift
2. SMS and MMS Support
- SMS: Standard text messages that contain only text.
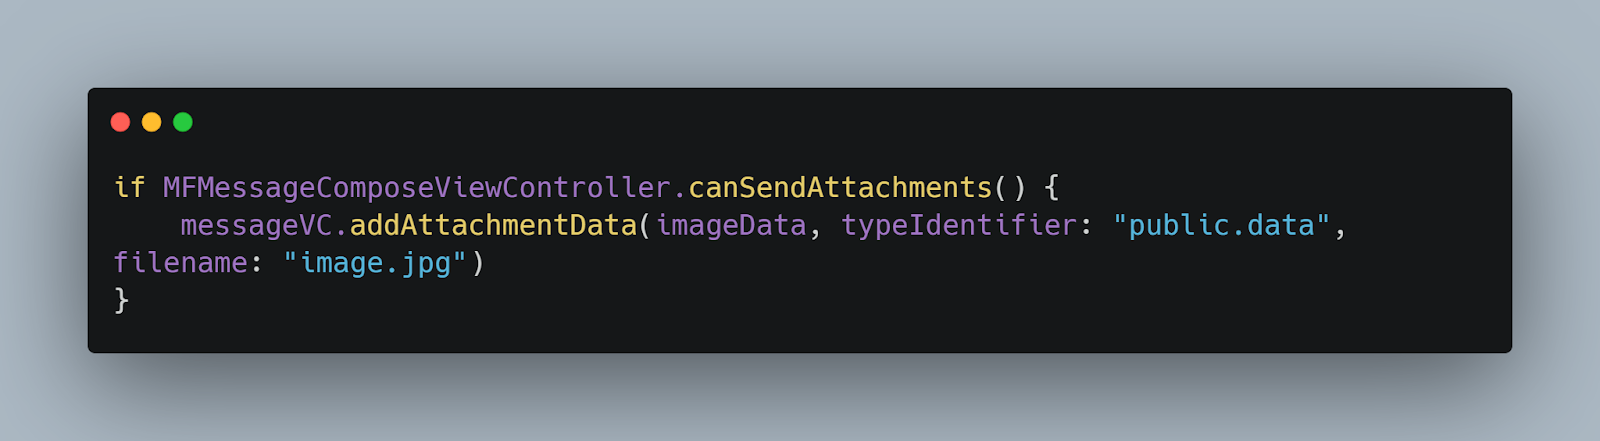
- MMS: Multimedia messages that can include images, videos, and other attachments.
- Handling Different Content Types: Ensure your app can handle both SMS and MMS to provide a comprehensive messaging experience.
Swift
Best Practices for Implementing SMS Features
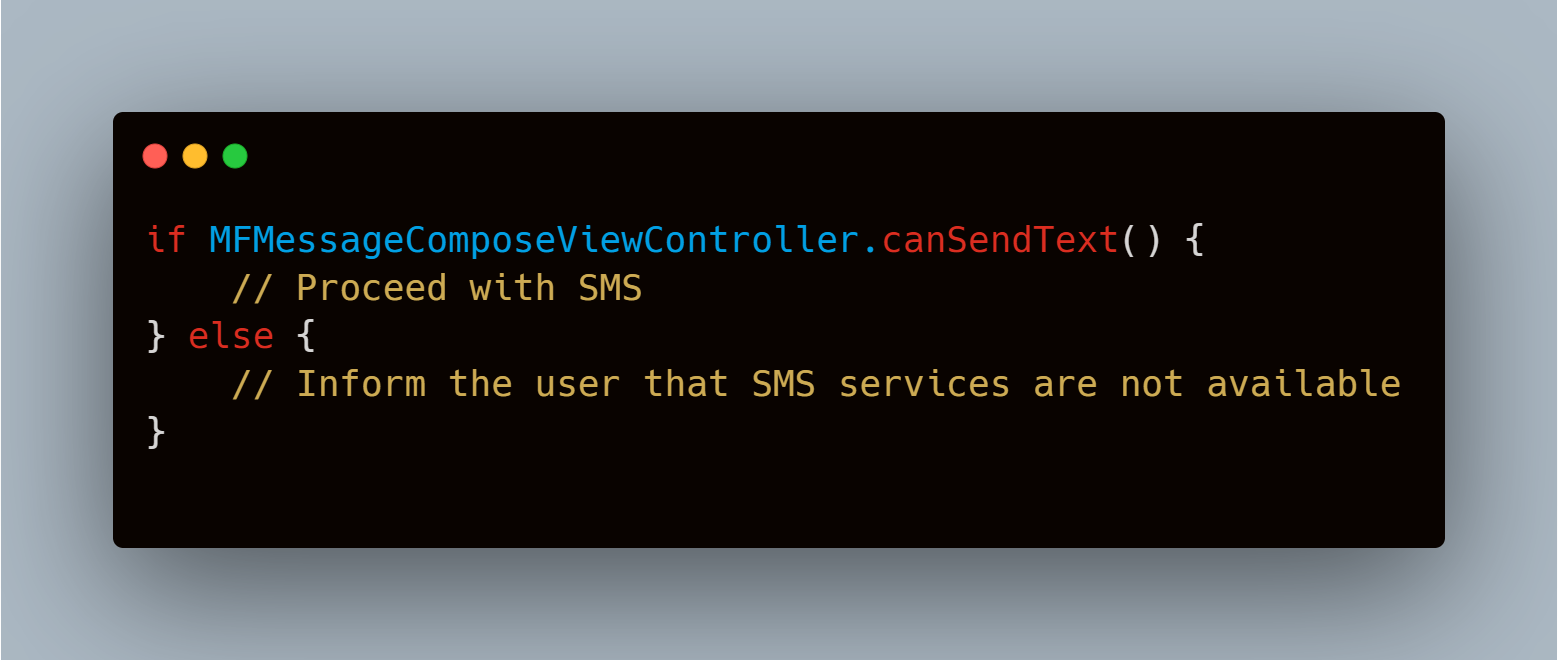
- User Permission: Always check and handle user permissions for sending SMS messages.
Swift
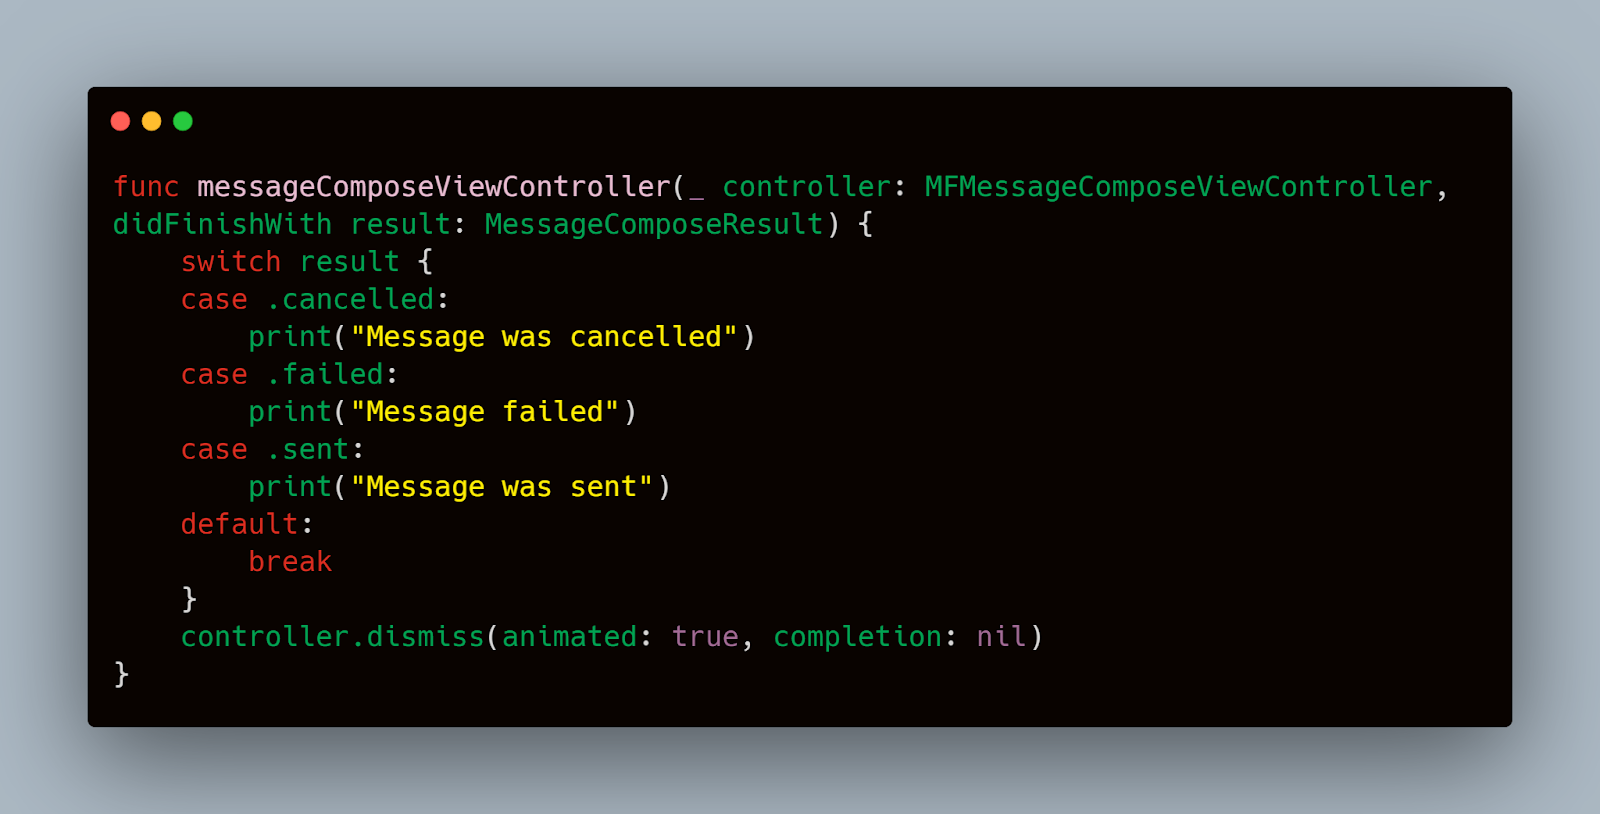
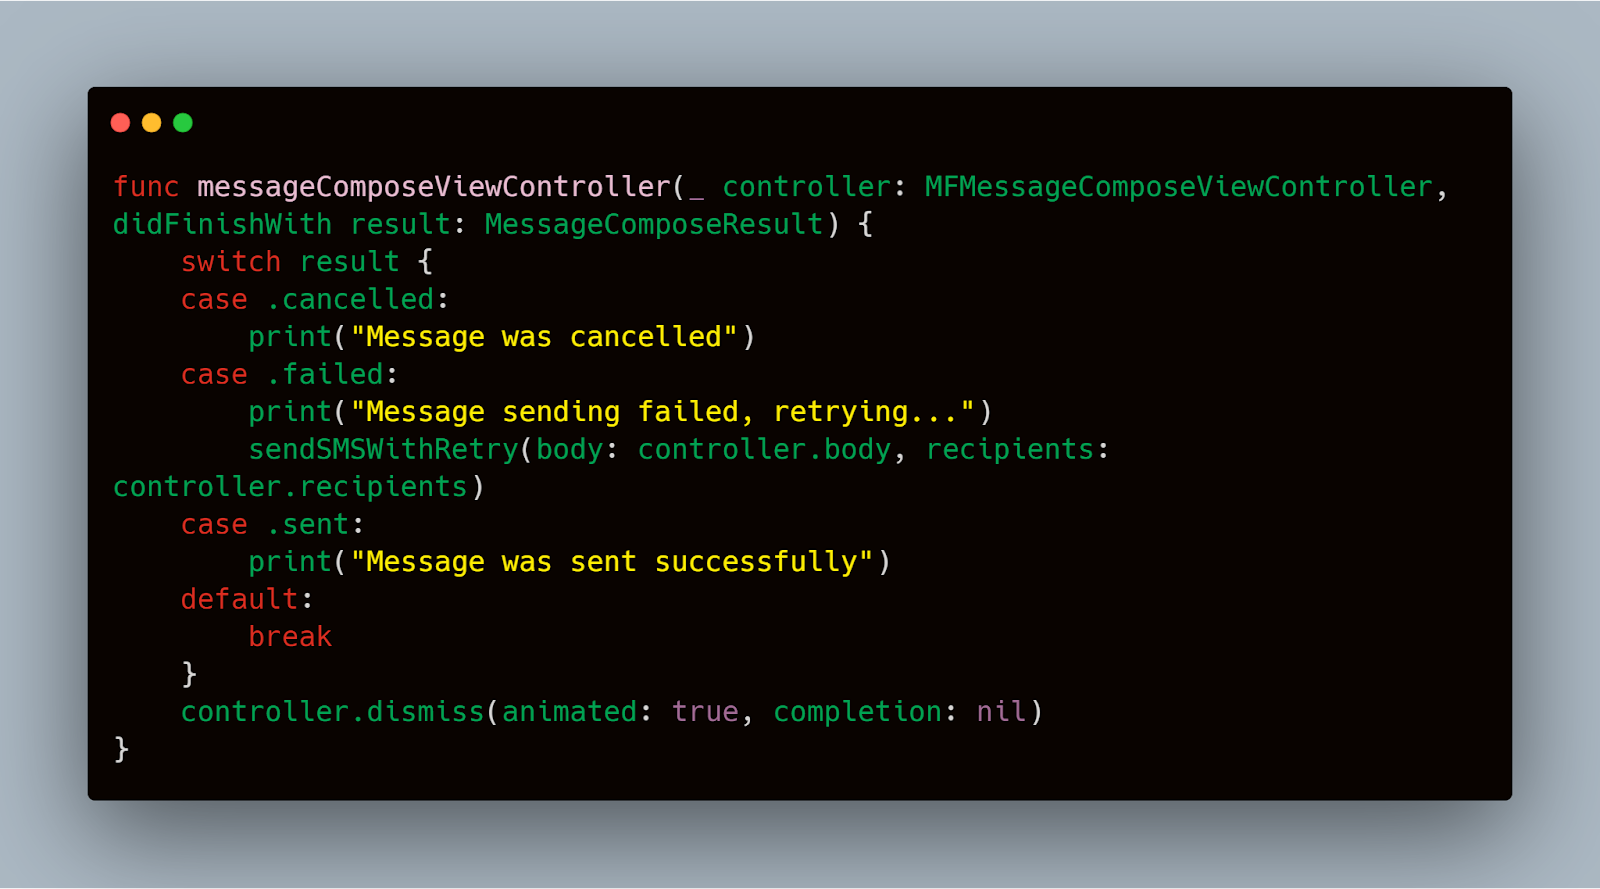
2. Error Handling: Implement strong error handling to manage scenarios where SMS sending might fail.
Swift
3. Testing on Real Devices: Simulators can be useful, but testing on real devices is essential to ensure SMS functionalities work under actual network conditions and device-specific behaviors.
While the MessageUI framework provides the basic tools for SMS functionalities, integrating a service like Mobot can enhance your testing strategy. Mobot can automate complex testing scenarios, such as simulating different network conditions and testing across various device configurations, to ensure your SMS functionalities are strong and reliable.
Creating Test Scenarios
To ensure that your SMS features are reliable, you need to cover various scenarios. Here are some essential test cases to consider:
- Sending Plain Text SMS:
- Objective: Verify that the application can send a plain text SMS.
- Steps:
- Open the app.
- Navigate to the SMS sending feature.
- Enter a valid phone number and a simple text message.
- Send the message and verify its successful delivery.
- Expected Result: The message should be sent and received without errors.
- Sending MMS with Media Attachments:
- Objective: Ensure that the application can send multimedia messages with attachments.
- Steps:
- Open the app.
- Navigate to the MMS sending feature.
- Select an image or video to attach.
- Enter a valid phone number and a text message.
- Send the MMS and verify its successful delivery.
- Expected Result: The multimedia message should be sent and received with the correct attachments.
- Receiving SMS While the App is in Foreground:
- Objective: Verify the app’s behavior when an SMS is received while it is open.
- Steps:
- Open the app and navigate to any screen.
- Send an SMS to the device from another phone.
- Observe the app’s response to the incoming SMS.
- Expected Result: The app should display a notification or update the UI appropriately without crashing.
- Receiving SMS While the App is in Background:
- Objective: Ensure the app handles incoming SMS correctly when it is not in the foreground.
- Steps:
- Minimize the app.
- Send an SMS to the device from another phone.
- Open the app and verify how it processes the incoming SMS.
- Expected Result: The app should handle the incoming SMS correctly and update its UI when brought to the foreground.
- Handling Long Messages (Concatenated SMS):
- Objective: Check the app’s ability to handle long messages split into multiple parts.
- Steps:
- Open the app.
- Send a long SMS that exceeds the character limit for a single message.
- Verify that the message is received correctly and reassembled in the app.
- Expected Result: The long message should appear as a single coherent message in the app.
Handling Different SMS Content Types
Different content types in SMS can introduce various challenges. Here’s how to handle them effectively:
- Plain Text Messages:
- Ensure that plain text messages are displayed correctly without any formatting issues.
Example
swift

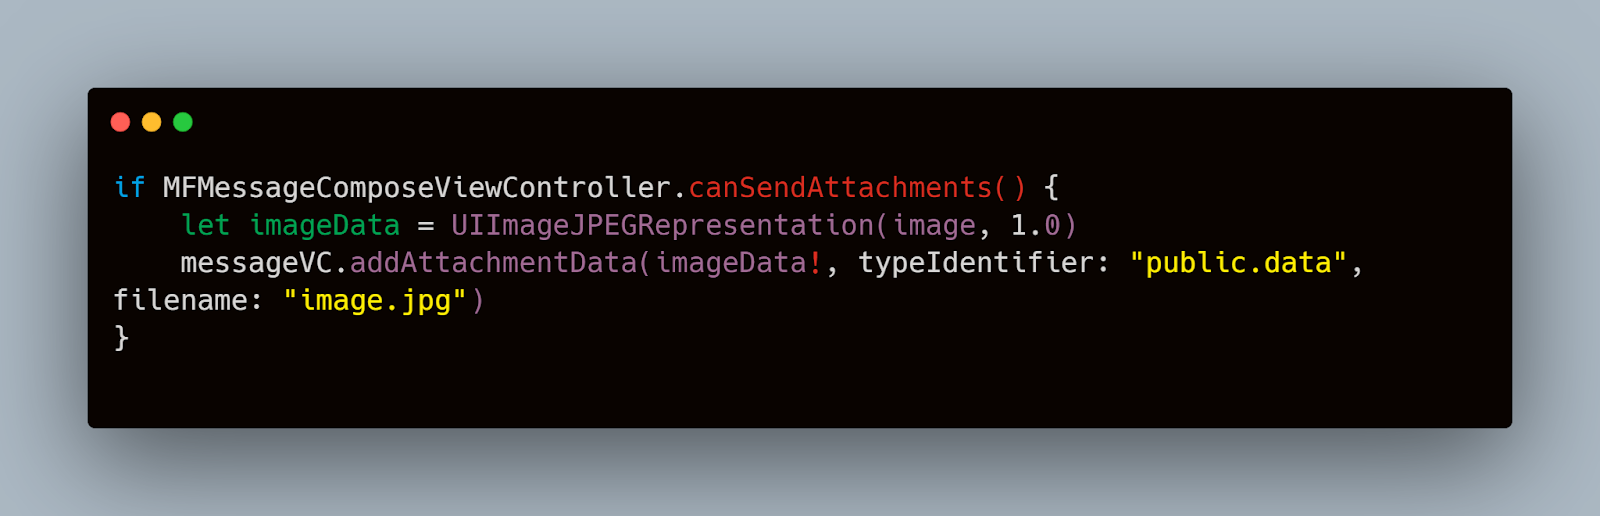
2. Media Attachments in MMS:
- Verify that media attachments (images, videos) are correctly sent and received.
Example
Swift
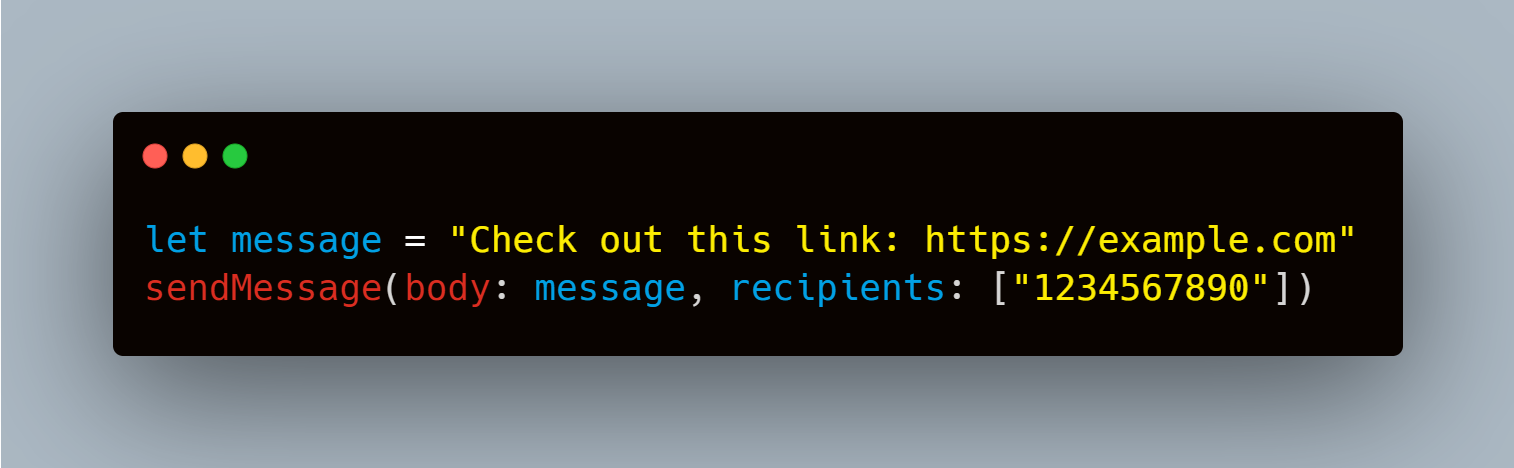
3. Links in SMS:
- Test that links within SMS messages are clickable and open the correct URL in a browser.
Example
Swift
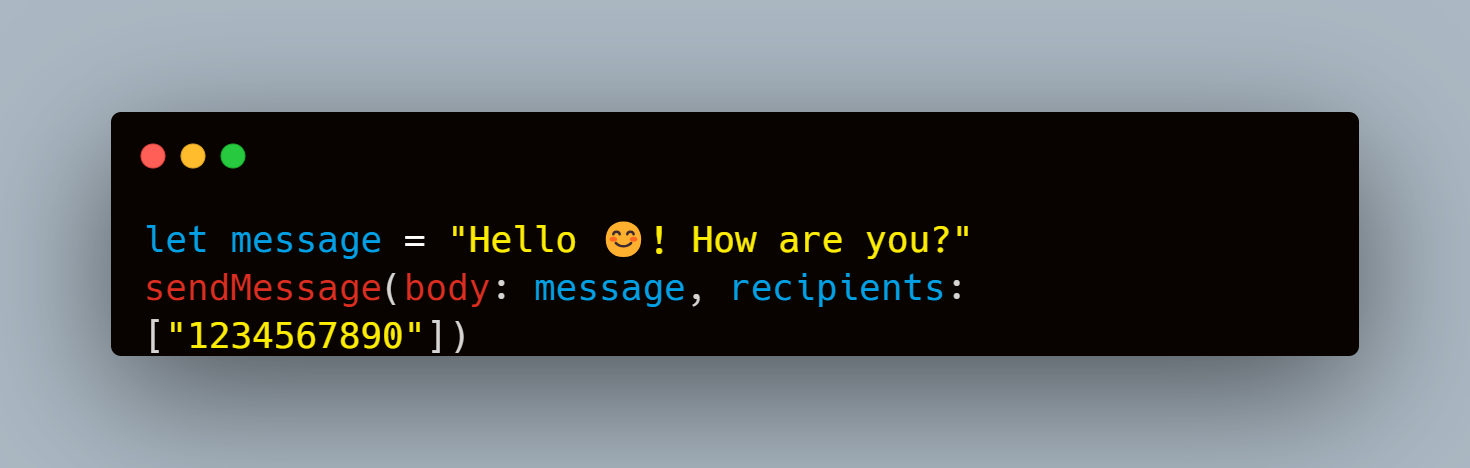
4. Special Characters and Emojis:
- Ensure that special characters and emojis are displayed correctly without causing any encoding issues.
Example
Swift
By defining these test cases and handling different SMS content types, you can ensure that your SMS functionalities are strong and reliable. Comprehensive testing will help identify and fix potential issues, providing a better user experience.
While manually creating test scenarios is crucial, integrating Mobot can enhance your testing process by automating complex scenarios. Mobot can help simulate various network conditions and device configurations, ensuring thorough testing of SMS functionalities.
Automating SMS Testing
Automation is a critical aspect of ensuring comprehensive and efficient SMS testing on iOS. Automating tests not only saves time but also helps in consistently executing repetitive tasks, reducing human error, and improving test coverage.
Using XCTest for SMS Testing
XCTest is Apple’s framework for unit and UI testing in Xcode projects. It provides tools to write tests that can automate the process of interacting with the user interface, sending SMS messages, and verifying results.
Setting Up XCTest
To start using XCTest for SMS testing, you need to create a test target in your Xcode project:
- Add a Test Target:
- Open your project in Xcode.
- Go to File > New > Target.
- Select iOS Unit Testing Bundle and follow the prompts to add it to your project.
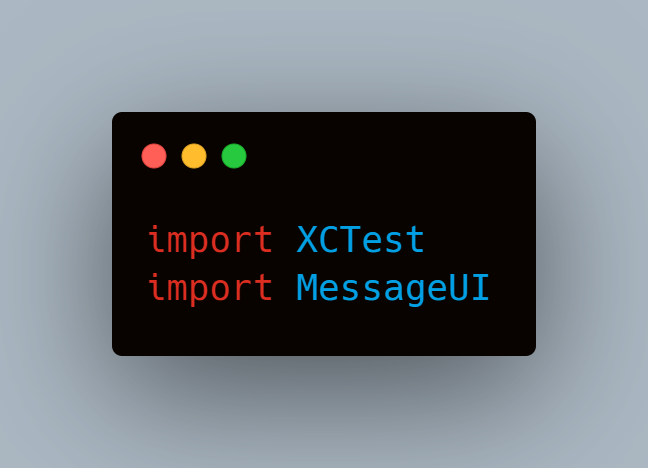
- Import XCTest and MessageUI:
- In your test class, import the XCTest and MessageUI frameworks
Swift
While XCTest provides a strong framework for writing and executing tests, integrating Mobot can further enhance your testing strategy by automating more complex scenarios and ensuring thorough test coverage across different devices and network conditions.
Benefits of Using Mobot
- Simulating Real-World Conditions: Mobot can simulate various network conditions and device states, helping you test SMS functionalities under different scenarios.
- Automating Repetitive Tasks: Mobot can automate repetitive testing tasks, freeing up time for more critical testing activities.
- Cross-Device Testing: Mobot allows you to test across a wide range of devices and iOS versions, ensuring compatibility and reliability.
Manual Testing of SMS Messages
While automated testing is essential for efficiency and consistency, manual testing plays a crucial role in capturing the nuances and edge cases that automation might miss.
Steps for Manual Testing
Manual testing involves executing test cases manually without the aid of automation tools. Here are the steps to manually test SMS functionalities:
- Compose and Send SMS:
- Objective: Verify that the application can compose and send SMS messages correctly.
- Steps:
- Open the application.
- Navigate to the SMS sending feature.
- Enter a valid phone number and a text message.
- Tap the send button.
- Expected Result: The SMS should be sent without any errors.
- Receive SMS:
- Objective: Ensure the application can receive and handle incoming SMS messages.
- Steps:
- Send an SMS to the device from another phone.
- Observe how the app handles the incoming SMS.
- Expected Result: The app should display a notification or update its UI to reflect the incoming message.
- Edge Cases and Error Handling:
- Objective: Test the application’s behavior in edge cases, such as sending messages with special characters or very long messages.
- Steps:
- Send SMS messages with special characters, emojis, or long text.
- Verify that the app handles these cases correctly without crashes or misbehavior.
- Expected Result: The app should correctly display and handle the content of the messages.
Tools and Best Practices for Manual SMS Testing
Manual testing can be enhanced with the use of certain tools and best practices:
- Physical Devices:
- Always test on a variety of physical devices to ensure compatibility across different hardware and iOS versions.
- Documentation:
- Maintain detailed documentation of your test cases and results. This helps in tracking issues and verifying that they have been resolved.
- Test Scenarios:
- Define clear and concise test scenarios covering all possible use cases. This ensures comprehensive testing and reduces the risk of missing critical issues.
- Real-World Conditions:
- Test under real-world conditions, including various network types (Wi-Fi, 4G, 5G) and different battery levels. This helps in identifying issues that may not appear in controlled environments.
Example of Manual Testing Process
Here’s a simple example of a manual testing process for sending and receiving an SMS:
Swift
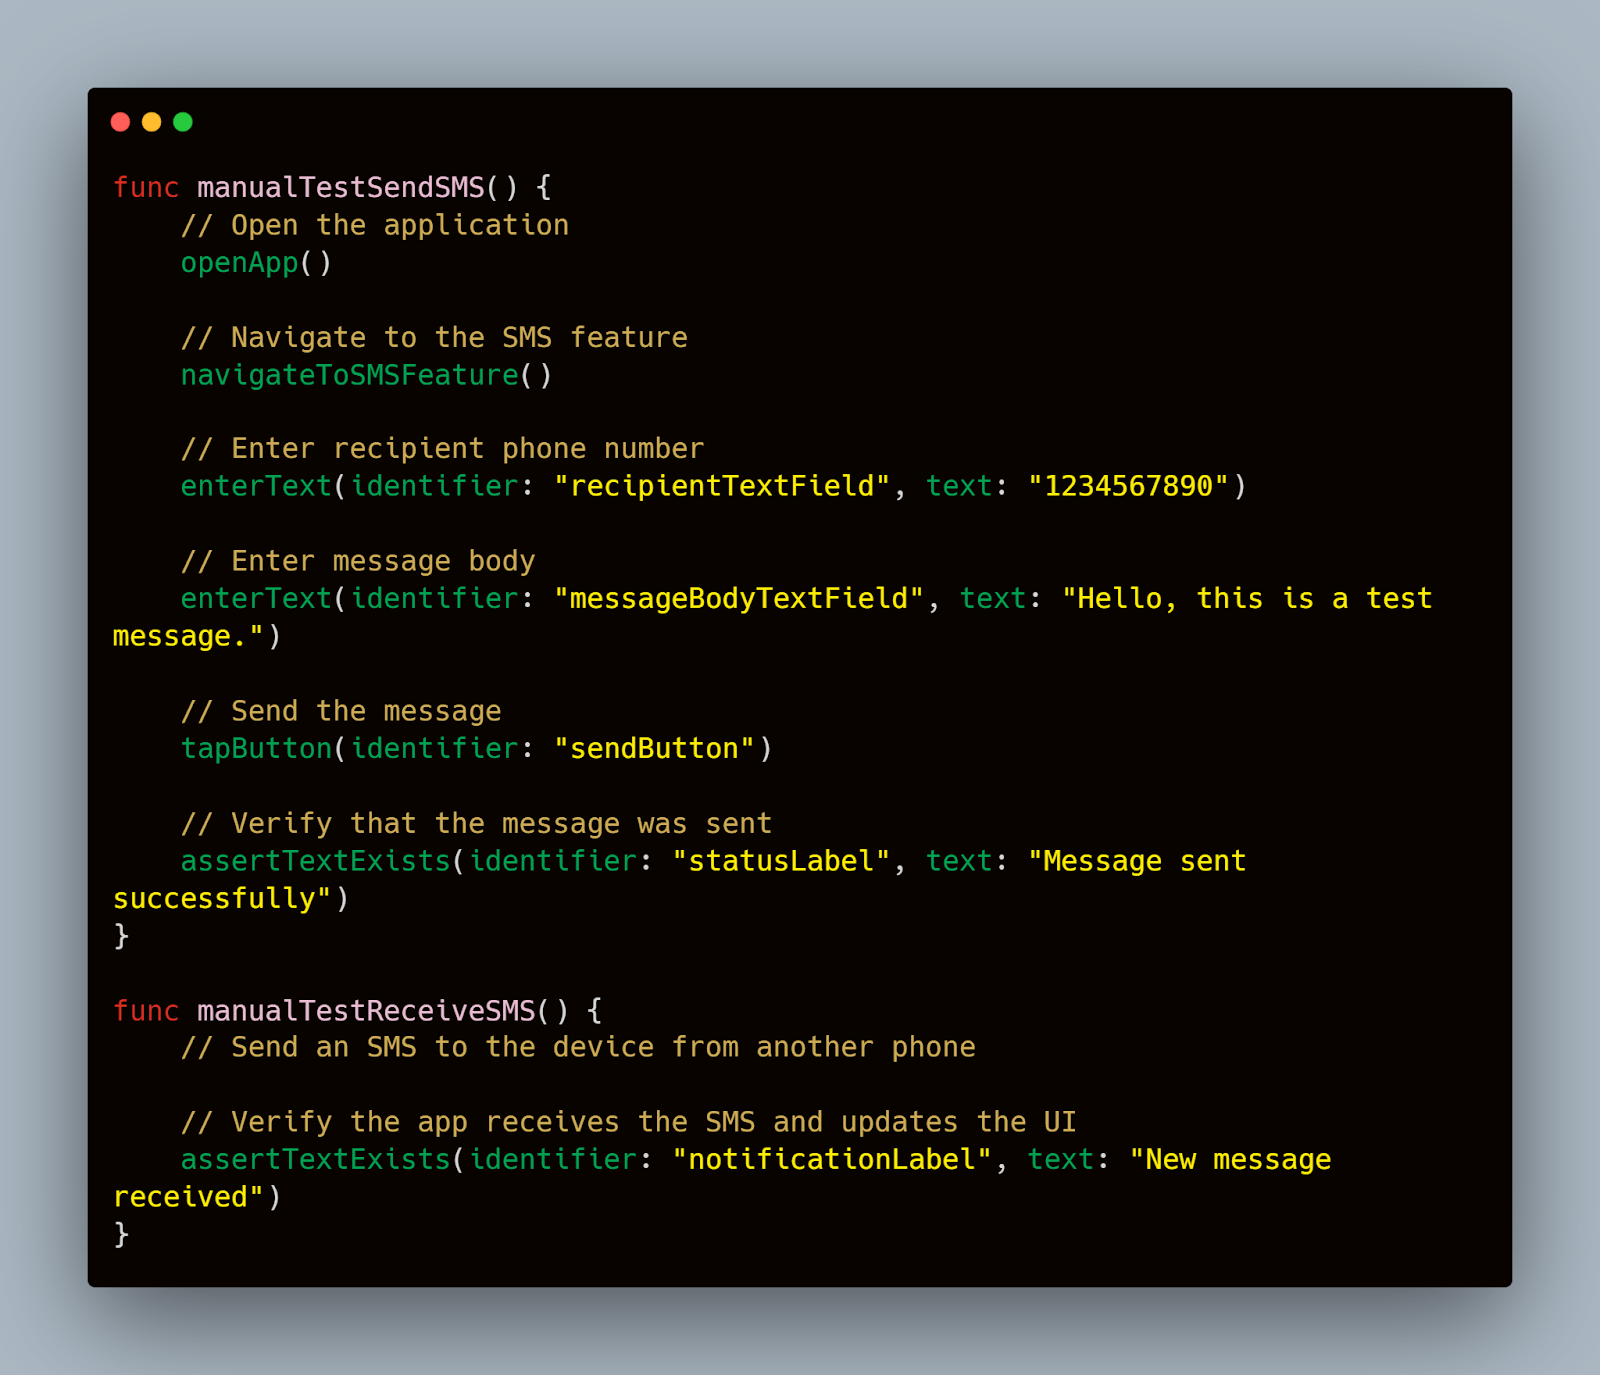
By following these steps and best practices, you can ensure thorough and effective manual testing of SMS functionalities in your iOS application. Manual testing helps capture edge cases and user experiences that automated testing might miss, ensuring a more reliable and user-friendly app.
Validating SMS Delivery and Content
Ensuring that SMS messages are delivered correctly and their content remains intact is a crucial part of SMS testing.
Techniques to Ensure SMS Delivery
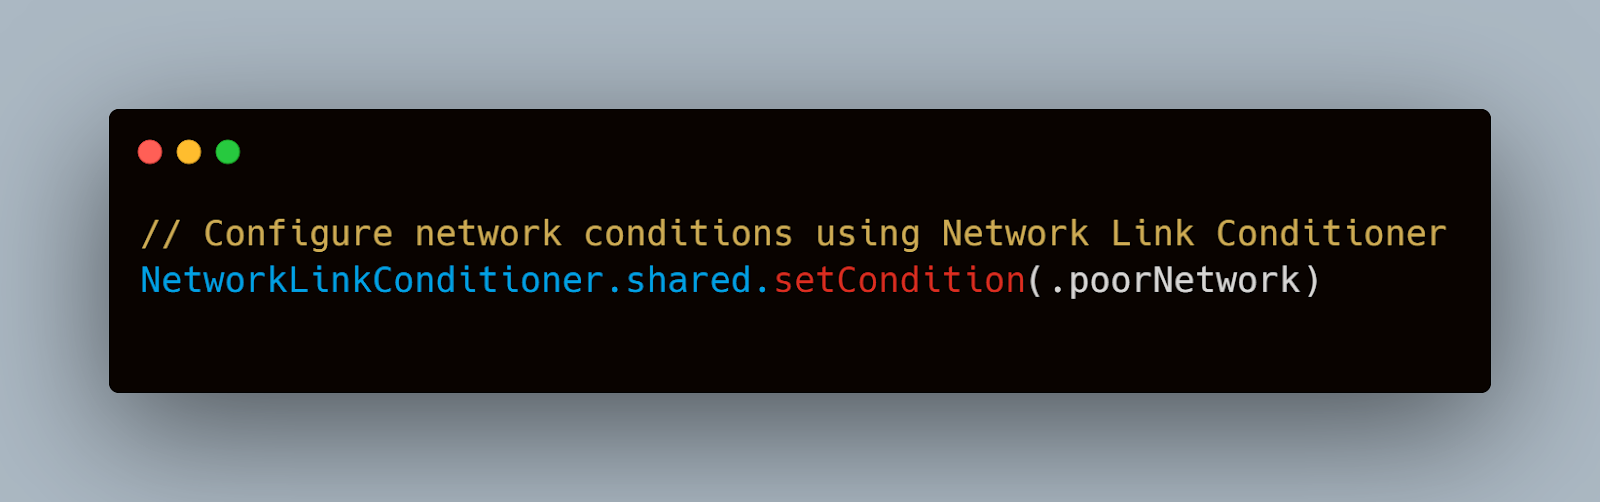
- Network Simulation:
- Simulate different network conditions (e.g., weak signal, no signal) to test the reliability of SMS delivery.
- Use tools like Apple’s Network Link Conditioner to create various network scenarios and observe how the application handles them.
Example
swift
- Delivery Receipts:
- Check for delivery receipts to confirm that the SMS has reached the recipient’s device.
- Some carriers provide delivery receipts, which can be used to validate the delivery status of SMS messages.
- Manual Verification:
- Manually verify the receipt of SMS messages by sending messages to test devices and checking for their arrival.
- Maintain a log of sent messages and their delivery statuses for tracking purposes.
Verifying SMS Content Integrity
- Character Encoding:
- Ensure that the SMS content is correctly encoded and decoded, preserving special characters and emojis.
Example
Swift

2. Content Verification:
- Validate that the SMS content received matches the content sent.
- Check for truncation or corruption of message content, especially for long messages or those containing special characters.
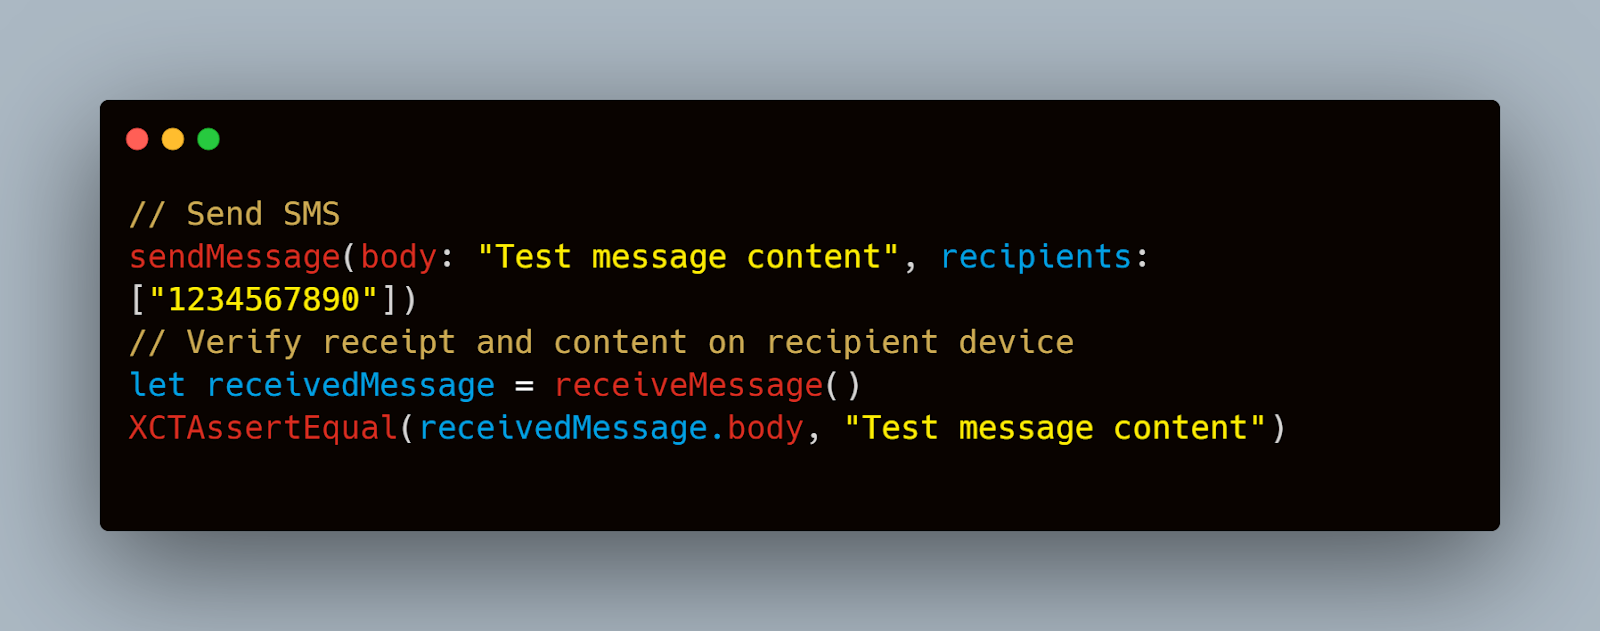
3. End-to-End Testing:
- Perform end-to-end testing by sending SMS messages from the application to another device and verifying the content on the recipient’s device.
Example
Swift
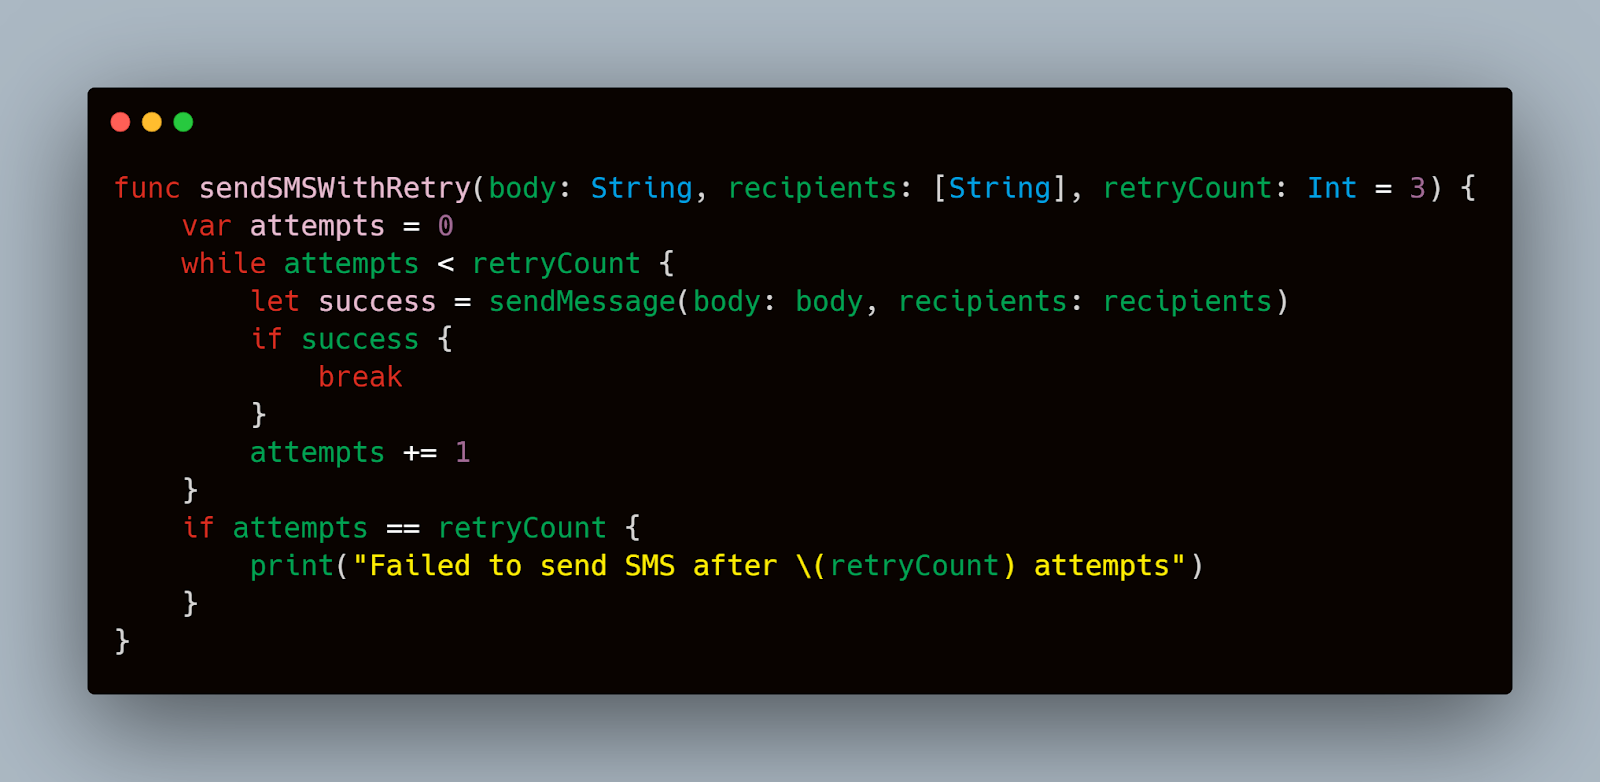
Handling Failures and Retries
- Retry Mechanism:
- Implement a retry mechanism for cases where SMS sending fails due to network issues or other temporary problems.
Example
Swift
2. Error Handling:
- Handle errors gracefully and provide feedback to the user when SMS sending fails.
Example
Swift
By following these techniques, you can ensure that SMS messages are delivered correctly and that their content remains intact. Validating delivery and content is essential for providing a reliable messaging experience in your iOS application.
Testing SMS Interactions with the App
Testing how your iOS application interacts with SMS messages is crucial to ensure a seamless user experience.
Simulating User Interactions with SMS
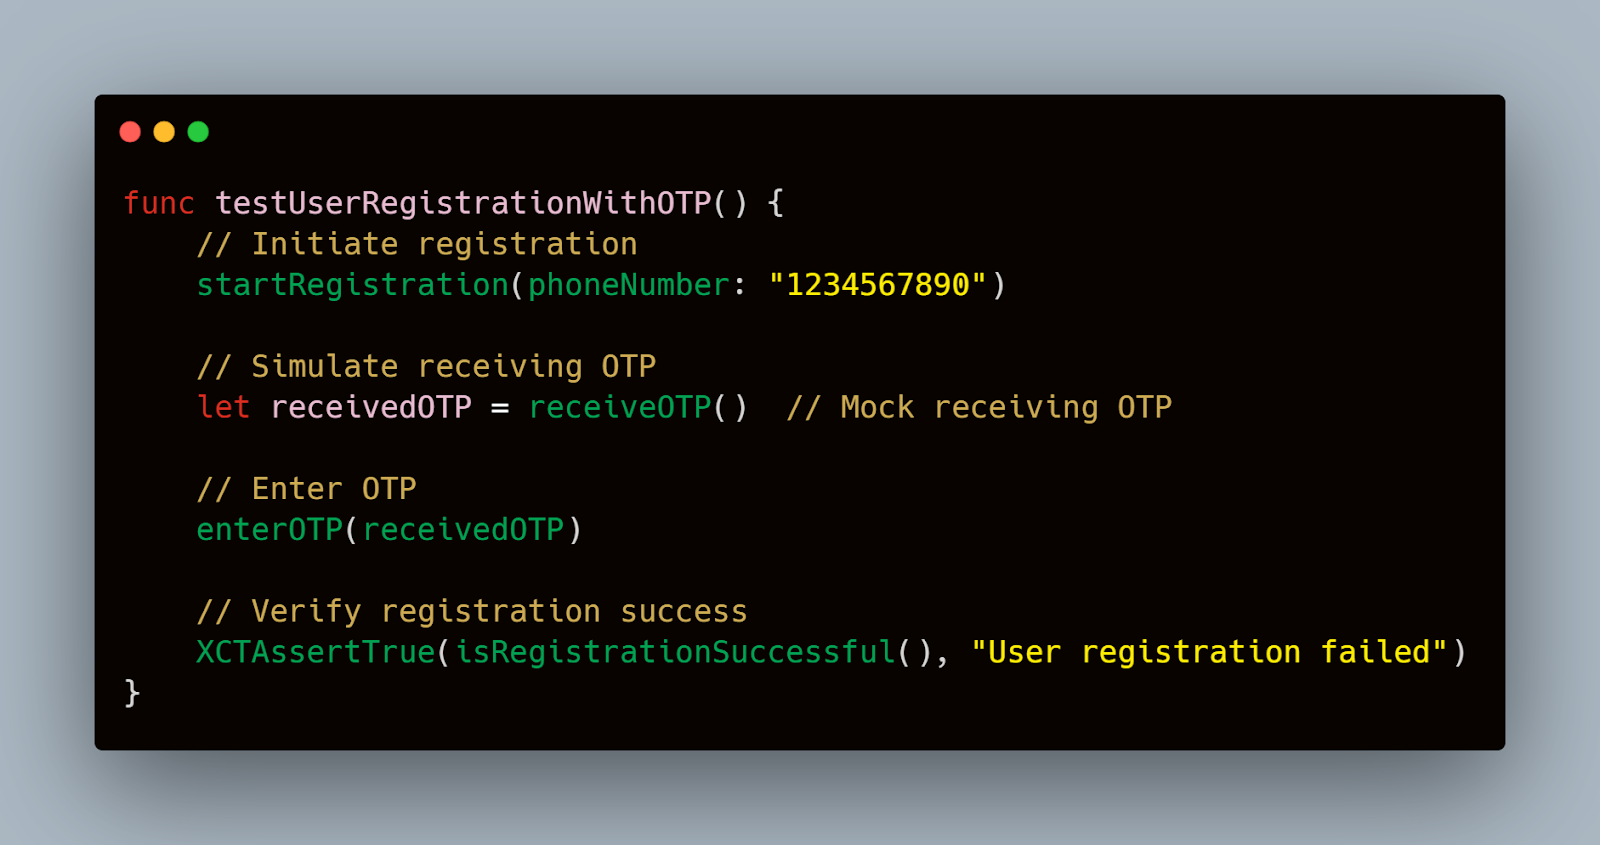
- User Registration and Authentication:
- Many apps use SMS for user registration and authentication (e.g., sending OTPs).
- Steps:
- Initiate the registration process in the app.
- Send an OTP via SMS to the user's phone number.
- Enter the received OTP in the app to complete the registration.
- Expected Result: The app should verify the OTP and successfully register the user.
Swift
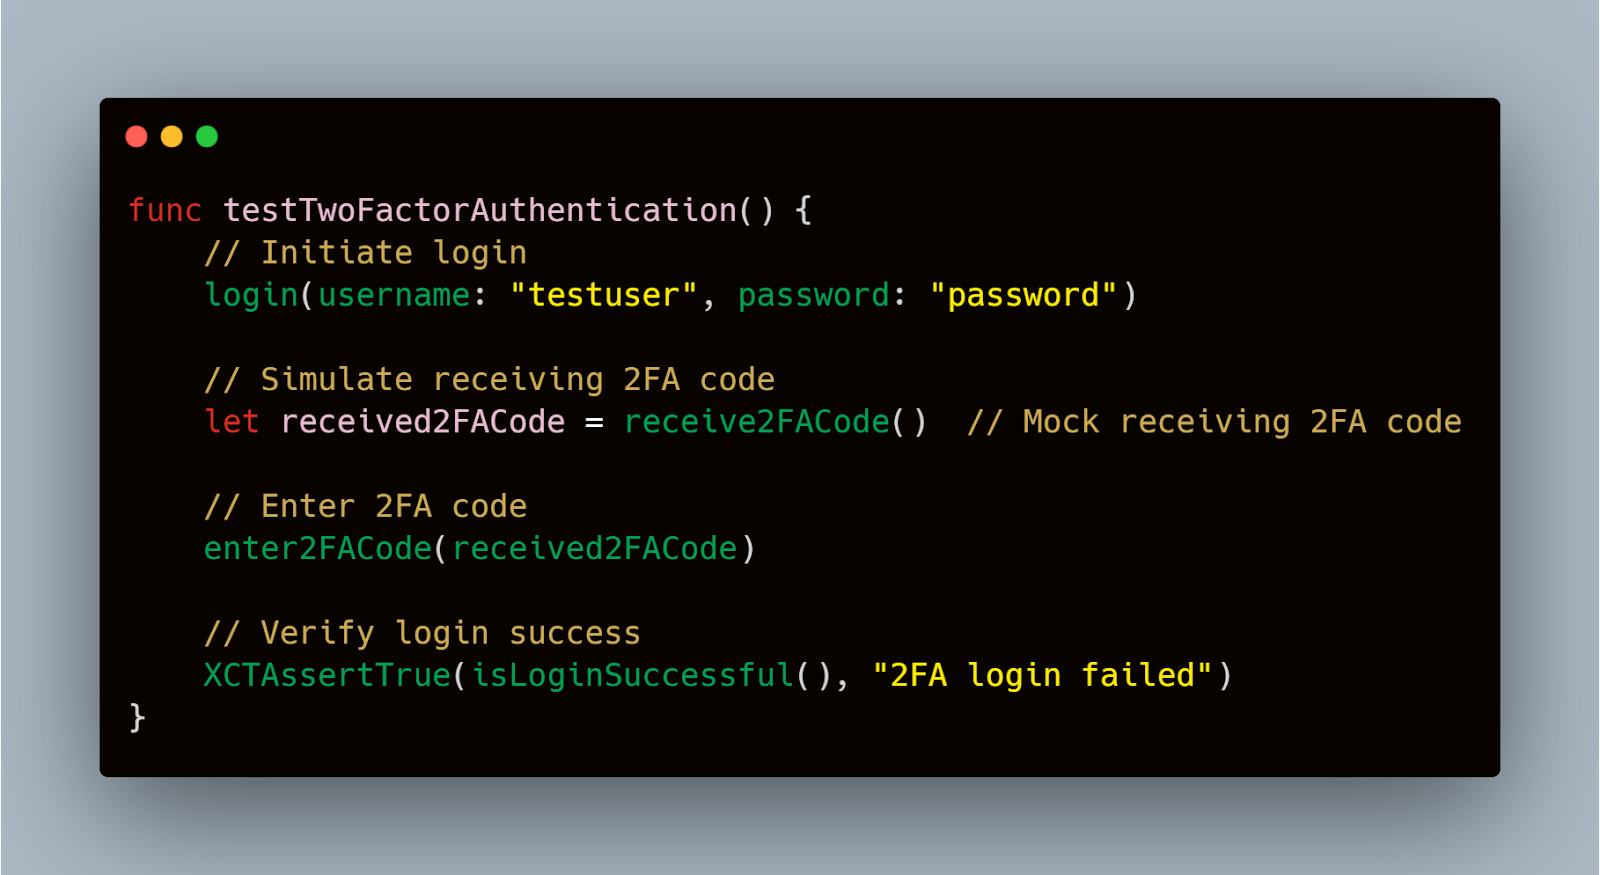
2. Two-Factor Authentication (2FA):
- Steps:
- Log in to the app.
- Receive a 2FA code via SMS.
- Enter the 2FA code to complete the login process.
- Expected Result: The app should authenticate the user and grant access.
Swift
Ensuring App Behavior on SMS Reception
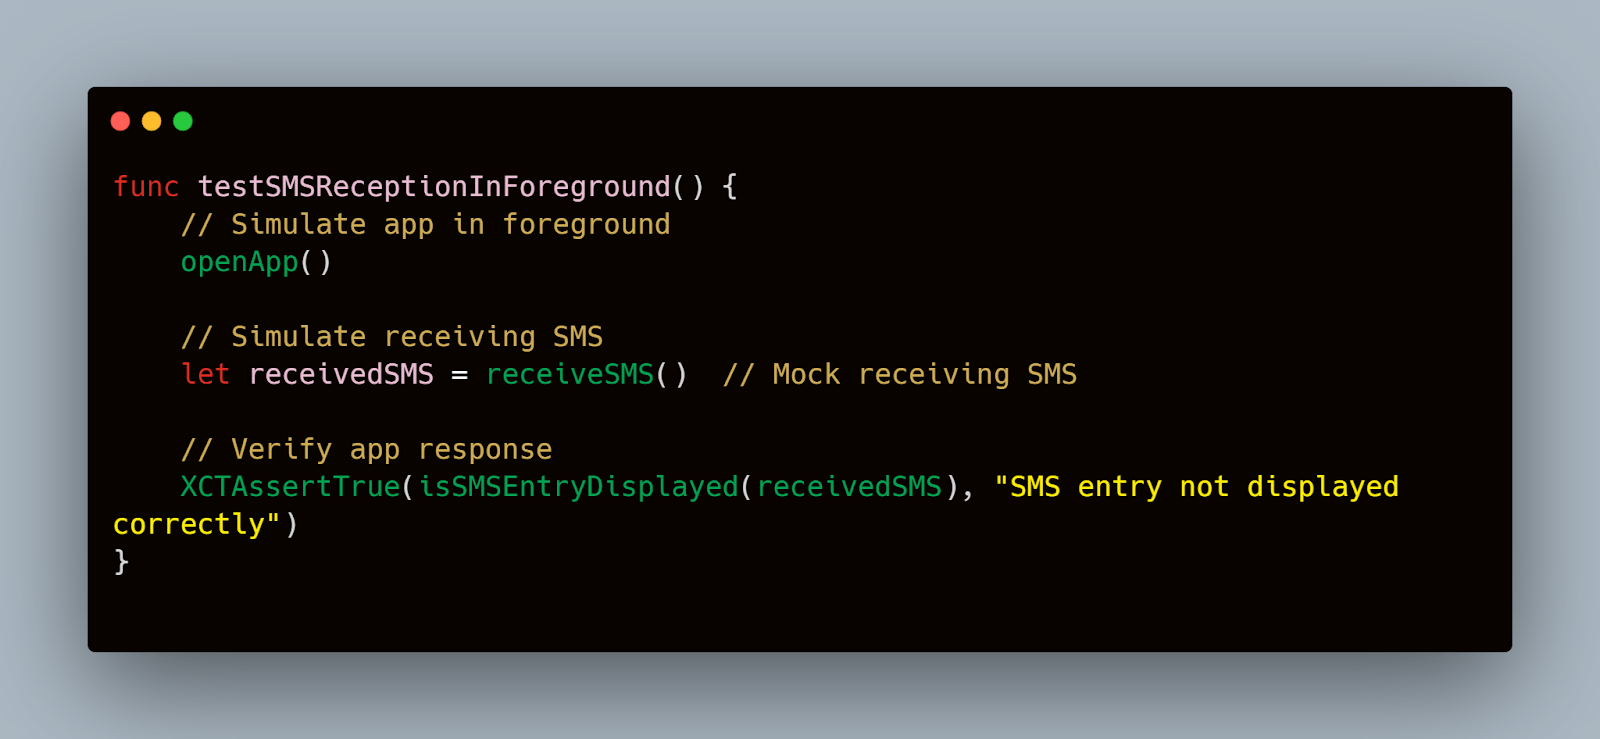
- Foreground State:
- When the app is in the foreground, it should handle incoming SMS without interrupting the user experience.
- Steps:
- Keep the app open.
- Send an SMS to the device.
- Verify the app's response (e.g., display a notification or update a UI element).
- Expected Result: The app should handle the SMS gracefully, updating the UI or showing a non-intrusive notification.
Swift
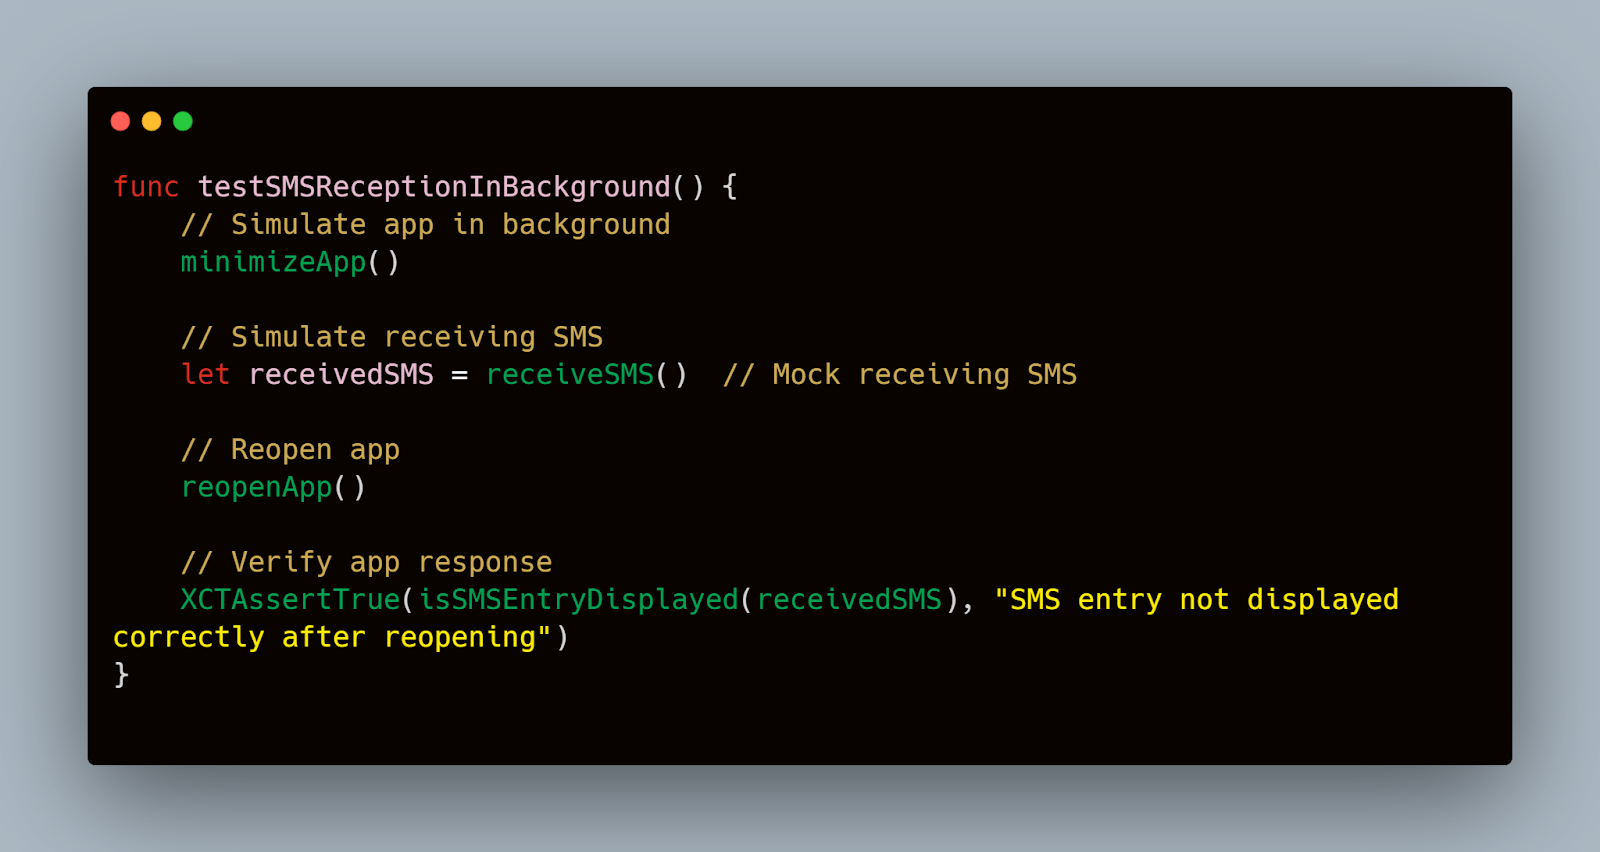
2. Background State:
- The app should correctly handle incoming SMS when it is in the background or closed.
- Steps:
- Minimize or close the app.
- Send an SMS to the device.
- Reopen the app and verify the SMS is processed correctly.
- Expected Result: The app should process the SMS and update the UI when brought back to the foreground.
Swift
Testing Push Notifications and In-App Messages
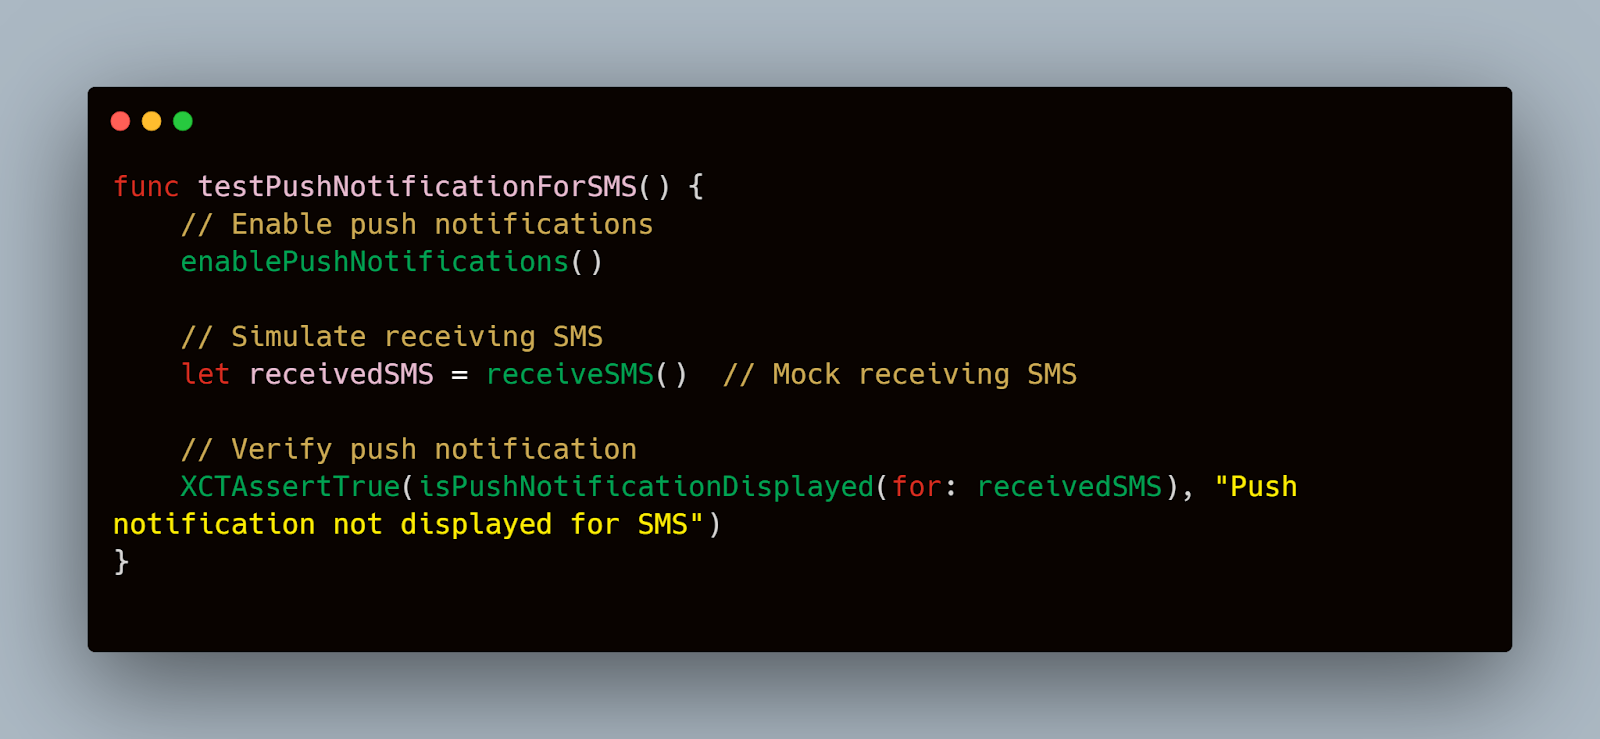
- Push Notifications for SMS:
- Steps:
- Ensure push notifications are enabled.
- Send an SMS to the device.
- Verify that the push notification is displayed.
- Expected Result: The app should display a push notification for the incoming SMS.
- Steps:
Swift
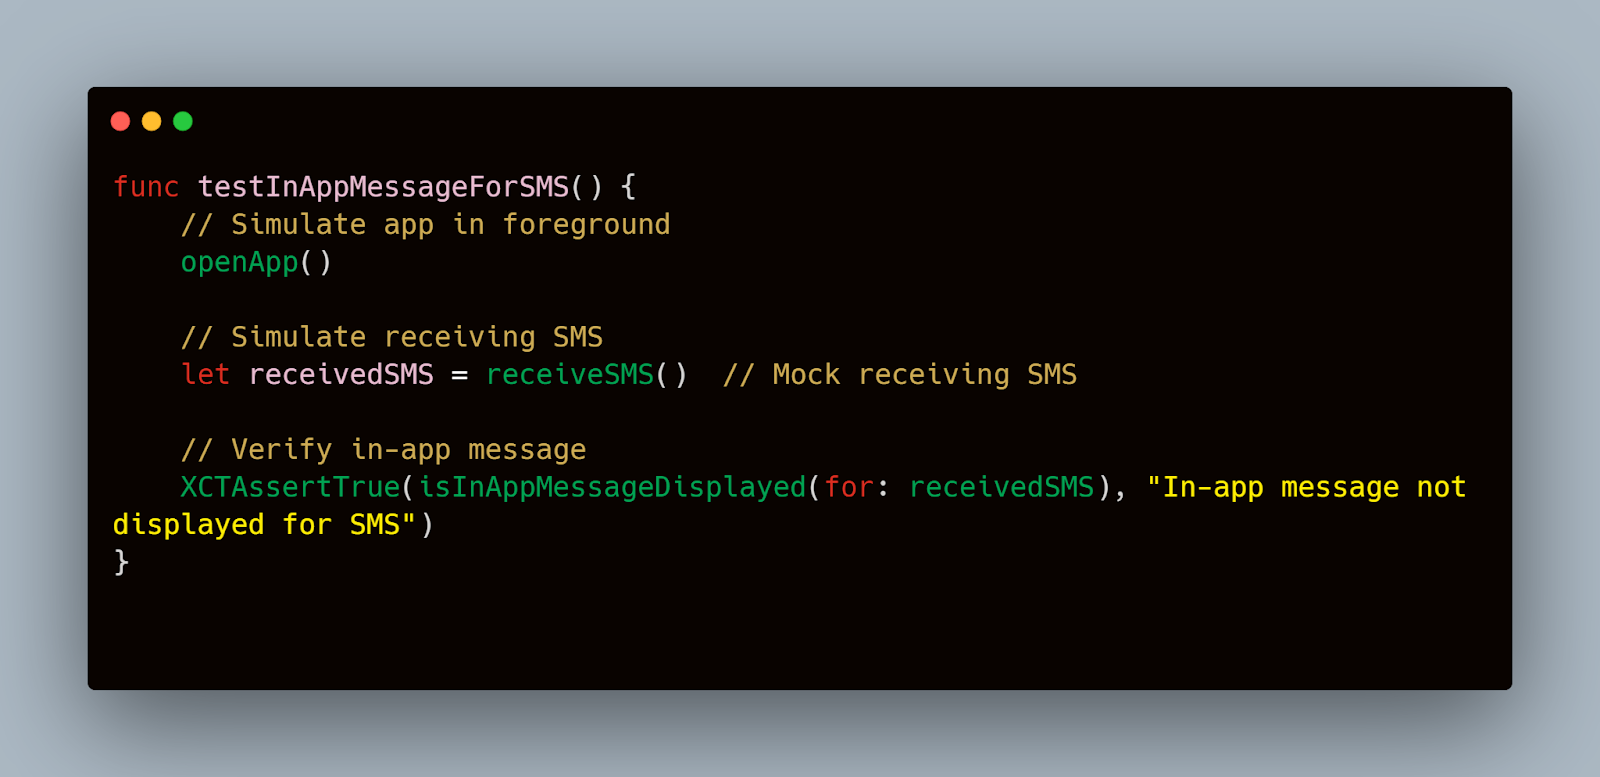
2. In-App Messages:
- Some apps use in-app messages to notify users of new SMS or other important events.
- Steps:
- Send an SMS while the app is open.
- Verify that the in-app message is displayed correctly.
- Expected Result: The app should display the in-app message without disrupting the user experience.
Swift
By following these steps and examples, you can thoroughly test how your iOS application interacts with SMS messages, ensuring a seamless and reliable user experience. Testing interactions with SMS is essential for applications that rely on messaging for critical functionalities like authentication and notifications.
Performance and Load Testing
Performance and load testing are critical to ensure your SMS functionalities can handle high-traffic conditions and maintain responsiveness under stress.
Methods for Performance Testing of SMS Features
Performance testing evaluates the speed, responsiveness, and stability of your SMS functionalities. Here’s how you can conduct performance testing for SMS on iOS:
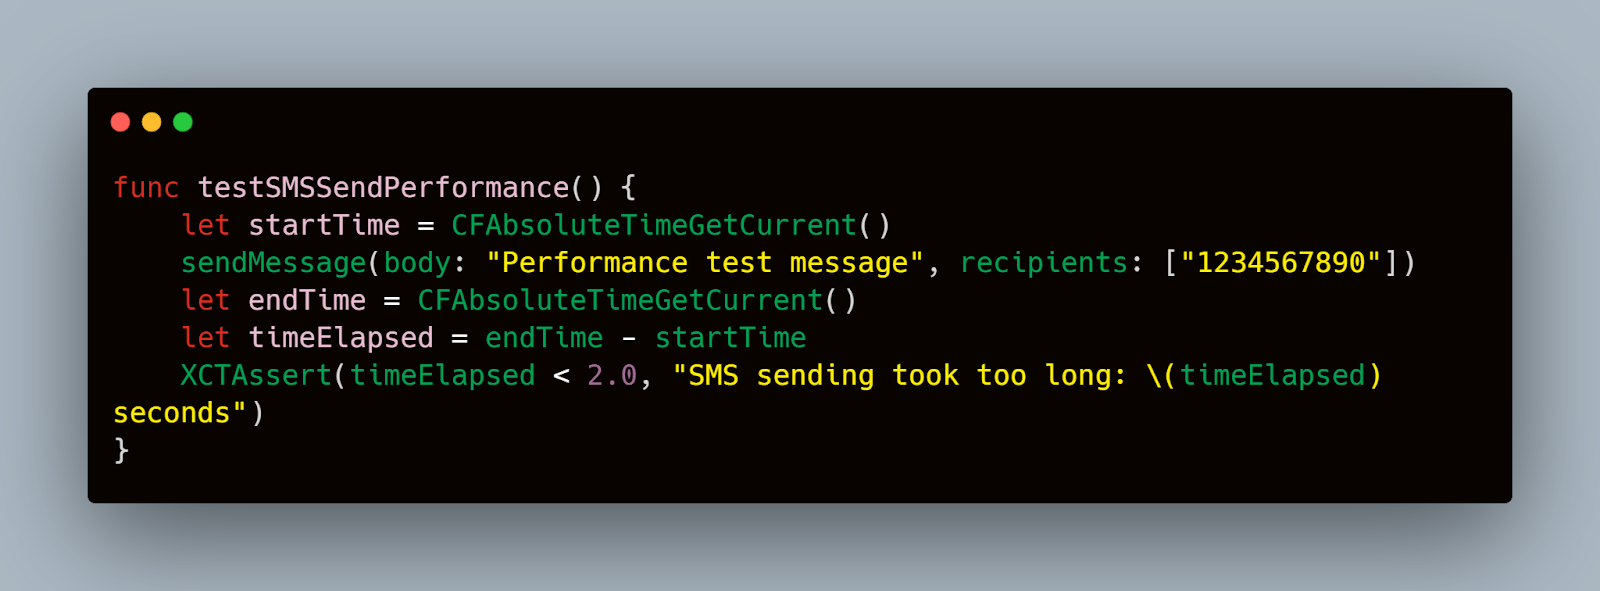
- Measure Message Sending Time:
- Objective: Measure the time taken to send an SMS from initiation to completion.
- Steps:
- Start a timer when the SMS send action is initiated.
- Stop the timer when the confirmation of SMS sent is received.
- Expected Result: The time taken should be within acceptable limits for a good user experience.
Swift
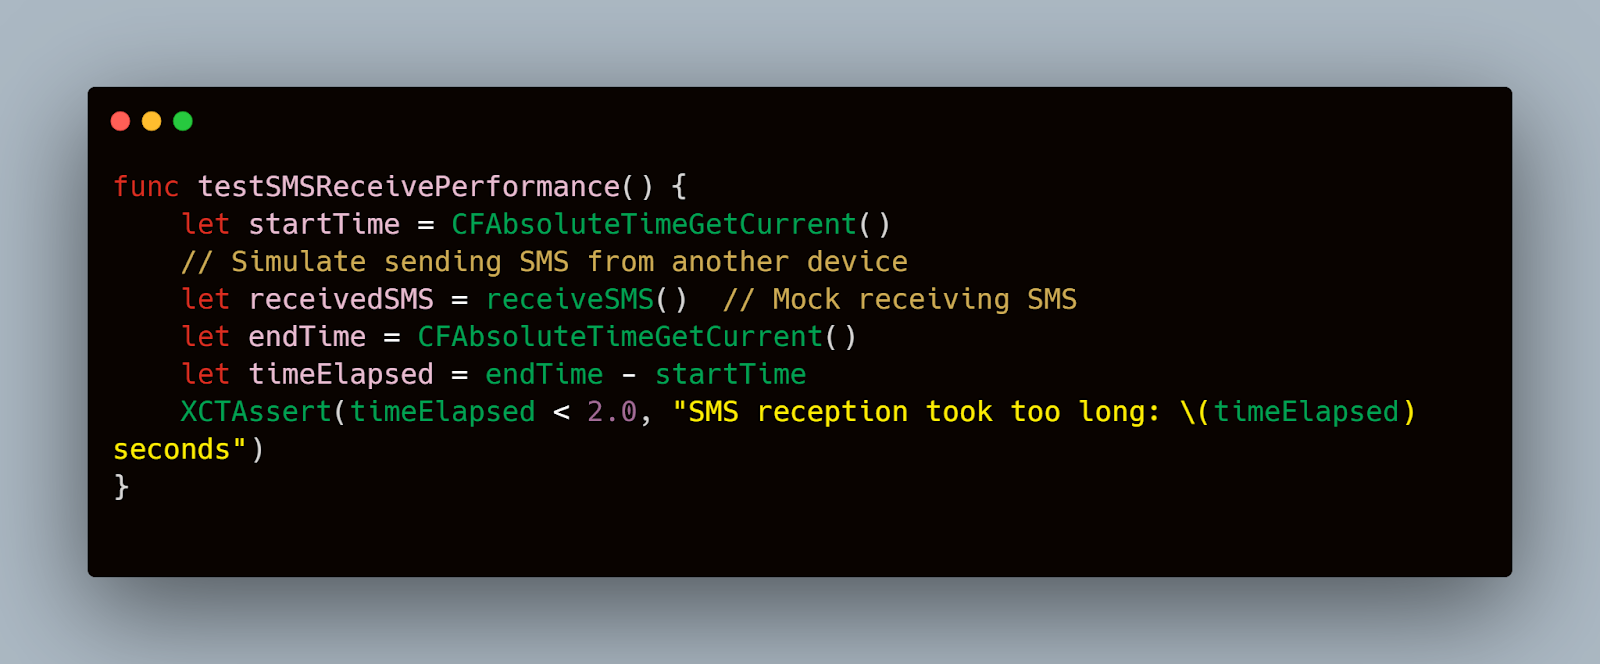
2. Measure Message Reception Time:
- Objective: Measure the time taken to receive an SMS after it is sent.
- Steps:
- Start a timer when the SMS is sent from another device.
- Stop the timer when the SMS is received on the test device.
- Expected Result: The reception time should be minimal to ensure timely communication.
Swift
Load Testing to Simulate High SMS Traffic
Load testing simulates high SMS traffic to ensure your application can handle a large volume of messages. Here’s how to conduct load testing:
- Simulate High Volume of SMS:
- Objective: Ensure the app performs well under high SMS traffic.
- Steps:
- Use a script or tool to send a large number of SMS messages to the test device.
- Monitor the app’s performance, checking for responsiveness and any crashes.
- Expected Result: The app should handle high traffic without significant performance degradation or crashes.
Swift

- Monitor Resource Usage:
- Objective: Track CPU, memory, and battery usage during high SMS traffic.
- Steps:
- Use Xcode’s Instruments tool to monitor resource usage while performing load tests.
- Analyze the data to identify any bottlenecks or excessive resource consumption.
- Expected Result: The app should efficiently use resources and not exhibit excessive CPU, memory, or battery drain.
By following these methods and using tools like Mobot, you can thoroughly test the performance and load-handling capabilities of your SMS functionalities on iOS. Ensuring your app performs well under various conditions is crucial for providing a reliable and seamless user experience.
Conclusion
It is important to ensure the reliability and performance of SMS functionalities in your iOS application to deliver a seamless user experience. From setting up the test environment and understanding the SMS framework to creating comprehensive test scenarios and automating tests, each step plays a vital role in the overall testing strategy. Performance and load testing further guarantee that your app can handle high traffic and remain responsive under various conditions. By incorporating manual testing and leveraging tools like Mobot, you can address potential issues and ensure that your SMS features are strong and reliable. Following these best practices will help you build a more resilient application, ultimately enhancing user satisfaction and trust in your product.


.jpg)


.jpg)