

Learn essential strategies for testing iOS medical device apps to ensure compliance, performance, and user satisfaction.

Introduction
Testing medical devices on iOS platforms is crucial for developers and companies aiming to deliver reliable, functional, and regulatory-compliant applications for healthcare. Medical apps, especially those interfaced with actual medical devices, need to meet stringent accuracy and safety standards. This introduction outlines the necessity and challenges of such testing, along with a high-level view of the regulatory landscape impacting these processes.
The proliferation of mobile technology in healthcare has paved the way for advanced medical applications that can perform a variety of critical functions, from monitoring patient vitals to administering therapies. Given the sensitive nature of health data and the potential life-saving capabilities of these devices, ensuring their reliability through rigorous testing on iOS devices is not just a technical requirement but a moral imperative.
Setting Up the Testing Environment
Creating an effective testing environment is a foundational step in ensuring the quality and reliability of iOS applications for medical devices.
Choosing the Right iOS Devices and OS Versions
Given the variety of iOS devices and operating systems in the market, selecting the right combination is crucial for comprehensive testing. Consider the following:
- Device Variety: Test on a broad spectrum of devices, from older iPhones to the latest iPads, to ensure the app performs well across different screen sizes and hardware capabilities.
- OS Coverage: Include multiple iOS versions, especially the latest ones, as these are likely to be most used by your target audience. However, don’t overlook older versions still in circulation, particularly if your app targets demographics likely to use such devices.
To streamline the selection process, leverage data from analytics to identify the most common devices and OS versions among your existing users. This data-driven approach ensures that your testing efforts are focused and effective.
Configuring Development and Testing Tools
Setting up the right tools is essential for efficient and thorough testing. Utilize the following:
- Xcode: Apple’s integrated development environment (IDE) offers comprehensive tools for developing and testing iOS applications. Make sure to use the latest version to have access to the newest features and testing capabilities.
- Simulators and Real Devices: While simulators provide a good initial testing ground, nothing replaces testing on real devices to understand how an app behaves in real-world scenarios.
- Continuous Integration Tools: Tools like Jenkins or Travis CI can automate the testing process, ensuring that new code submissions are automatically tested, reducing the manual effort required and speeding up the development cycle.
Example setup snippet for configuring a CI tool with Xcode:
Bash
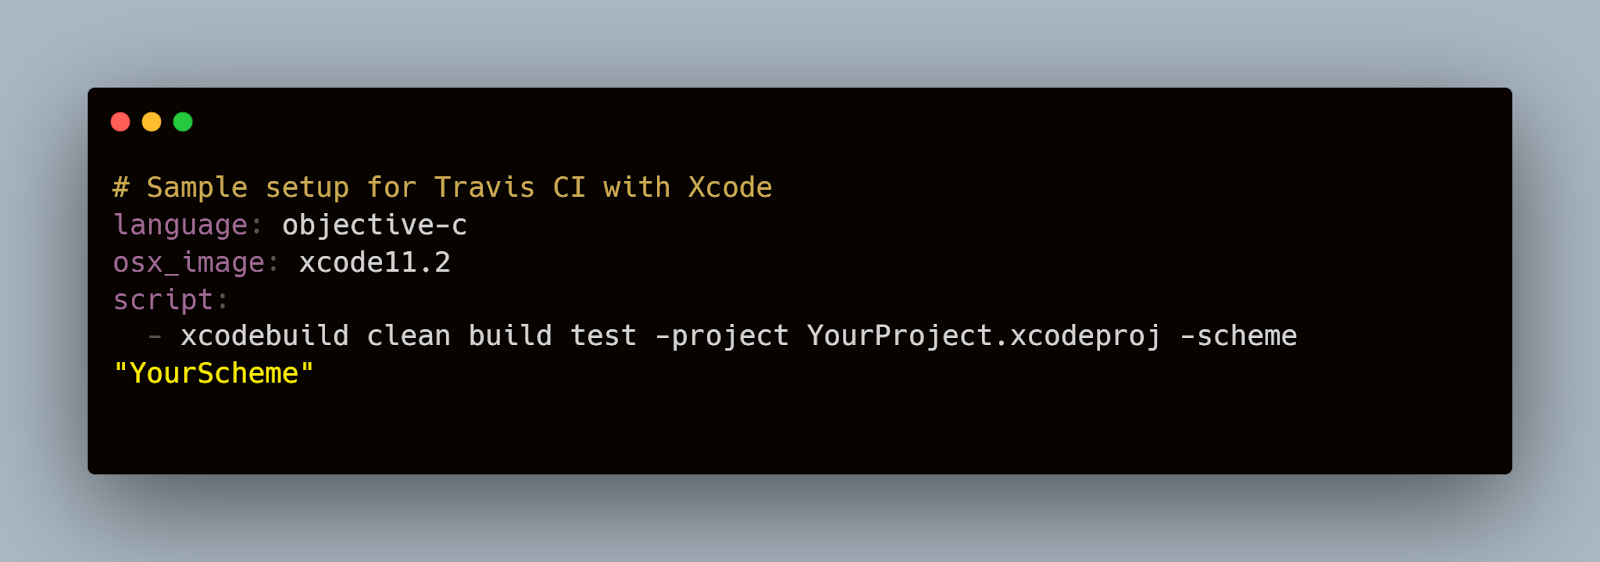
This script sets up Travis CI for an iOS project, specifying the Xcode version and the commands to clean, build, and test the application.
Leveraging Third-Party Tools and Services
Incorporating third-party tools can significantly enhance your testing capabilities:
- Network Simulation Tools: Tools like Network Link Conditioner allow you to simulate various network conditions to see how your app performs with different data speeds and latencies.
- Accessibility Testing Tools: Ensure your app is accessible to all users by utilizing tools that help validate the accessibility features of your application.
- Mobot: Mobot’s service can be integrated into your testing strategy to automate physical tests, which is particularly useful for apps interacting with external medical hardware.
By carefully setting up your testing environment with the right mix of devices, tools, and strategies, you set the stage for rigorous and effective testing of your iOS medical device applications. This foundational work is crucial not only for meeting user expectations but also for adhering to strict medical and privacy regulations.
Testing Strategies for Medical Device Apps
Ensuring the reliability and safety of medical device apps on iOS requires a multi-faceted approach to testing.
Unit Testing: Ensuring Component Reliability
Unit testing is the first line of defense in ensuring your medical device app functions correctly. This involves testing individual components or modules of the application to ensure they operate as expected independently.
Example: Testing a glucose monitoring app's calculation module
Consider a module designed to calculate insulin doses based on glucose readings and carbohydrate intake. Here's how you might write a unit test in Swift using the XCTest framework:
Swift
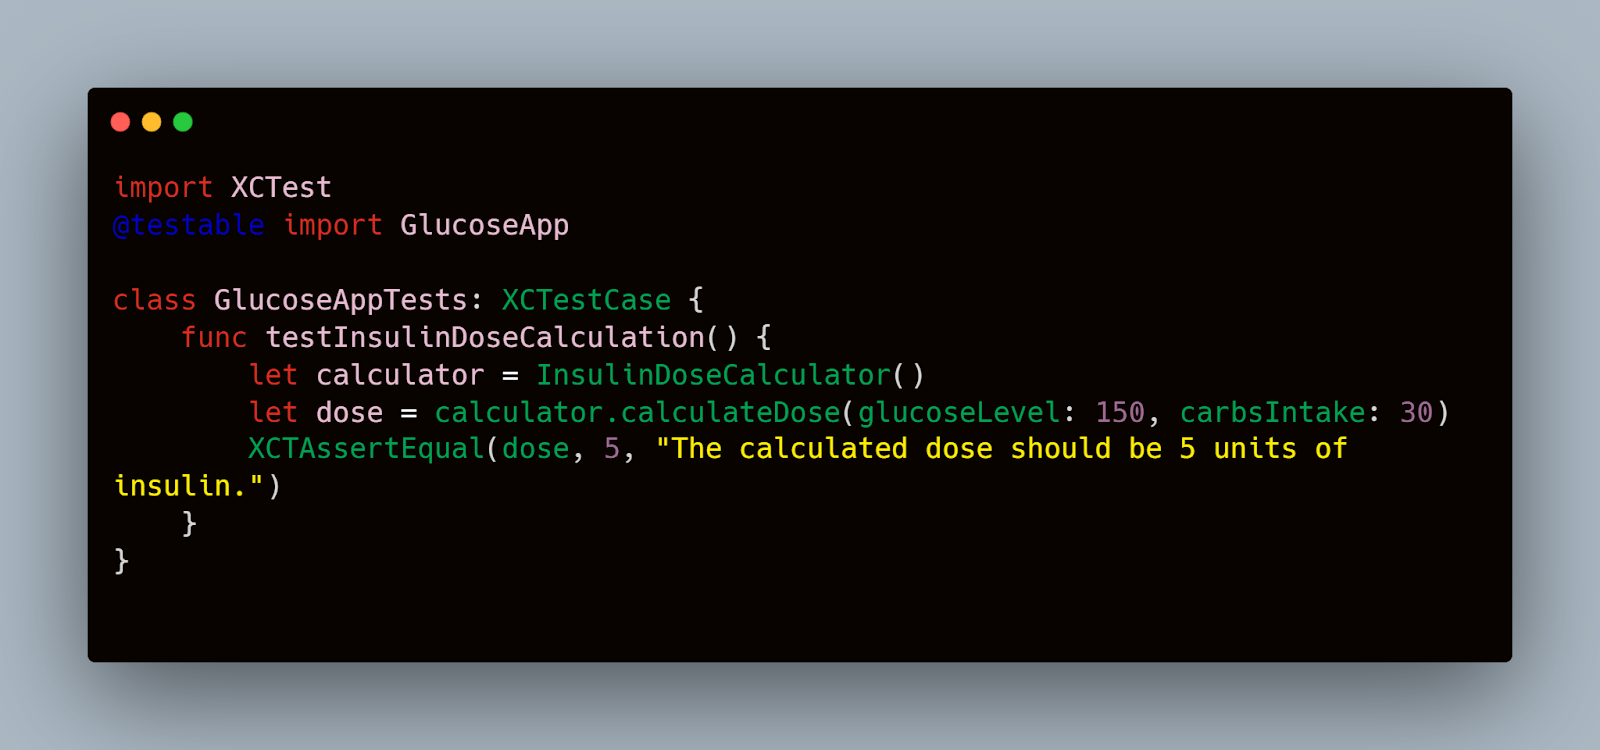
This test ensures that the calculateDose function returns the correct insulin dose based on predefined inputs.
Integration Testing: Checking Inter-Component Functionality
While unit tests verify the functionality of individual components, integration testing assesses how well these components work together. This is crucial for medical device apps where different modules must interact seamlessly to perform complex functions.
Example: Integrating heart rate monitoring with data storage
For an app that monitors heart rate and stores this data for later review, you'd test the integration like so:
Swift

Interface Testing: Ensuring Interaction with iOS Hardware
Interface testing is particularly significant for medical apps that rely on external hardware or sensors that interface with an iOS device. This testing ensures that the app correctly interacts with hardware to receive accurate data, which is then processed appropriately.
Example: Testing connectivity with an external blood pressure cuff
Swift
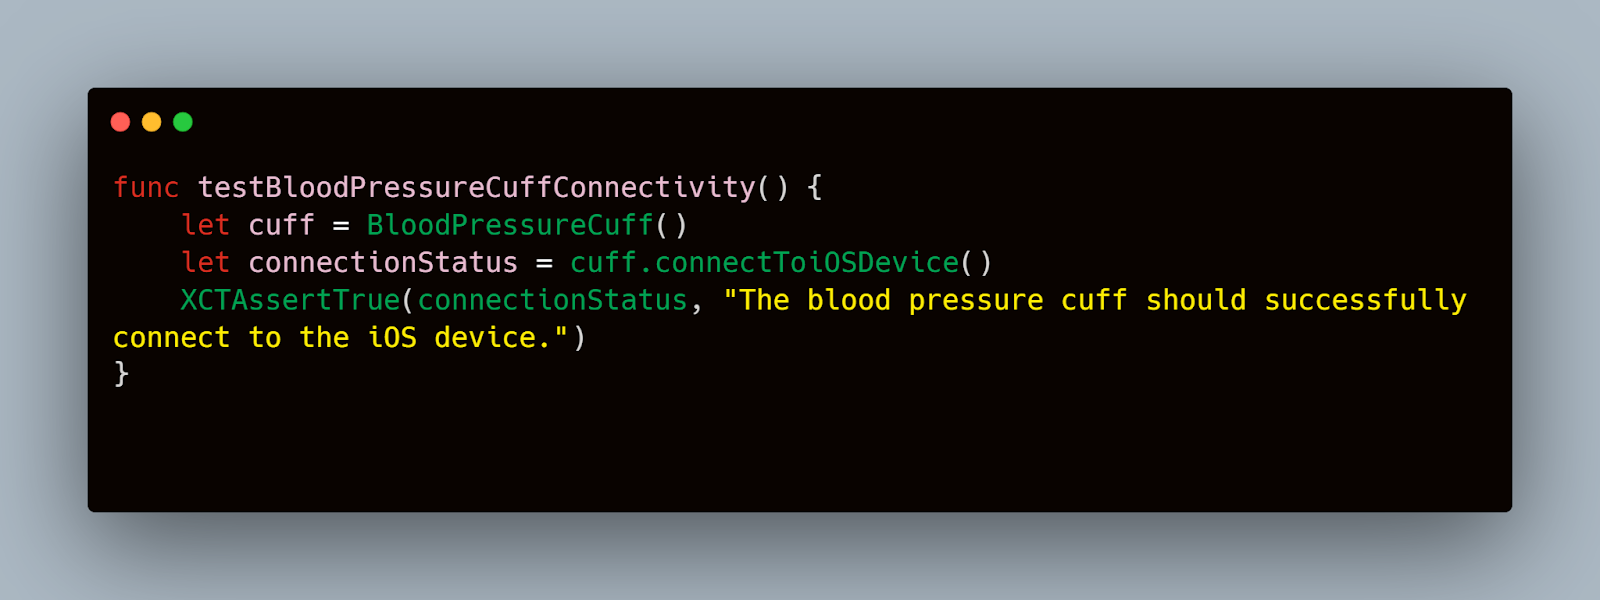
This test verifies that the app can establish a connection with an external blood pressure cuff, a critical step for accurate blood pressure monitoring.
By implementing these testing strategies, developers and QA teams can significantly mitigate the risks associated with medical device apps on iOS. These tests form a crucial part of the development process, ensuring that each component functions correctly alone and in conjunction with others, and that the app interfaces seamlessly with any required hardware. This comprehensive testing approach not only aids in compliance with medical regulations but also ensures that the app can reliably support healthcare providers and patients in critical care scenarios.
Automating Tests Using Frameworks
Automated testing is an indispensable part of developing strong iOS applications, particularly when dealing with medical devices where reliability and precision are crucial.
Several frameworks are available for automating iOS tests, but two stand out due to their strongness and integration with the iOS development ecosystem:
- XCTest: Apple’s native framework that integrates seamlessly with Xcode. It supports unit, performance, and UI tests and is an excellent choice for developers looking to leverage continuous integration and other advanced testing features.
- EarlGrey: Developed by Google, this framework is specifically designed for UI automation testing. It offers precise interaction with UI elements and integrates well with XCTest.
Choosing the right framework depends on your specific testing needs and the complexity of your iOS application.
Example Setup for Automated Test Scripts
Let’s explore how to set up a simple automated test using XCTest, focusing on a scenario where the medical app needs to ensure that patient data entry forms are functioning correctly.
Automated Test for Verifying Patient Form Submission
Swift
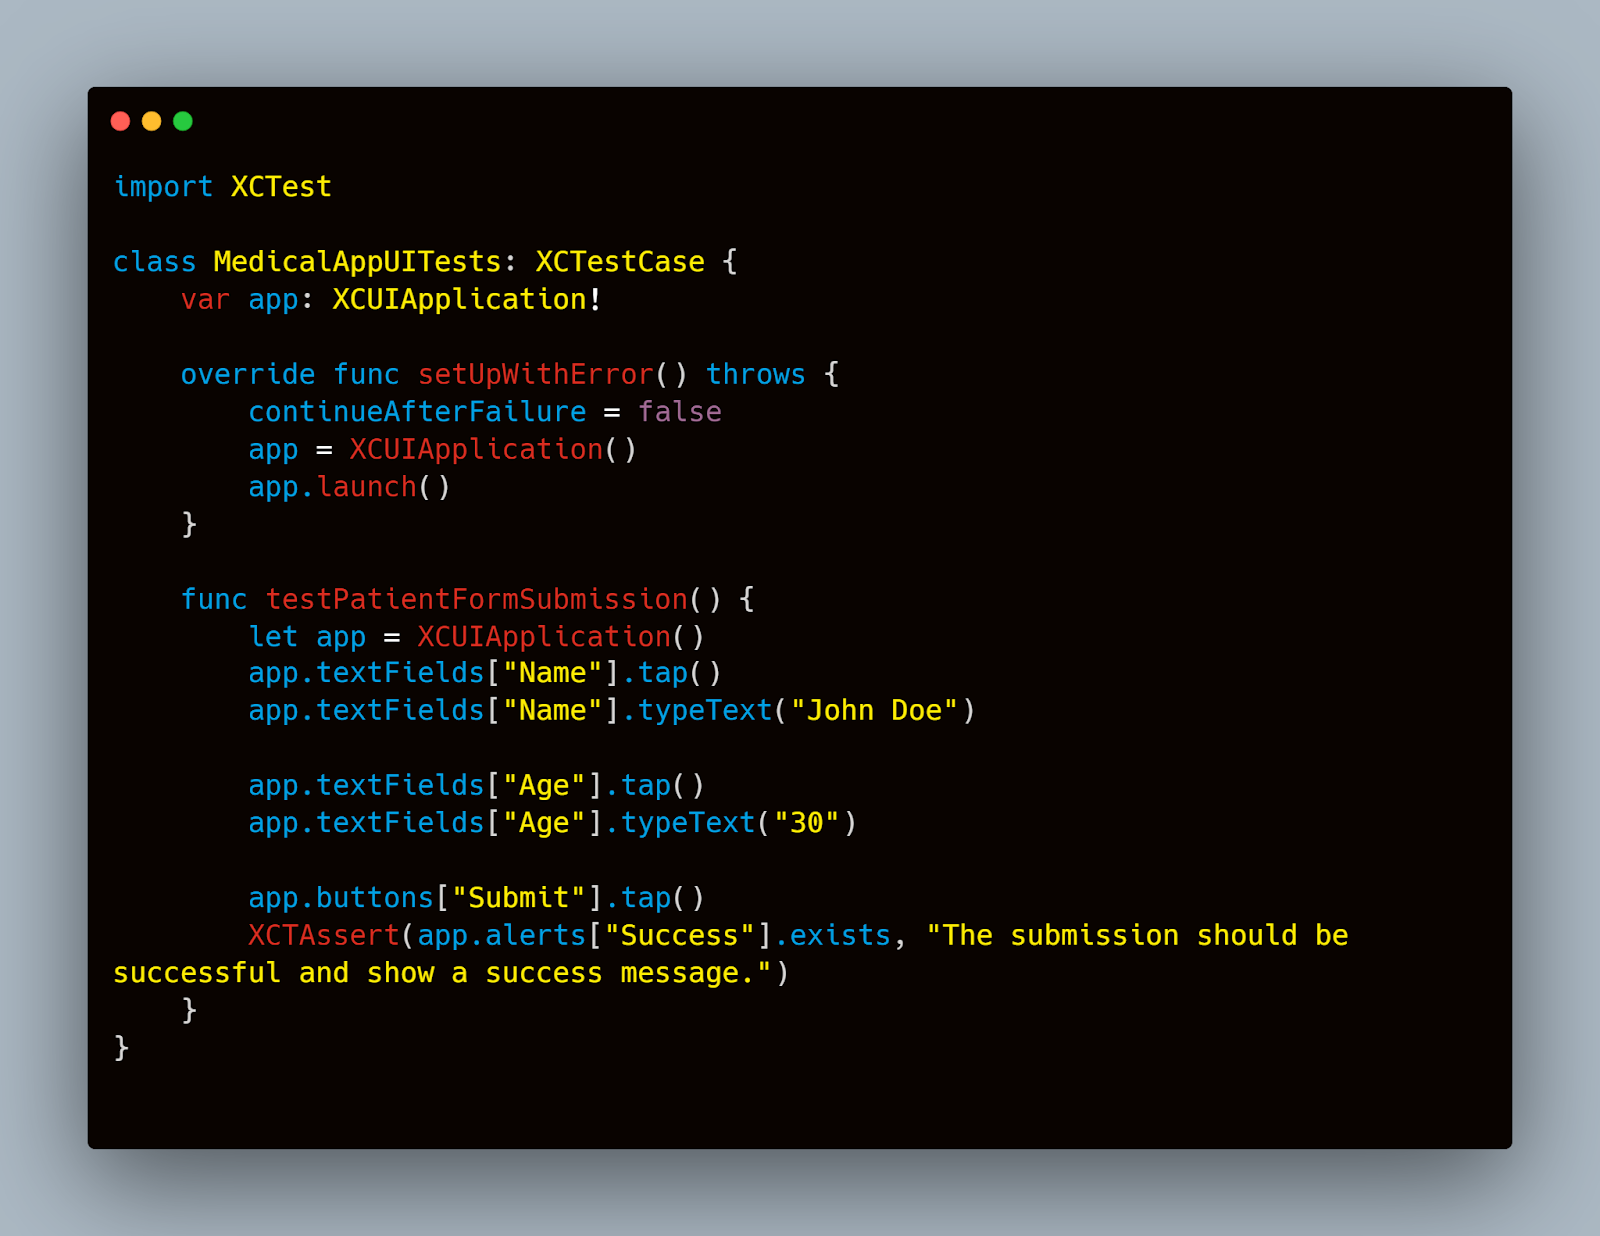
This script sets up a UI test where it launches the app, enters a name and age into the text fields, and submits the form. It then checks for a success message, verifying that the form handles the input and submission process correctly.
Integrating Automated Testing into the Development Cycle
To maximize the effectiveness of automated testing, integrate these tests into your development and continuous integration processes:
- Continuous Integration (CI) Systems: Tools like Jenkins or CircleCI can be used to run your tests automatically every time a change is made to the codebase. This helps identify issues early in the development cycle.
- Regular Test Updates: As your application evolves, so should your tests. Regularly review and update your tests to cover new features and changes in the app’s functionality.
Automating the testing process for iOS medical device apps not only saves time but also significantly enhances the quality and reliability of the software. By employing these frameworks and integrating automated tests into the development process, teams can ensure that their applications meet the stringent requirements necessary for medical device software, ultimately leading to safer and more effective patient care.
Simulating Medical Device Inputs
Testing medical device apps on iOS often requires simulating real-world inputs from various sensors and devices.
Techniques for Simulating Sensor Data
Simulating sensor data is essential for testing how your app interacts with different types of medical devices. Here are some methods to consider:
- Using Xcode Simulators: Xcode provides built-in simulators that can simulate various sensor data, such as accelerometer, gyroscope, and location data. These simulators are useful for the initial testing phases.
- Third-Party Tools: Tools like Device Farm or Appium can simulate a wide range of sensor data, providing more comprehensive testing scenarios.
- Custom Data Generation: For more control, you can write custom scripts to generate simulated sensor data. This is particularly useful for testing specific scenarios or edge cases.
Example: Simulating Heart Rate Data
Let’s look at an example of simulating heart rate data using Xcode’s Core Location framework and a custom script.
Using Xcode Simulators
To simulate heart rate data using Xcode:
- Open Xcode and navigate to the Devices and Simulators window.
- Select the device you want to test on and click on “Add Additional Simulators.”
- Choose a device model that supports health data simulation.
- Use the Simulator’s “Health” app to configure simulated heart rate data.
Custom Script for Simulating Heart Rate Data
For more control, you can write a script in Swift to generate and inject heart rate data into your app. Here’s a simple example:
Swift

This script simulates heart rate data by generating random values and writing them to a characteristic on a peripheral device. It integrates with CoreBluetooth to handle the Bluetooth communication required for this simulation.
Testing App Response to Simulated Inputs
Once you have set up your simulation, you need to test how your app responds to these inputs. Here’s how you can structure your tests:
- Connect to the Simulated Device: Use the CoreBluetooth framework to connect to your simulated device.
- Send Simulated Data: Use your custom script or third-party tools to send simulated data to the app.
- Validate the Response: Check that the app correctly processes and displays the simulated data. This may include validating UI updates, data storage, or alert triggers.
Example Test Case: Verifying Heart Rate Data Handling
Swift
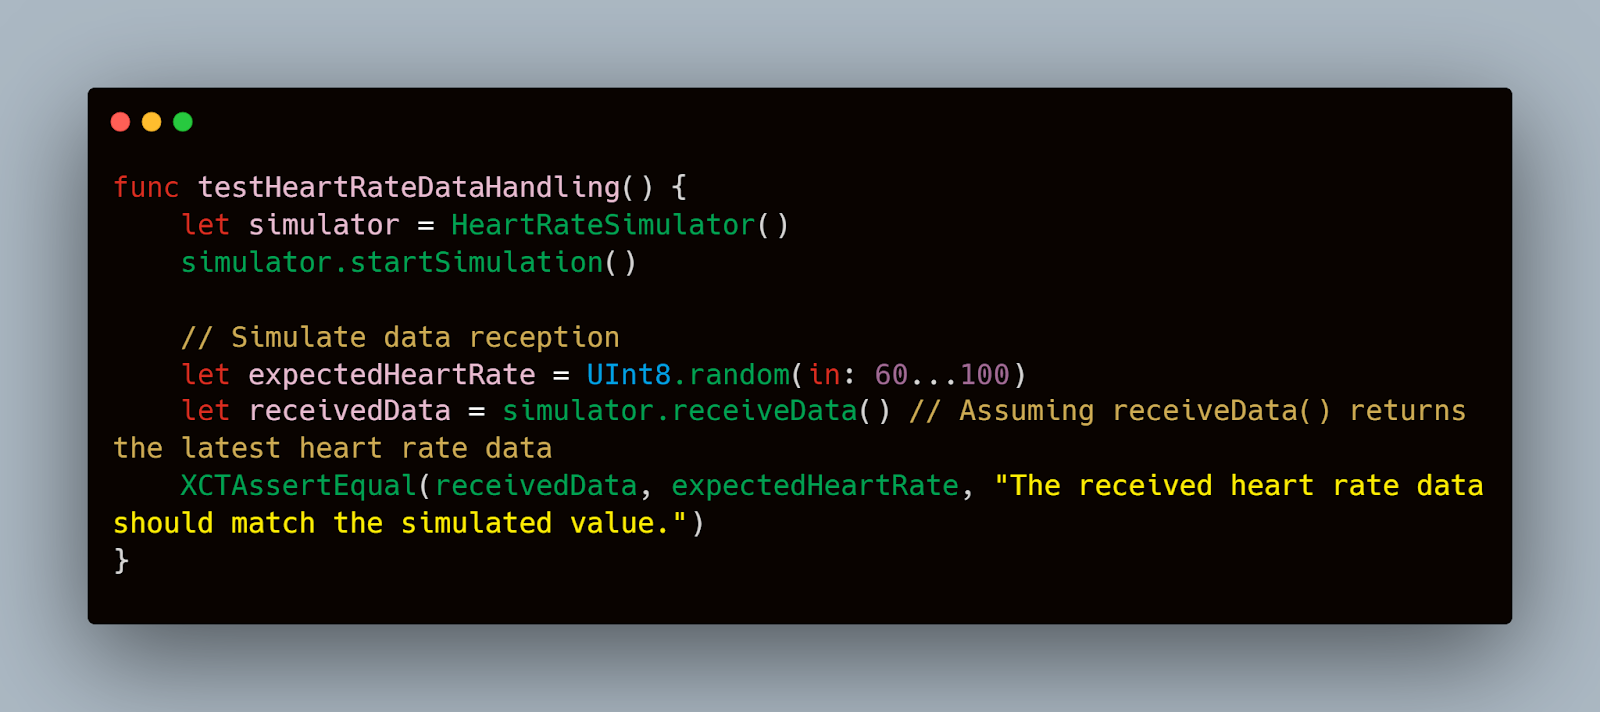
By integrating these techniques, you ensure that your app can handle real-world inputs from medical devices reliably. This approach not only helps in identifying potential issues early but also enhances the strength and safety of the application.
Performance and Security Testing
Performance testing is critical to ensure that the app remains stable and responsive under various conditions. This involves testing the app's response times, resource usage, and behavior under load.
Example: Stress Testing an App for Diabetic Patients
Consider an app designed to continuously monitor glucose levels and issue alerts. Here’s how you might conduct a stress test:
- Simulate Multiple Users: Use a tool like JMeter to simulate multiple devices sending data to the app simultaneously.
- Monitor Performance Metrics: Use Xcode's Instruments tool to monitor CPU usage, memory leaks, and response times.
- Analyze Results: Determine if the performance declines under heavy loads or if any resource leaks could hinder the app’s functionality.
Swift
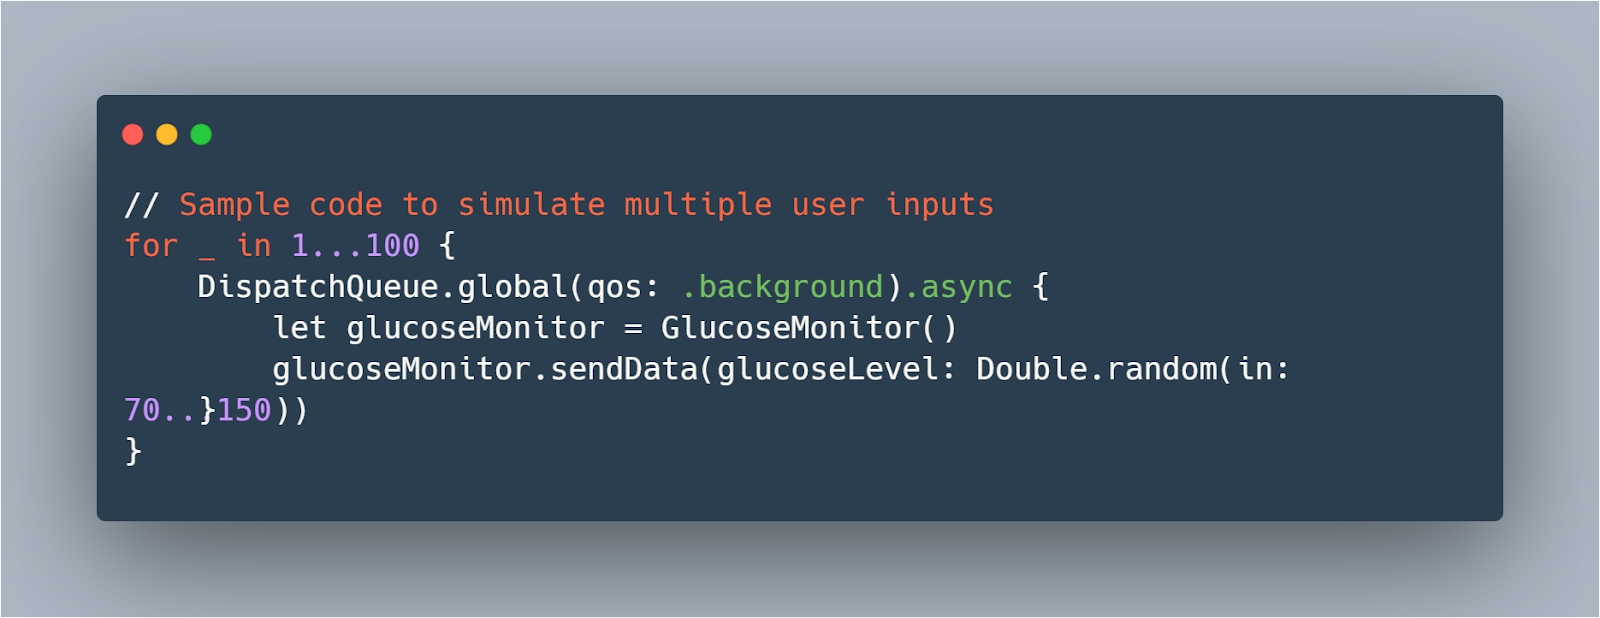
This code snippet simulates multiple background threads sending random glucose levels to the app, mimicking a high-load scenario.
Security Testing: Protecting Patient Data
Security testing is paramount, particularly for apps handling medical data. This section covers the essential security tests that should be conducted.
Example: Testing Encryption of Data Transmissions
For an app transmitting patient data, ensure that all data sent over the network is encrypted. Here’s how you could test this:
- Intercept Network Traffic: Use tools like Wireshark or Charles Proxy to intercept the data being transmitted by the app.
- Verify Encryption: Check that the intercepted data is fully encrypted using standards like TLS 1.2 or higher.
- Perform Vulnerability Scanning: Regularly scan the app using security tools like OWASP ZAP to identify security vulnerabilities.
Swift
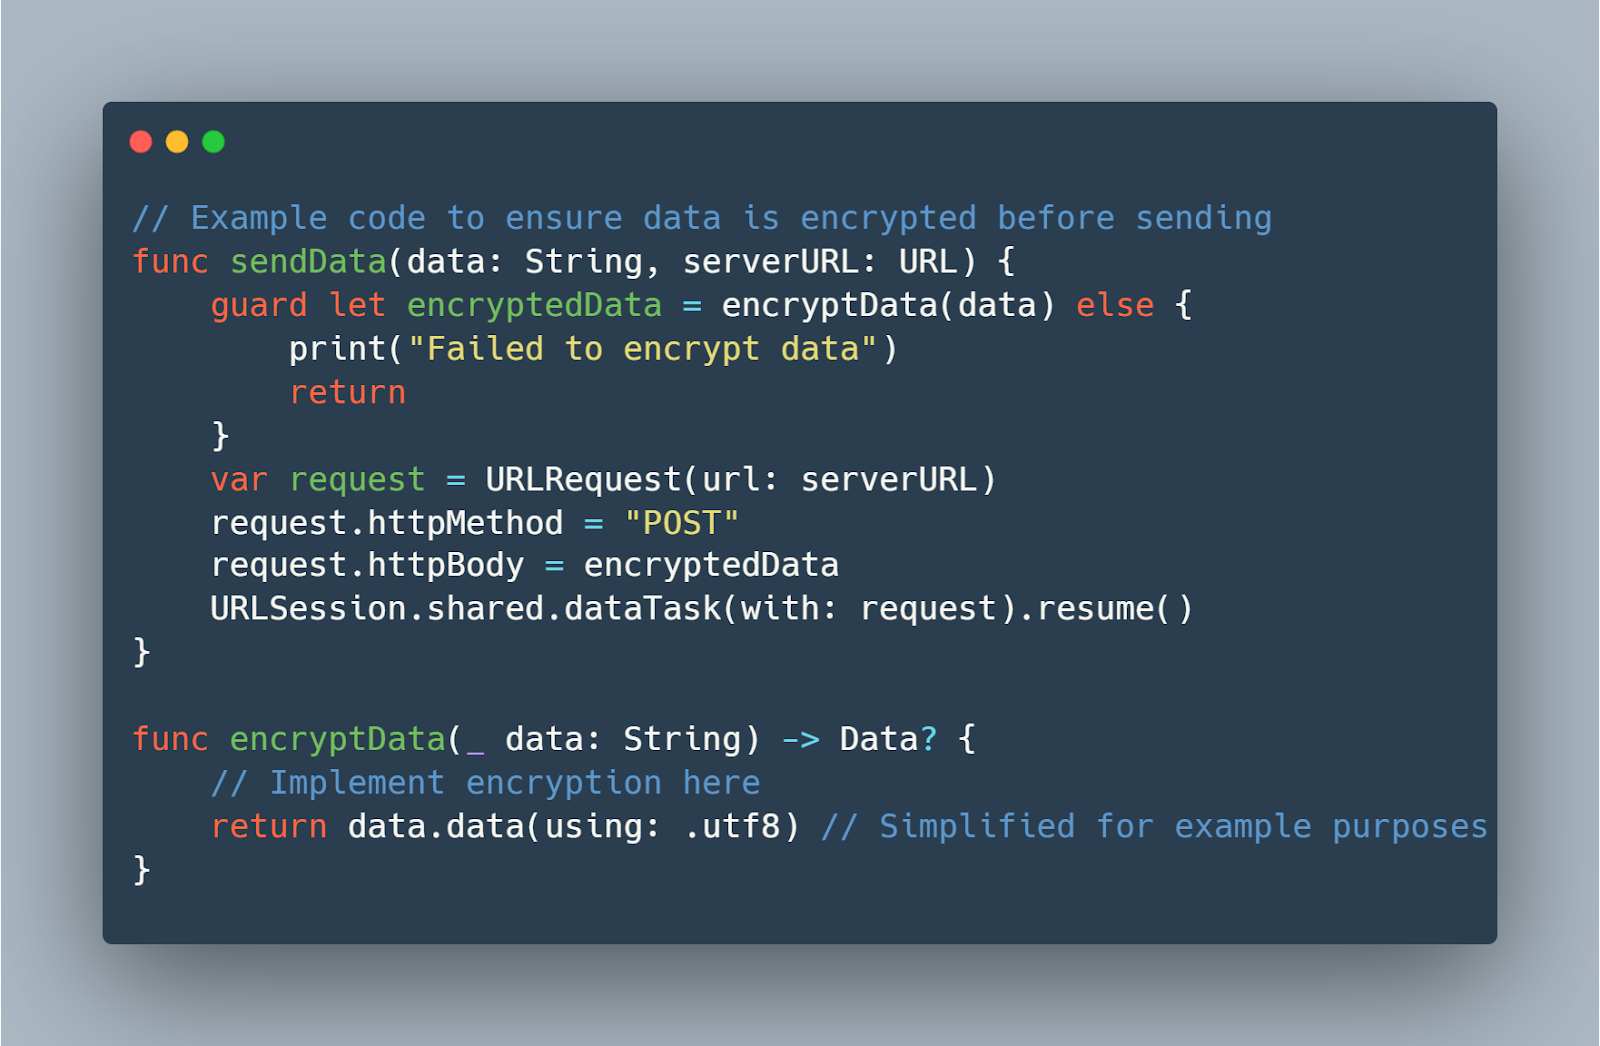
This code shows how to encrypt data before it is sent to a server, ensuring that sensitive information is secured.
Integrating Performance and Security into Continuous Testing
To maintain high standards of performance and security, integrate these tests into your continuous integration and deployment pipelines:
- Automate Performance Tests: Set up automated scripts in your CI/CD pipeline to run performance tests with each build.
- Regular Security Audits: Schedule regular security audits and update your security tests based on the latest vulnerabilities.
By implementing rigorous performance and security testing strategies, you ensure that your iOS medical device app not only meets the required standards but also provides a reliable and secure experience for users. This attention to detail is crucial in building and maintaining trust in applications that play a critical role in health management.
User Accessibility and Compliance
Ensuring that medical device apps on iOS are accessible and compliant with relevant regulations is not just a legal requirement—it's a commitment to inclusivity and patient safety.
Accessibility Features for Medical Apps
Accessibility features are essential to make apps usable for everyone, including people with disabilities. iOS provides a range of tools and guidelines to help developers implement these features effectively.
Example: Implementing VoiceOver for Visually Impaired Users
VoiceOver is a screen reader feature that helps visually impaired users interact with your app. Here’s how to implement it in an app that measures blood pressure:
Swift

This code ensures that the label used to display blood pressure readings is accessible with VoiceOver, providing a spoken description of its content.
Ensuring FDA Usability Guidelines Compliance
The FDA provides specific usability guidelines for medical device software to ensure that devices are safe and effective for all users. These guidelines cover aspects like user interface design, error prevention, and the clarity of instructions.
Example: Compliance Testing for Usability
To ensure your app complies with these guidelines, conduct usability testing sessions. Here’s a structured approach:
- Develop User Scenarios: Create scenarios that cover all typical interactions with the app.
- Conduct User Testing: Recruit participants who match the app's target demographic, including those with disabilities, to test the app in controlled environments.
- Analyze Feedback and Iterate: Use the feedback to identify areas for improvement and refine the app accordingly.
Swift
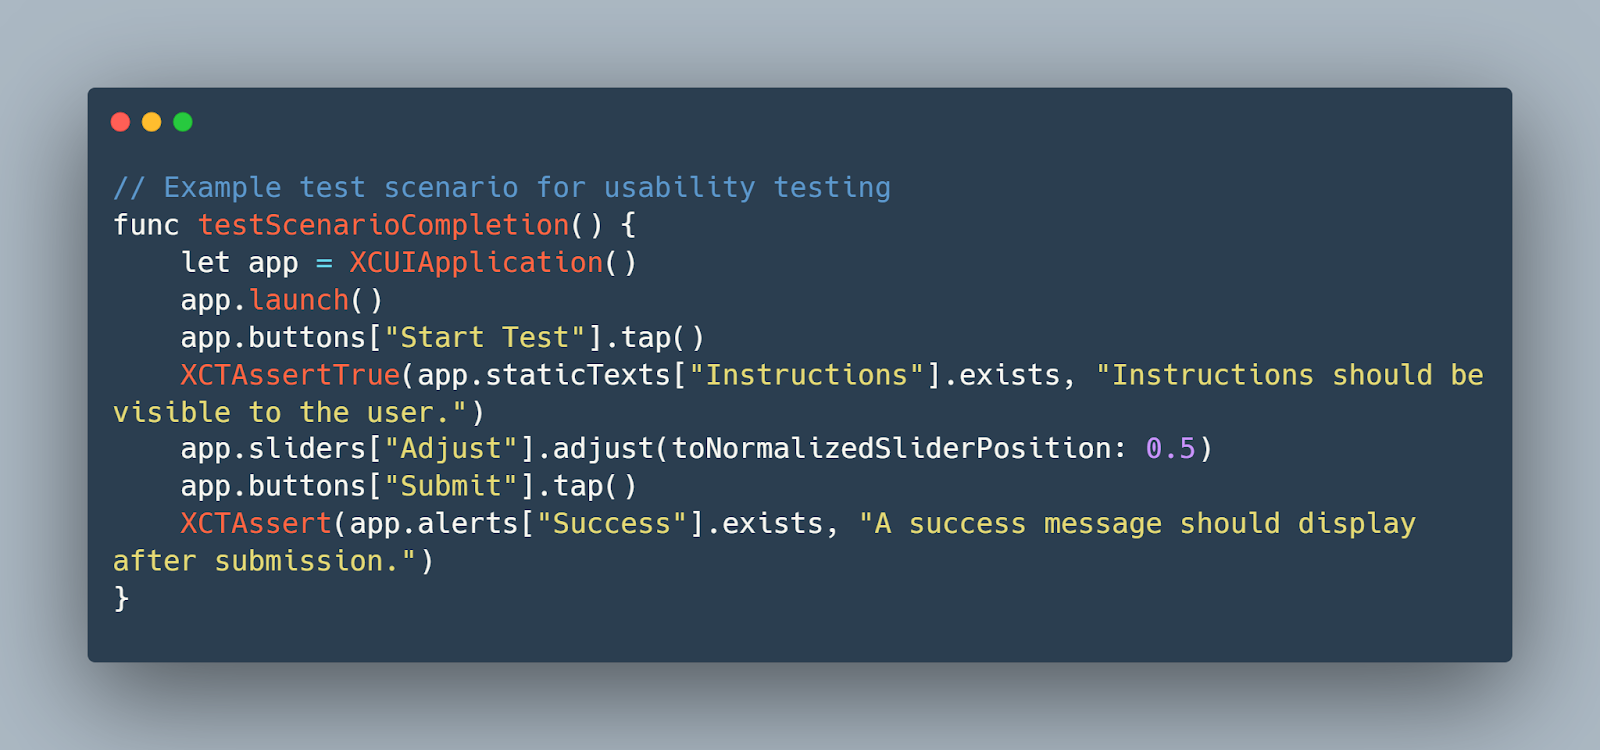
This code snippet provides a basic framework for automating a usability test scenario where the user interacts with various UI elements to complete a task.
Regular Review and Update of Compliance Measures
Regulatory standards are frequently updated to address new technological developments and challenges. Regularly review and update your app to ensure ongoing compliance:
- Stay Informed: Keep up to date with changes in regulatory guidelines from the FDA and other relevant bodies.
- Audit and Update: Schedule regular audits of your app to ensure it meets the latest standards and implement updates where necessary.
By prioritizing accessibility and regulatory compliance, developers not only adhere to legal standards but also enhance the user experience, making sure that medical device apps are safe, effective, and accessible to all users, including those with disabilities. This comprehensive approach to development fosters trust and reliability, crucial elements in the medical field.
Common Challenges and Solutions
Testing iOS apps for medical devices presents unique challenges that can impede progress and affect the reliability of the app if not addressed properly.
Handling Connectivity Issues with External Medical Devices
Challenge: One of the frequent issues faced during testing is ensuring consistent connectivity between the iOS app and external medical devices, such as blood pressure monitors or glucose sensors.
Solution: Implement comprehensive connectivity tests that simulate various real-world scenarios. This includes testing with different device models, varying signal strengths, and interruptions.
Code Example: Testing Bluetooth Connectivity
Swift
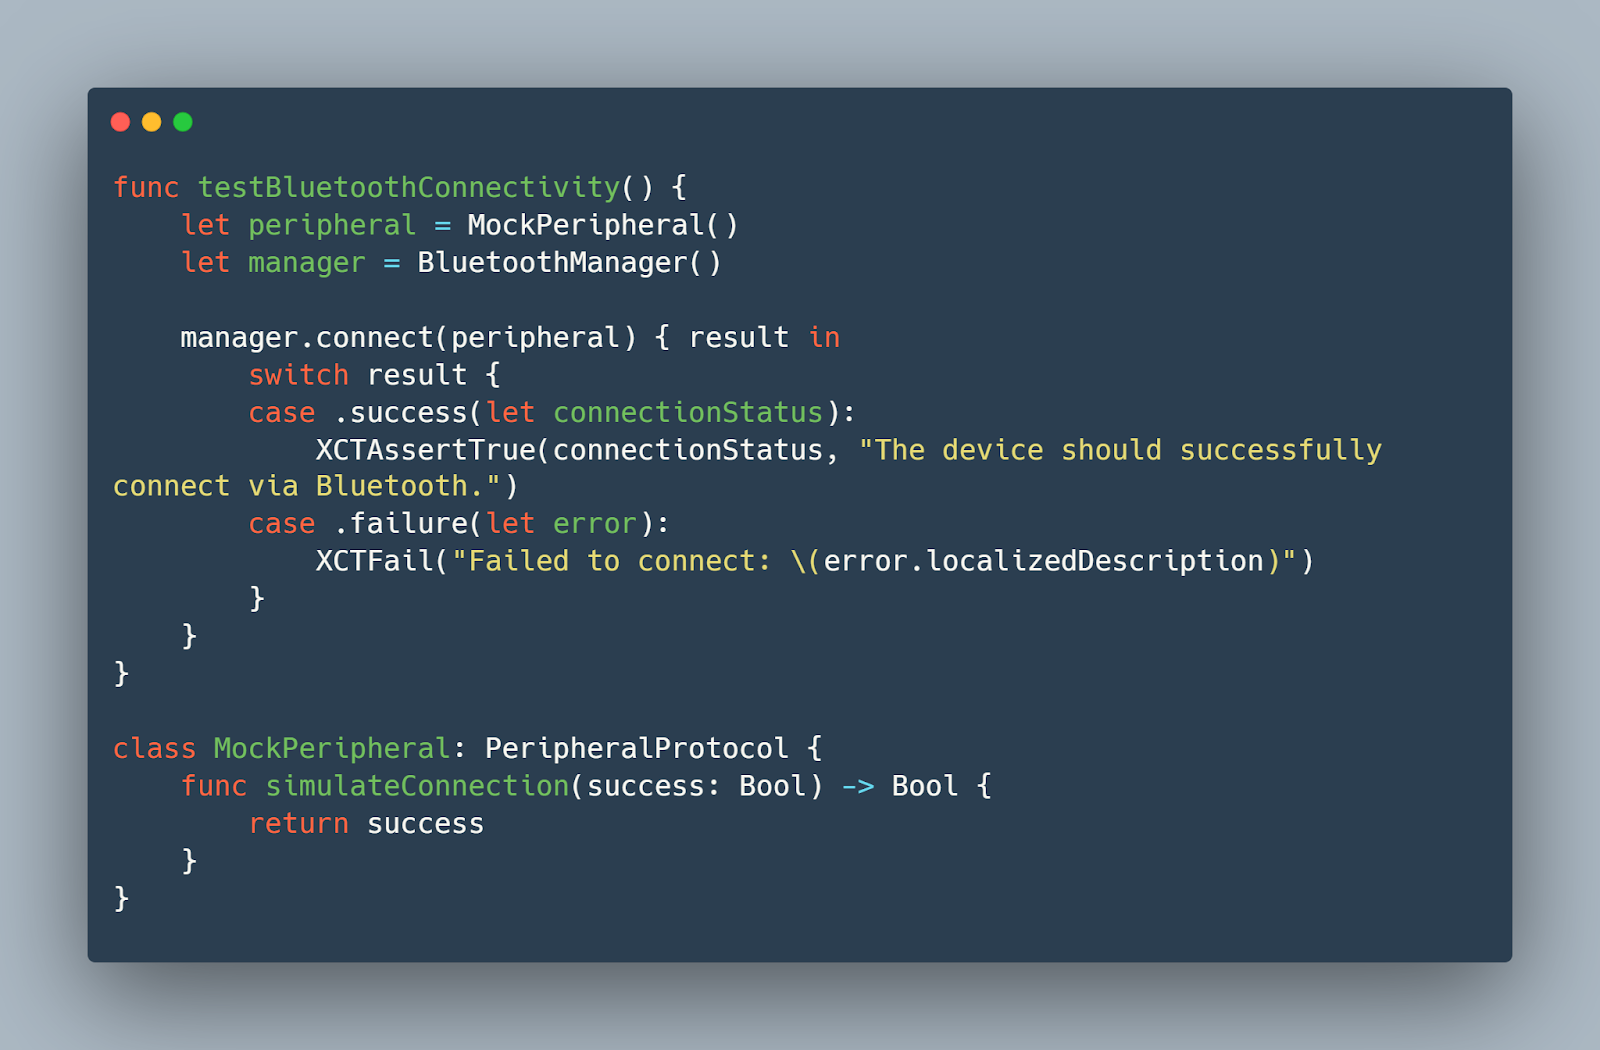
This Swift code snippet demonstrates how to test Bluetooth connectivity by using a mock peripheral, which allows you to control the outcome of the connection attempt for testing purposes.
Ensuring Reliable Operation Across Different iOS Versions and Devices
Challenge: Medical apps must function flawlessly across a broad range of iOS devices and versions, which can vary significantly in terms of screen size, hardware capabilities, and OS functionalities.
Solution: Utilize a combination of simulators and real-device testing to cover as many device and OS version combinations as possible. Automated testing frameworks like XCTest can be configured to run tests across multiple devices simultaneously.
Code Example: Automated Device Compatibility Test
Swift
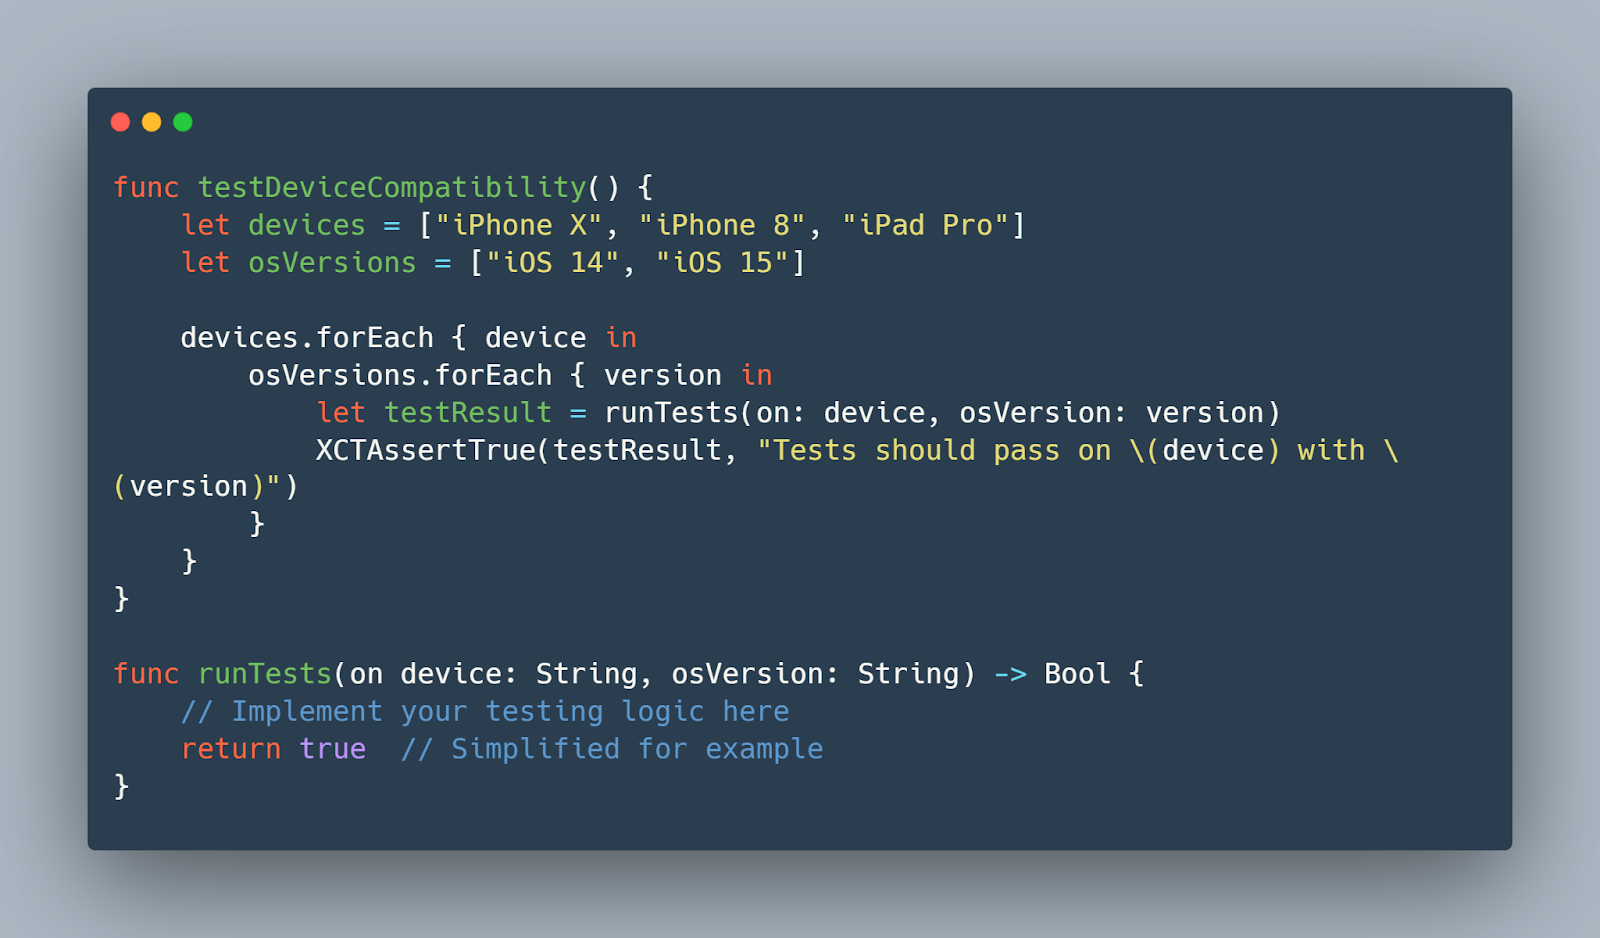
This snippet outlines a method to automate compatibility testing across different devices and iOS versions, ensuring the app’s performance remains consistent.
Integrating Real-World Feedback for Iterative Testing
Challenge: Apps that perform well in controlled test environments may still encounter issues in real-world usage due to variables that are difficult to simulate, such as user interaction variances and environmental factors.
Solution: Implement beta testing phases using tools like TestFlight to gather real-world user feedback. This feedback can be invaluable for identifying unforeseen issues and improving the app.
Example Setup for Beta Testing Using TestFlight
- Prepare Your Beta Build: Ensure your app is ready for public testing, with all major features functioning as expected.
- Upload to TestFlight: Use Xcode to archive your app and upload it to TestFlight.
- Invite Testers: Send invitations to potential testers—both technical and non-technical users.
- Collect and Analyze Feedback: Use the feedback to identify issues, prioritize them, and plan your next iterations.
By addressing these common challenges through strategic testing approaches and solutions, you can enhance the reliability and user experience of your iOS medical device apps. This proactive problem-solving not only streamlines development but also significantly boosts the app’s quality and compliance with medical standards.
Conclusion
In conclusion, testing medical devices on iOS requires a thorough and multifaceted approach that spans from setting up strong testing environments to integrating real-world user feedback for continuous improvement. By carefully applying the strategies discussed across various facets of testing, ranging from unit and integration testing to performance, security, and user accessibility, developers can ensure that their applications not only meet stringent regulatory standards but also deliver a reliable, secure, and user-friendly experience. Embracing these practices will not only enhance the functionality and safety of medical device apps but also solidify the trust and confidence of users and stakeholders in the healthcare technology landscape.


.jpg)


.jpg)