

Learn essential strategies for testing iOS biometric functionalities effectively to enhance app security and user experience.

Introduction
Biometric authentication technologies like Touch ID and Face ID have transformed user security and convenience on iOS devices. As these technologies become integral to everyday apps, from banking to personal communication, ensuring their reliability and security through meticulous testing is paramount for developers.
iOS devices support various biometric modalities, primarily Touch ID and Face ID. Touch ID uses fingerprint recognition technology to provide secure and fast access to devices and applications. Introduced with the iPhone 5S, it has been a staple in numerous models until the advent of Face ID. Face ID, which debuted with the iPhone X, uses a sophisticated facial recognition system enabled by the TrueDepth camera, offering a secure yet more seamless authentication experience.
These technologies enhance user convenience and bolster application security by leveraging biometric data encrypted on the device itself, never leaving the user's phone.
The effectiveness of biometric functionalities directly influences the security and user experience of an app. Flaws in biometric implementation can lead to unauthorized access or, conversely, prevent legitimate access, leading to user frustration and potential security risks. Thus, rigorous testing of these features is crucial.
Accurate testing ensures that biometric implementations are not only secure but also resilient to various real-world conditions that could affect performance, such as lighting changes affecting Face ID or worn-out fingerprints impacting Touch ID. This section of the guide aims to lay the groundwork for a structured approach to testing biometric implementations, ensuring they are strong, secure, and user-friendly.
Understanding iOS Biometric Capabilities
Testing biometric features on iOS devices requires a deep understanding of the technology and its integration within the platform.
Types of Biometric Features on iOS
Touch ID: Introduced with the iPhone 5S, Touch ID is Apple’s fingerprint recognition technology. It allows users to unlock their devices, make secure payments, and authenticate into apps quickly and securely. Developers can integrate Touch ID into their apps using the Local Authentication framework, which provides APIs to manage biometric authentication directly.
Face ID: With the advent of the iPhone X, Apple launched Face ID, an advanced facial recognition system. Utilizing the TrueDepth camera system, Face ID scans the user's facial features to create a detailed depth map that ensures secure and accurate recognition. Similar to Touch ID, Face ID is integrated into apps via the same Local Authentication framework.
Both technologies store biometric information securely in the Secure Enclave, a coprocessor within the main chipset of iOS devices, ensuring that biometric data is not accessible by the iOS or its applications, and safeguarding user privacy.
Integrating Biometrics into iOS Apps
Integration of biometric authentication involves calling the Local Authentication API, which requires developers to write conditions handling the authentication success or failure. Here’s a basic code snippet demonstrating how to implement Face ID authentication in an iOS app using Swift:
Swift
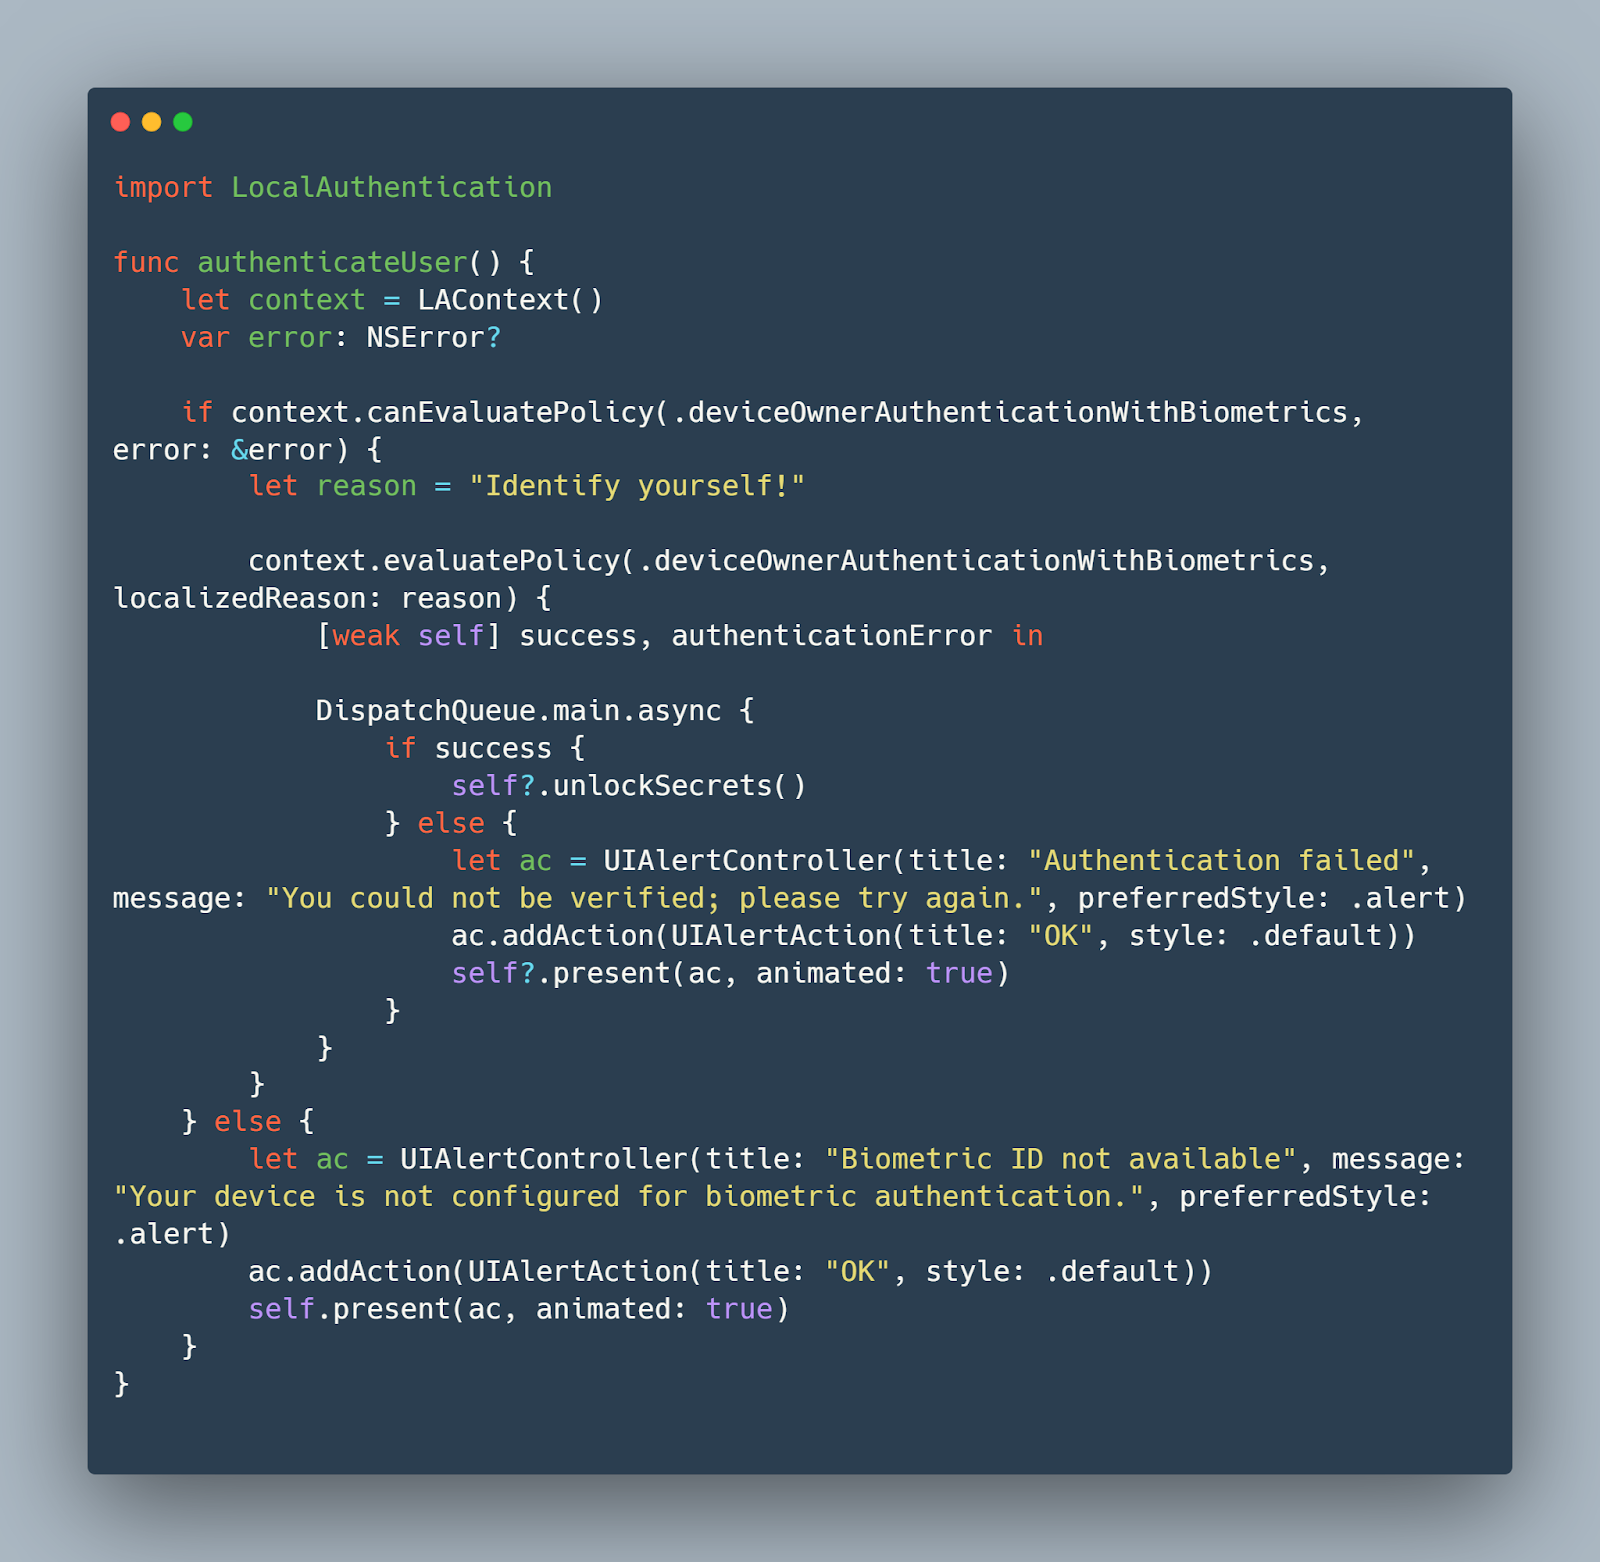
In this code, LAContext is used to create an instance that manages the authentication context. The method canEvaluatePolicy checks if biometric methods are available and enabled on the device, while evaluatePolicy initiates the authentication process. Developers need to handle scenarios where authentication fails due to reasons like too many failed attempts or biometric hardware not being available or configured.
Setting Up the Testing Environment
To effectively test biometric functionalities on iOS, setting up an accurate and controlled testing environment is critical. This environment should replicate real-world conditions as closely as possible to ensure that the biometric implementations behave as expected across a variety of scenarios.
Required Tools and Software
Xcode: Apple's Xcode is indispensable for developing and testing iOS applications. It includes simulators for different iOS devices, which are essential for initial testing phases, especially when hardware-specific tests, like those involving older versions of Touch ID, are necessary.
Physical Devices: While simulators are useful for preliminary testing, physical devices are crucial for a thorough assessment of biometric functionalities. Different iPhone and iPad models with varying configurations of Touch ID and Face ID must be used to ensure comprehensive test coverage.
iOS Simulators: Starting from Xcode 9, Apple introduced the capability to simulate Face ID and Touch ID interactions within the iOS simulator. This feature allows developers to perform preliminary checks and automate tests without always needing physical hardware.
Here's how to enable Touch ID or Face ID in an iOS simulator:
- Run your application in the simulator.
- From the menu bar, select Hardware > Touch ID or Face ID.
- Choose Enrolled, which will simulate a user's biometric data being registered in the device.
Configuring Devices and Simulators for Biometric Testing
To set up physical devices and simulators effectively, follow these guidelines:
- Ensuring Device Diversity: Include a range of devices that support different forms of biometric authentication. For instance, test with both an iPhone 8 (Touch ID) and an iPhone 11 (Face ID) to cover the spectrum of biometric technologies.
- Environmental Conditions: Test in various environmental conditions to simulate real-world use cases, such as different lighting conditions for Face ID or worn-out fingerprints for Touch ID.
- Security Settings: Ensure that security settings on the devices are configured to reflect typical user scenarios, including the enrollment of multiple fingerprints or facial data variations.
Integrating Biometric Testing Tools
For automating the testing process, several third-party tools can be integrated with Xcode to enhance testing efficiency. These tools support the scripting of interaction flows, which can simulate user authentication using biometrics in a repeatable manner.
- Mobot: While primarily for physical testing, Mobot can also assist in ensuring that biometric functionalities work seamlessly across different devices and configurations by providing an automated, real-device testing service.
- Appium: A popular open-source tool for automated testing of mobile apps, Appium can be configured to test iOS applications with both Touch ID and Face ID.
Here is a simple Appium script snippet to automate Face ID authentication in tests:
Python
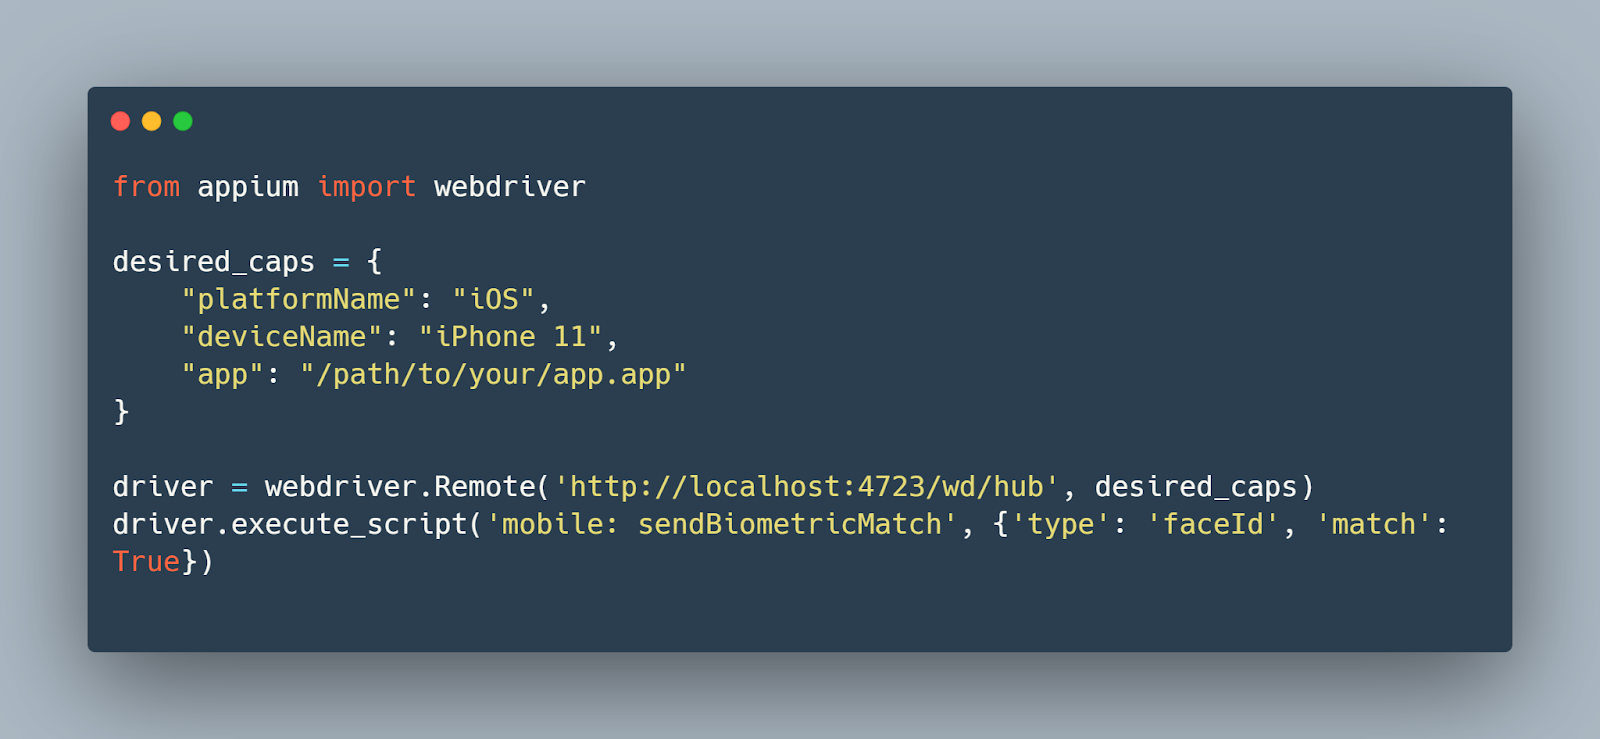
This script sets up a test on an iPhone 11 simulator, and the sendBiometricMatch command simulates a successful Face ID authentication.
Creating Test Cases for Biometric Authentication
Creating effective test cases is essential for ensuring that biometric features function correctly and securely.
Defining What to Test
When testing biometrics on iOS, focus on the following key areas:
- Authentication Accuracy: Ensure that the system accurately recognizes registered biometric data (fingerprints for Touch ID or facial features for Face ID) under various conditions.
- Authorization Scenarios: Verify that the application correctly grants or denies access based on biometric authentication results.
- Error Handling: Test how the application responds to failed authentication attempts, such as unrecognized fingerprints or faces.
- Fallback Mechanisms: Ensure that alternative authentication methods (PIN, passcode) are offered when biometrics fail or are unavailable.
Writing Test Cases: A Step-by-Step Guide
Here’s how you can structure your test cases for biometric features:
Test Case 1: Verify Successful Authentication
- Objective: Confirm that the system grants access when a registered biometric is used.
- Steps:
- Navigate to the biometric login screen.
- Authenticate using a registered fingerprint or face.
- Verify that access is granted.
- Expected Result: The user is successfully authenticated and gains access to the application.
Test Case 2: Handle Authentication Failure
- Objective: Test the application's response to an unsuccessful biometric attempt.
- Steps:
- Navigate to the biometric login screen.
- Attempt to authenticate using an unregistered biometric.
- Verify that access is denied and an error message is displayed.
- Expected Result: The user receives an appropriate error message and is prompted to try again or use an alternative authentication method.
Test Case 3: Evaluate Fallback to Passcode
- Objective: Ensure the fallback to passcode works when biometric authentication fails.
- Steps:
- Simulate a situation where biometric authentication cannot be performed (e.g., sensor failure).
- Attempt to access the feature requiring authentication.
- Verify that the system prompts for a passcode.
- Expected Result: The user can authenticate using a passcode and access the application.
Automating Test Case Execution
Automating the execution of these test cases can significantly enhance the efficiency and repeatability of your testing process. Using tools like XCTest for unit and UI tests, you can automate scenarios to simulate various biometric conditions.
Here’s a simple example of an XCTest scenario for testing Face ID authentication:
Swift
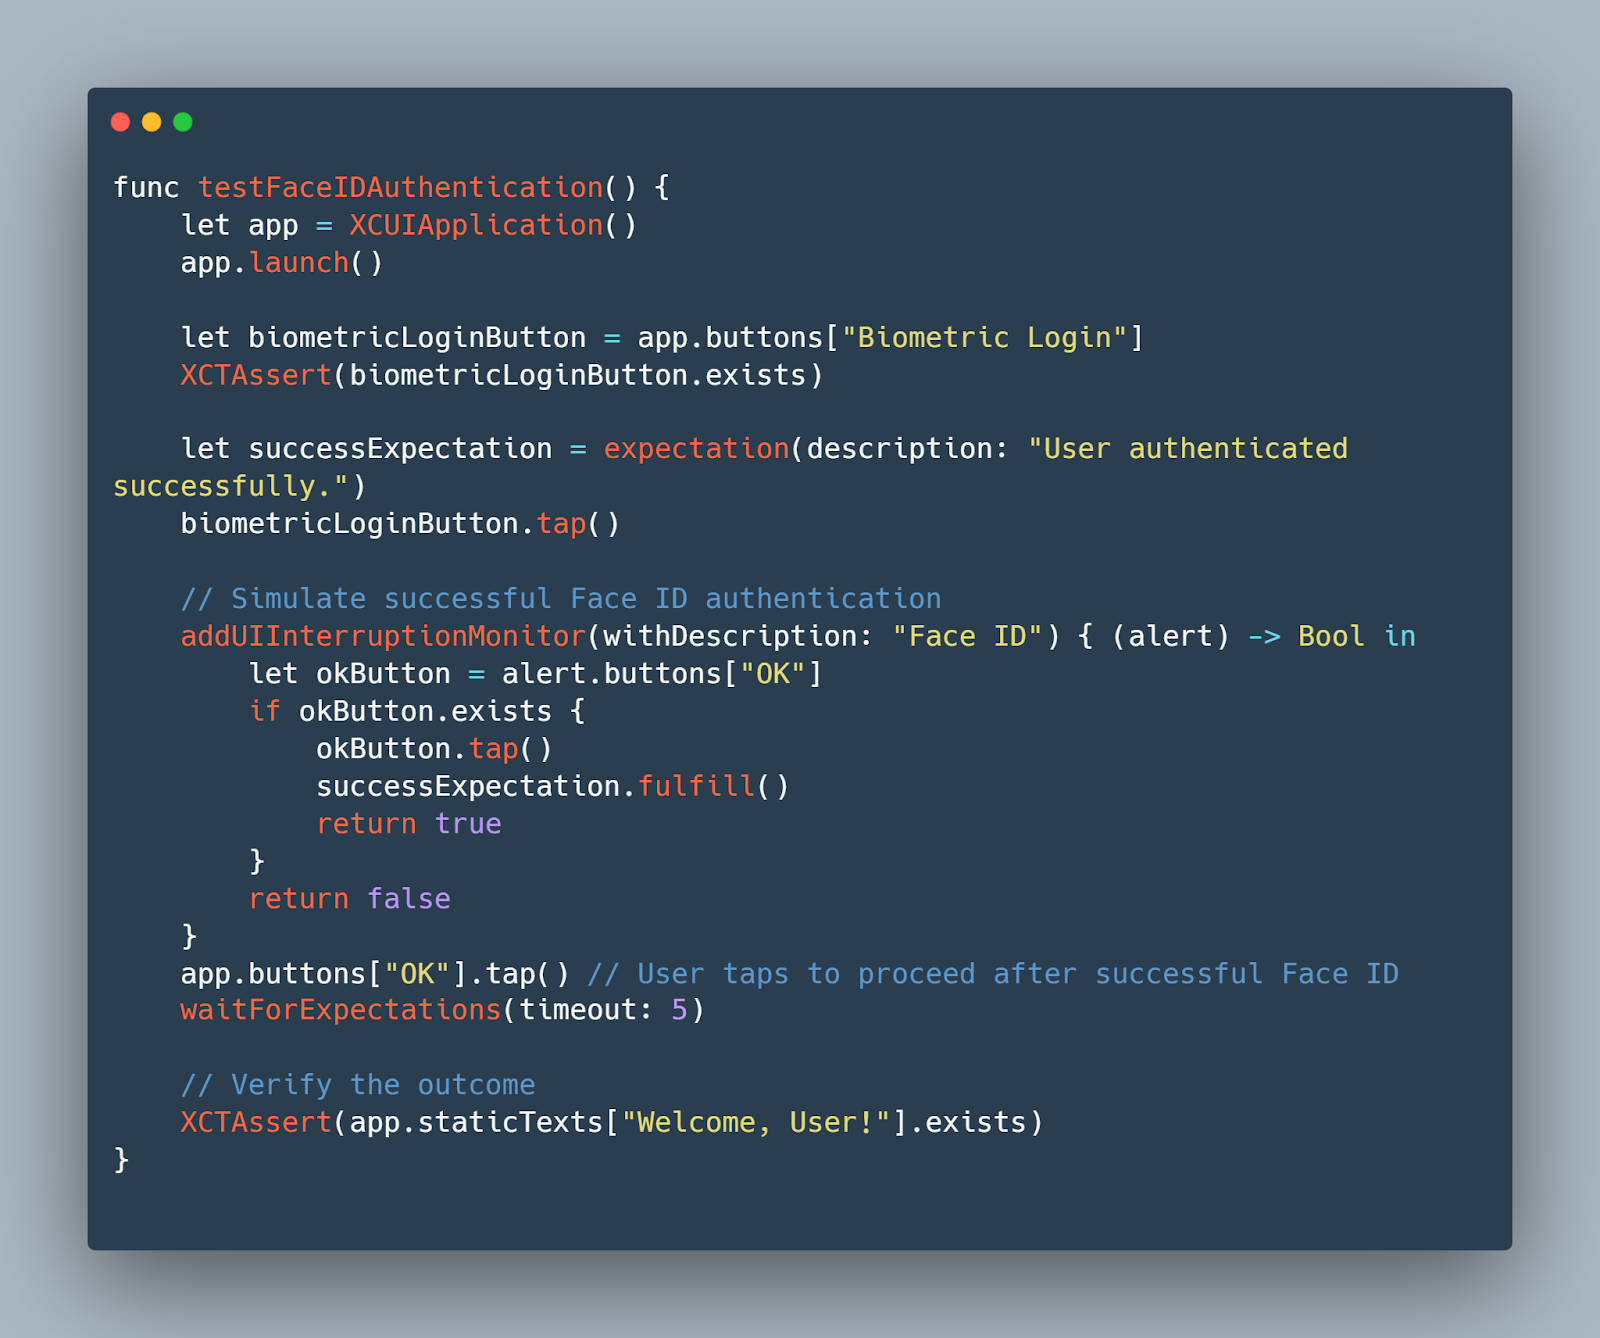
By developing and automating these test cases, you ensure that the biometric features in your iOS apps are not only functional but also strong against a variety of real-world conditions. This can lead to higher user trust and satisfaction due to the reliable security measures implemented in your application.
Using Mobot for Automated Biometric Testing
Mobot is a unique tool in the landscape of mobile testing, especially when it comes to automating biometric testing for iOS applications. This platform leverages physical robots to interact with mobile devices in ways that software-based emulators cannot.
Advantages of Using Mobot for Biometric Testing
- Real-World Interaction: Unlike software simulators, Mobot uses mechanical robots to physically interact with devices. This means it can replicate human interactions more accurately, such as touching the fingerprint sensor or positioning a face in front of the camera for Face ID.
- Consistency and Reproducibility: Mobot can perform repeated tasks with high precision, ensuring consistent test results. This is crucial for biometric testing where slight variations in interaction (like angle or pressure) can affect outcomes.
- Scalability: With Mobot, it’s possible to scale testing efforts without the need for a large human QA team. Multiple devices can be tested simultaneously under the same conditions, increasing throughput and efficiency.
Integrating Mobot into Your Testing Strategy
- Defining Test Cases: Determine which biometric features and scenarios you need to test. For Touch ID, this could include testing with different finger positions and conditions (e.g., wet, dry, dirty fingers). For Face ID, you might test against various facial expressions, makeup, or even different lighting conditions.
- Mobot Programs the Robots based on the provided test cases: In the second stage of the process, Mobot programs the robots based on the test cases provided by the QA team. This step involves translating the detailed test scenarios into actionable commands that the robots can execute. The programming directs the robots on how to interact with the devices—where to touch, how much pressure to apply, and what gestures to perform. This ensures that each test is carried out with precision, consistently replicating human interactions to assess the functionality and reliability of biometric features under various conditions.
- Analyzing Results: After running the tests, analyze the data collected by Mobot. Look for patterns that indicate common failures or issues with the biometric system. Mobot provides a full report of each test, including flagged issues and failures with screenshots.
- Integration with Other Tools: Mobot can be part of a larger CI/CD pipeline. Ensure it integrates smoothly with other automated tools for seamless testing workflows.
Using Mobot for automated biometric testing offers a strong solution for ensuring the functionality and reliability of biometric features in iOS applications. By simulating real human interactions, Mobot provides an invaluable tool for developers to rigorously test and refine biometric authentication processes, ultimately enhancing the user experience and security of mobile applications.
Automating Biometric Tests
Tools and Frameworks for Automation
Mobot: Mobot can be an invaluable asset in the automation process by offering physical testing services that interact with actual devices. This is beneficial for scenarios that cannot be fully emulated in a simulator, such as varying fingerprint placements and real-world facial recognition tests.
XCTest: Apple’s XCTest framework supports UI tests that can simulate user interactions with the UI elements of an app, including biometric authentication dialogs. It is integrated directly into Xcode, making it a convenient option for iOS developers.
Appium: An open-source test automation framework that supports both iOS and Android apps. Appium is particularly useful for cross-platform applications and supports the automation of biometric authentication by interacting with the system alerts that appear during biometric operations.
Script Examples for Automated Testing Scenarios
XCTest Example for Face ID Authentication: This example demonstrates how to write a UI test in XCTest that handles Face ID authentication:
Swift

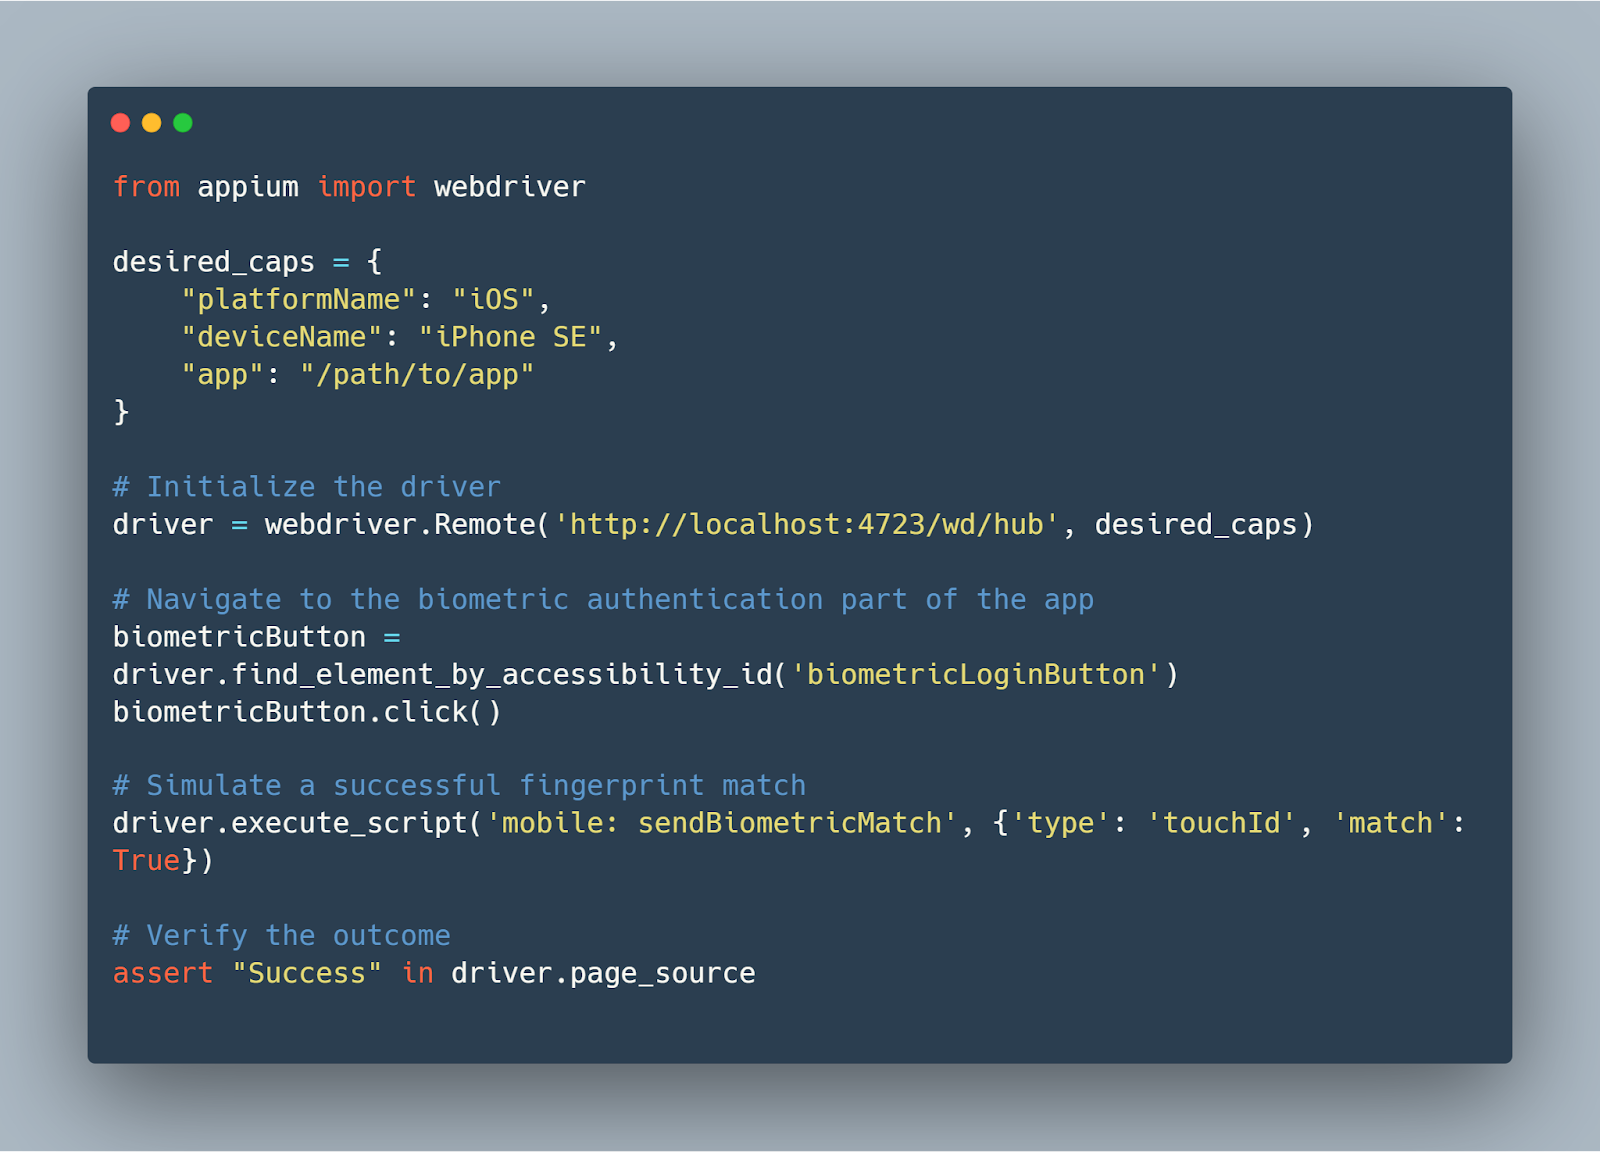
Appium Python Example for Touch ID: This script uses Appium with Python to simulate a fingerprint authentication:
Python
Integrating Biometrics Testing into Continuous Integration (CI) Pipelines
Automated biometric tests should be incorporated into your CI/CD pipeline to ensure they are executed as part of the regular development process. This integration helps identify issues early and improves the quality of the software release cycle.
Tools like Jenkins, CircleCI, or GitHub Actions can be configured to execute these tests each time code is pushed to a repository, ensuring that biometric functionalities are consistently tested without manual intervention.
By leveraging the power of automation and incorporating these tests into your development workflow, you ensure that the biometric features in your iOS applications perform as expected under a wide range of conditions, thus safeguarding both the security and the user experience.
Manual Testing for Biometric Features
Biometric testing on iOS can present a series of challenges, each potentially impacting the reliability and user experience of your application. Addressing these common issues effectively is crucial for developers and QA teams.
Typical Biometric Testing Challenges and Solutions
1. Environmental Interference with Face ID
- Challenge: Face ID may fail under various lighting conditions or if the face is partially obscured.
- Solution: Ensure your testing covers a range of environmental conditions. Use both natural and artificial lighting scenarios during test runs. Additionally, simulate cases where the camera might be partially blocked to gauge the application’s responsiveness.
2. Fingerprint Recognition with Worn-out or Dirty Fingers
- Challenge: Touch ID might not correctly identify worn-out or dirty fingerprints, common in real-world usage.
- Solution: Include test cases that involve fingerprints with reduced fidelity. This can be simulated by applying a translucent layer (like a screen protector) over the home button during testing.
3. Biometric Data Changes Over Time
- Challenge: Biometric data can change due to various factors such as aging, injuries, or even daily facial changes (e.g., grooming, makeup).
- Solution: Regularly update the biometric data used in your test cases to reflect these changes. Implementing a procedure for periodic re-enrollment of biometric data in your test plans can mimic real user scenarios.
Ensuring Security and Privacy During Tests
Security and privacy are paramount when dealing with biometrics. Here are steps to maintain high standards during testing:
- Use Encrypted Channels: Ensure that all biometric data used during testing is transmitted and stored using encrypted formats to prevent unauthorized access.
- Data Anonymization: Anonymize the biometric data used in testing environments. Use synthetic biometric data where possible to prevent any association with real individuals.
- Secure Testing Devices: Use dedicated devices for testing that are regularly updated and secured against external threats. Ensure these devices are stored securely when not in use.
Preventive Measures for Reliable Biometric Testing
Implementing preventive measures can mitigate many issues before they affect the testing process:
- Comprehensive Test Coverage: Design test cases to cover a wide range of scenarios, including edge cases like rapid successive authentication attempts or simultaneous enrollment of multiple biometrics.
- Regular Device Calibration: Regularly calibrate testing devices to ensure sensors are functioning correctly, particularly for Touch ID and Face ID.
- Feedback Mechanisms: Implement feedback mechanisms in your testing suite to quickly identify and address failures or unexpected behaviors during biometric authentication.
By anticipating these challenges and establishing strong testing practices, you can enhance the reliability and security of biometric functionalities in iOS applications. This not only improves the end-user experience but also strengthens the trust users place in your application's biometric security measures.
Performance Testing for Biometric Authentication
Performance testing is critical for ensuring that biometric authentication systems in iOS apps not only maintain security and accuracy but also meet expected speed and efficiency standards under various conditions.
Biometric authentication mechanisms, such as Touch ID and Face ID, are fundamental to the user experience in many iOS apps. They need to be fast and reliable to avoid creating bottlenecks that could frustrate users or deter them from using the feature. Performance testing helps ensure these systems are optimized for speed and can handle high-load situations without degradation in response times or accuracy.
Setting Up Performance Testing
1. Defining Performance Metrics: Key metrics for biometric authentication include:
- Latency: The time taken from the initiation of the authentication process to a decision point (authentication success or failure).
- Throughput: The number of authentication requests that can be processed within a given time frame.
- Success Rate: The percentage of successful authentications out of the total attempts under various conditions.
2. Tools and Environments: Use tools like Xcode’s Instruments, which can track the performance of your app in real time, focusing on aspects such as CPU usage, memory usage, and network latency. It’s also essential to test on real devices across multiple iOS versions and hardware models to understand how performance might vary.
Testing Scenarios
1. Normal Conditions: Test how the biometric system performs under ideal conditions with a good network and on a fully functional device.
2. High Load: Simulate scenarios where the system must handle a high number of authentication requests simultaneously. This can include stress testing the app's backend to see how it copes with concurrent data processing.
3. Adverse Conditions: Introduce factors that could potentially degrade performance, such as low battery, poor network connectivity, or background app activity.
Example of a Performance Test Case:
Swift
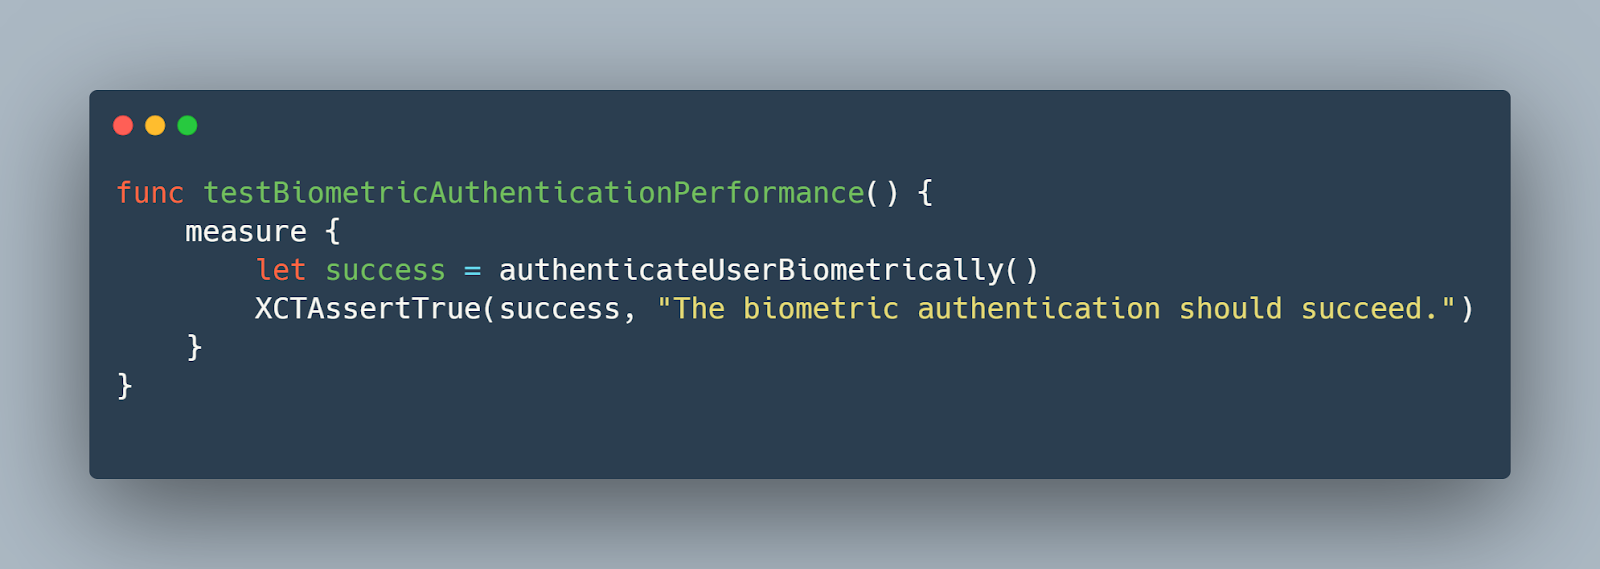
In this XCTest case, the measure method is used to benchmark the performance of the biometric authentication process, particularly focusing on how long it takes to authenticate successfully.
Once testing is complete, analyze the data to identify any deviations from expected performance thresholds. Look for patterns that might indicate bottlenecks or inefficiencies in the authentication process. This analysis will help you make informed decisions about potential optimizations.
Integrating Biometric Tests into CI/CD Pipelines
For organizations aiming to maintain high standards in software quality, integrating biometric tests into Continuous Integration/Continuous Deployment (CI/CD) pipelines is essential.
Steps to Integrate with Continuous Integration Systems
1. Selecting the Right CI Tools: Choose CI tools that are compatible with iOS development environments, such as Jenkins, Travis CI, CircleCI, or GitHub Actions. These tools can orchestrate your testing environment, manage test executions, and report outcomes.
2. Configuring the CI Environment: Set up the CI environment to include all necessary hardware and software components. This includes provisioning macOS servers with Xcode and simulators, and ensuring they have access to physical iOS devices if needed.
3. Automating the Build and Test Processes: Configure your CI pipeline to automatically build the application and run biometric tests upon each commit. Ensure that your pipeline script includes steps to install dependencies, execute test scripts, and handle test data.
Example Configuration for a Jenkins Pipeline:
Groovy
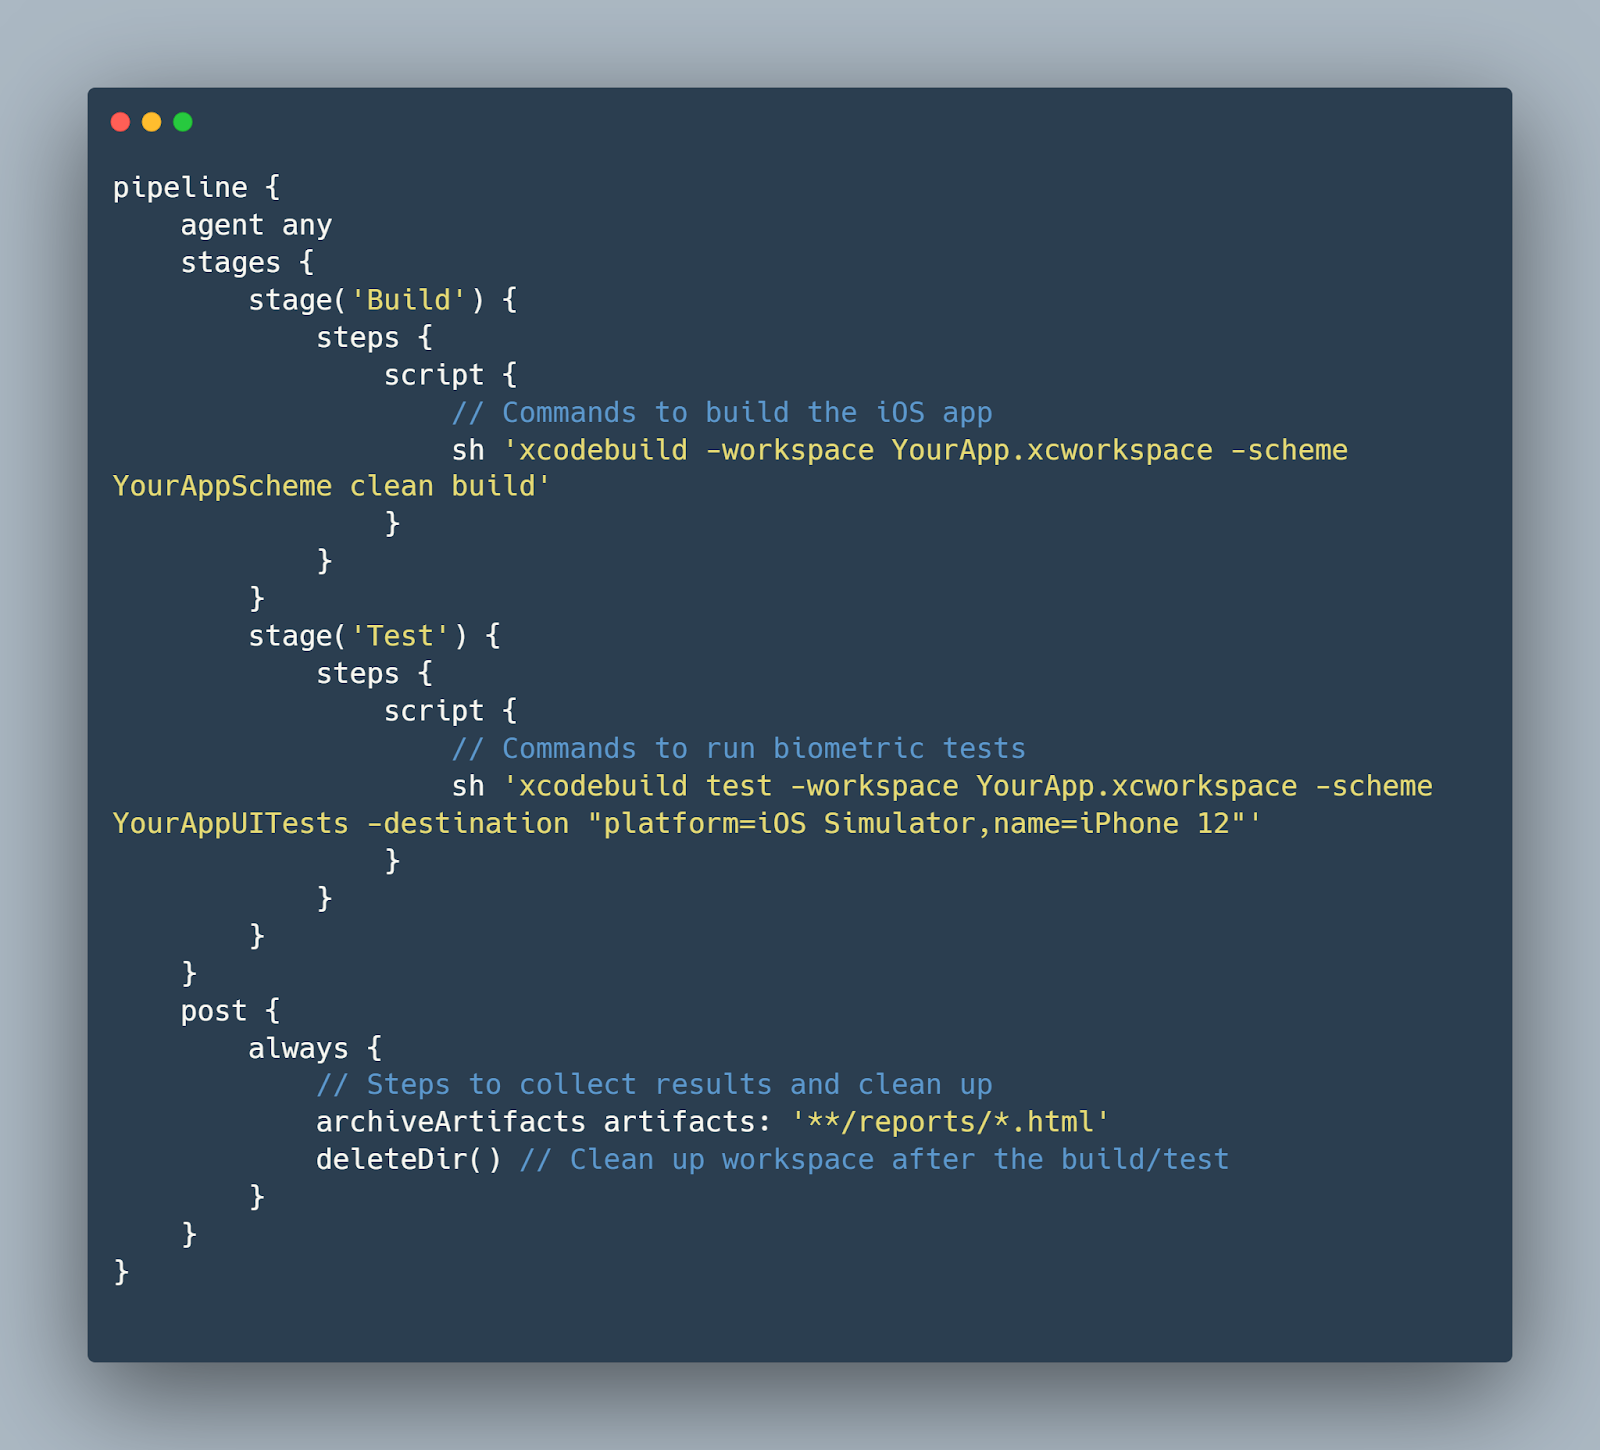
4. Monitoring and Reporting Results: Implement monitoring to catch failures early and report results back to the development team. Many CI tools offer integrated dashboards and notification systems to alert teams about the test outcomes.
Examples of CI/CD Configurations
GitHub Actions Example for Biometric Testing: Here's how you might configure GitHub Actions to automate biometric testing:
Yaml

By following these steps, you can ensure that your iOS applications with biometric capabilities are tested thoroughly and automatically, improving the overall quality and reliability of releases. Integrating biometric testing into CI/CD pipelines not only streamlines the development process but also reinforces the commitment to delivering secure and functional applications.
Conclusion
In conclusion, the comprehensive guide to testing biometric functionalities on iOS outlines essential strategies and tools necessary for ensuring the performance, reliability, and security of biometric authentication systems. From setting up the initial testing environment to integrating automated testing into CI/CD pipelines, each step is crucial in developing a strong testing framework. Utilizing tools like Mobot enhances the ability to mimic real-world interactions, providing a more accurate reflection of user experiences. By following the outlined methodologies, developers and QA teams can significantly improve the integrity and user acceptance of biometric systems, thereby strengthening the security and enhancing the usability of iOS applications in sensitive contexts like finance and personal security. This not only meets the technical expectations of mobile engineers and QA professionals but also aligns with the strategic business goals of delivering high-quality, user-trusted applications.


.jpg)


.jpg)